Blog
How to get the most out of your Snowflake data
Practical tips for getting the most out of your Snowflake data, from Snowpark to cost controls and picking the right exploratory workbench.

So you’ve splurged on the Cadillac of data warehouses, Snowflake. Your data rests peacefully in a plush, comfortable bed of separated compute and storage. But this is only the beginning! For most data teams, the warehouse is their biggest budget line item – getting the most out of it has never been more important than today. So how do you maximize your Snowflake investment?
This post will walk through a few practical tips for getting the most out of your Snowflake data, from Snowpark to cost controls and picking the right exploratory workbench.

1. Use Snowpark. Seriously
One of the most incredible features in Snowflake is also one of the most misunderstood, and that incredible feature is Snowpark. A major Snowflake “innovation” was separating storage and compute; what Snowpark does is let you use that compute for more than just SQL queries.
Consider the following highly relatable example. You’re a data scientist who wants to build a forecasting model. It’s not your first time around the block: you know you’re going to need to load data, explore it, tweak and clean, feature engineer, build a model, test it, deploy it into production, and then take a nap. This is all going to have to happen across several different tools and environments, with data moving around between all of them. Or will it? With Snowpark, you can do all of this inside your warehouse, using pretty much the same code as before.
If you haven’t tried out Snowpark yet, here are a few interesting things you can do (focused in particular on Snowpark for Python):
Use SnowparkML to train a machine learning model
The aptly named Snowpark ML is a Python library with a bunch of APIs for building ML models. It’s split into two pieces:
- Snowpark ML Modeling – for all of your modeling needs like preprocessing, feature engineering, training (think Scikit-Learn, XGBoost, etc.)
- Snowpark ML Operations – for all of your deployment needs (getting your model out into the world)
What all of this lets you do is build an end-to-end ML model without your data ever needing to leave Snowflake. No downloading, transferring, uploading a CSV to a notebook, etc. And the Snowpark ML Modeling syntax matches the packages you’re already using, like the aforementioned Scikit-Learn. Here’s a modified example from their docs that gives you the gist:
Your code automatically runs distributed, without you needing to wrangle a Spark job and spin up or (forget to) spin down infrastructure. You can even set up a Snowpark-optimized warehouse in Snowflake.
Astute readers will note that this is one of the few places where Snowpark ML syntax deviates from the standard XGBoost and Scikit-Learn specs. Here you pass a dataframe to .fit(), whereas in vanilla XGBoost you’d need to pass in X and Y separately (.fit(X,Y)).
Use Snowpark to write faster Python code
Some things are best expressed in Python, but working with Pandas DataFrames can be painfully slow. With Snowpark, you can write Spark-like code that compiles into SQL and runs distributed like normal Snowflake SQL— letting you operate on DataFrames faster without needing to spin up a Spark cluster. The Snowpark Dataframe is their Pandas Dataframe equivalent – it has similar methods (filter, join, etc.) and should be roughly similar to working with Pandas and Spark. But under the hood, everything is going to be a lot faster.
Build a distributed pipeline without messing with Spark
With Snowpark you can build data engineering pipelines that run distributed by default, all without needing to actually think about infrastructure. Snowflake actually has a super in-depth quickstart for getting this done, featuring fun characters like S3, Parquet, weather data, and a deployed app via GitHub Actions. All happening inside your database! You save both time and money by not having to worry about spinning up and configuring infrastructure.
Also, Snowflake has done a ton of optimizations for warehouse startup times. Chances are your entire pipeline might run in Snowpark before your old EMR instance has even finished booting up.

2. Cost controls 101
The flipside of Snowflake being easy to use and scale up is that it’s going to cost you. And unless you want to be that one analytics engineer who accidentally runs a $10,000 query, every data team member should be aware of the basics of Snowflake pricing, plus the cost implications of the work that you’re doing. Here are a few things you can do to keep Snowflake costs under control:
Resetting default query timeouts
Believe it or not, the default query timeout in Snowflake is 2 days (!). Which means that if you’re not careful to check how your queries are running, you can accidentally eat up a ton of credits. An easy thing your team can do is reset this default timeout to something more reasonable, like an hour or two (depending on the work your team is doing).
You can change the query timeout at a bunch of different levels, starting with the current user’s current session:
alter session set statement_timeout_in_seconds = 7200You can also change it for a specific user, specific warehouse, and even account-wide.
Tighten up warehouse auto-suspends
Snowflake warehouses will automatically suspend if they’re not being used, so you don’t spend credits on something you’re not using. They will then automatically resume if a query calls upon them. This “workflow” helps avoid using credits to run warehouses that aren’t doing anything (as long as you’re comfortable giving up caching). If it makes sense for your project, you can set the auto-suspend timeframe to be pretty short (a few minutes) to help save on cost. Remember – if your warehouse is running, you’re paying for it, even if nobody is running queries.
3. Find the right exploratory workbench
The perfect complement to a high quality warehouse for storing data is an equally powerful exploratory workspace for analyzing data. Hex’s native integration with Snowflake gives your team the ability to explore any of your data in Snowflake without having to think about complex configuration or infrastructure.
Share your data work interactively with the whole team
We’ve all been there – several days (or weeks!) spent on a project, condensed into a few small visualizations, screenshotted and shared contextlessly with team members. Your analysis is just like your warehouse: useless if nobody pays attention to it. In Hex, data work is default collaborative, from interactive visualizations to granular sharing. You can share a live version of a cell, graph, or even an entire workbook – plus add interactivity (a filter here, a date range there) with drag and drop UI elements. Just to make sure your insights make the impact you want.
By far the easiest way to get started with Snowpark
We’ve spent about 30% of this post talking about how great Snowpark is, and Hex is the best way to actually get started with it. Snowpark is great, but when you go to start using it, you might rapidly find yourself manually handling security keys, googling “how to connect Python and Snowflake,” etc. With Snowpark in Hex, it’s literally 1 click to create a secure Snowpark session in a notebook.
Hex already supports SQL + Python workflows (Python cell output to SQL, etc.) so it’s easy to blend Snowpark Python code with SQL queries running in that same session. You can flow seamlessly between Python and SQL cells without losing the benefits of keeping data in the Snowpark Dataframe format.
You can always use the language / framework that’s best for the job, not the one that your tool forces you to.
Chained SQL workflows
Instead of hundred line queries with 10 different CTEs, in Hex you can chain SQL statements together to run off of the results of a previous query. Atomic, individual SQL cells means easier query building and debugging – and it’s more straightforward for other team members you’re working with to understand what your queries are actually doing.
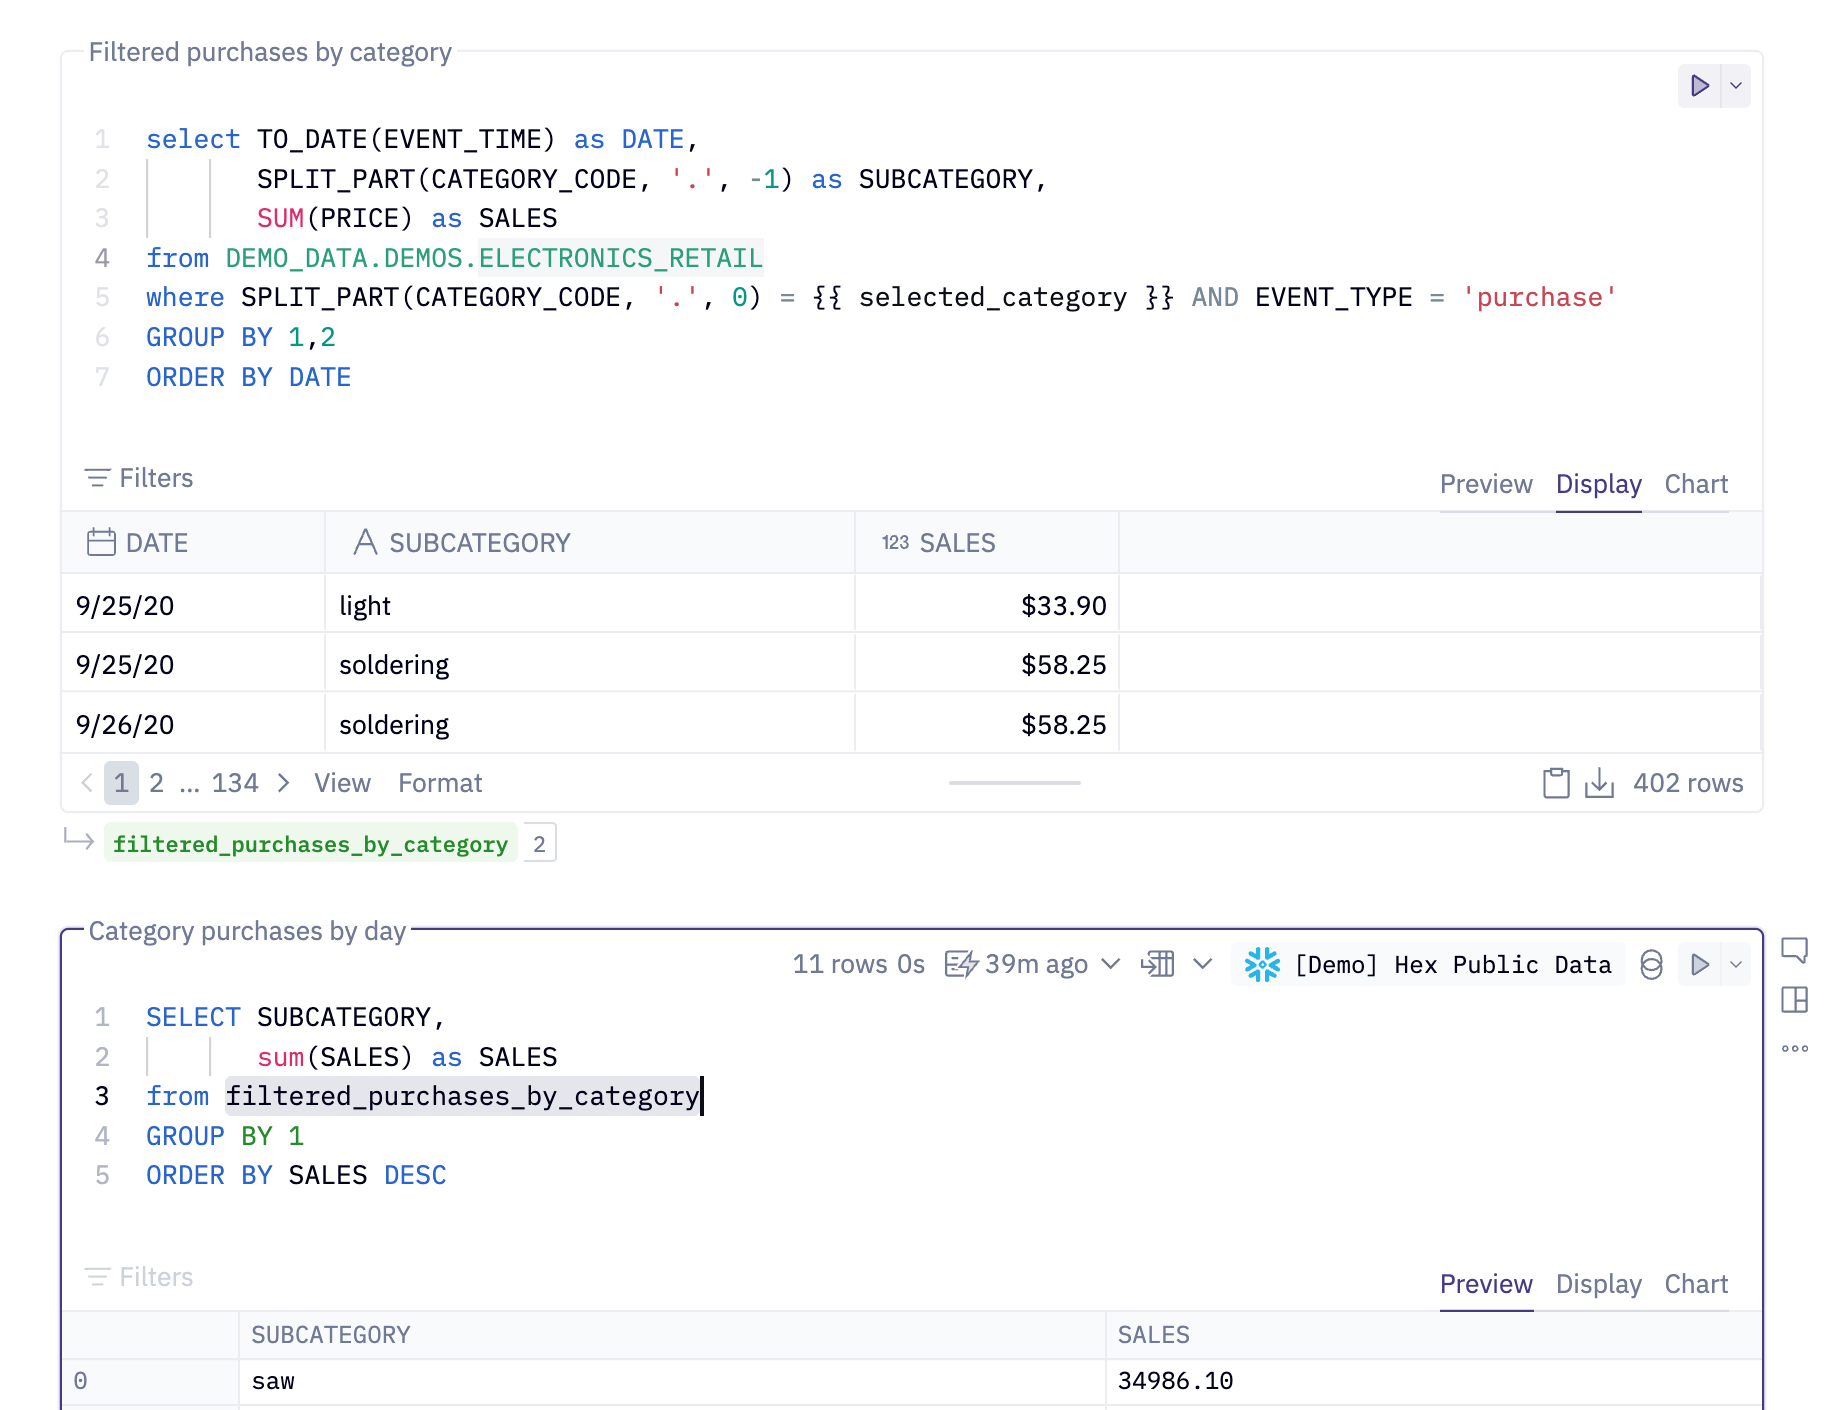
We’re big believers in SQL and Python (not SQL or Python), and using the right tool for the job. In Hex, you can query results of SQL cells with Python, results of Python cells with SQL, or any other combination that your heart desires.
Pushdown to Snowflake on the backend
Traditional notebooks require you to think constantly about resourcing – how much data are you bringing into memory? How big does your server need to be to handle that? With Hex, computation is automatically pushed down into Snowflake. Only necessary data is brought up into the notebook itself. Because you’re not copying data across the internet, you’re saving significant time—especially with large datasets.
This also lets you analyze datasets that you simply otherwise couldn't work with. Snowflake's benchmark blog post coyly notes that “The 5XL warehouse size would be useful for higher data volumes, such as 300 TB or 1 PB”. I don’t have a petabyte of data lying around, but I do have a few hundred gigabytes, and you simply cannot work with data even approaching that scale with a Jupyter notebook— it will run out of memory and crash.
Hex's Snowflake pushdown lets you work with data of essentially any scale, right from the familiar and powerful notebook interface. Your team can spend less time waiting around and worrying about performance and infrastructure, and more time actually thinking about your data.
If this is is interesting, click below to get started, or to check out opportunities to join our team.