Blog
Building ML Models In Minutes With Hex and Snowflake ML Functions
Build machine learning models with SQL

Machine learning has drastically changed in the past year with the rise of LLMs. Generative AI has changed the landscape, but traditional machine learning has been and still is very prevalent. However, a common problem still persists — the steep learning curve is too high for large adoption of ML models within enterprises. Snowflake’s answer to this problem are their Snowflake ML functions. I will walk through how to implement ML models using only SQL!
Snowflake ML Functions
Snowflake ML functions are a new way to train and call ML models in Snowflake. They are easy of use, provide security, and are accessible to anyone that can write basic SQL! Problems that required advanced knowledge of Python, machine learning libraries and best practices can now be solved with a few lines of SnowSQL. To date, there are four ML functions available:
We will review how to use the forecasting function.
Hex + Snowflake ML Functions
Taking advantage of Snowflake ML functions is made easy in Hex. All that is required is a Snowflake connection and a SQL cell. In Hex, the ML functions will return results as a Pandas dataframe. As a SQL user, understanding this is not important but it provides the flexibility to quickly work with Python. Every Hex project also comes with pre-installed libraries so you can expand on your analysis with ease.
Model Training With Snowflake ML Functions:
The ML Functions allow us to train models using only SQL. In the images below, I am using a dataset that contains US population information such as birth rates, growth rates, migration rates, and more. I want to forecast population growth over time by using these columns. I simply call the SNOWFLAKE.ML.FORECAST() against my dataset called usa_population and my model is trained!
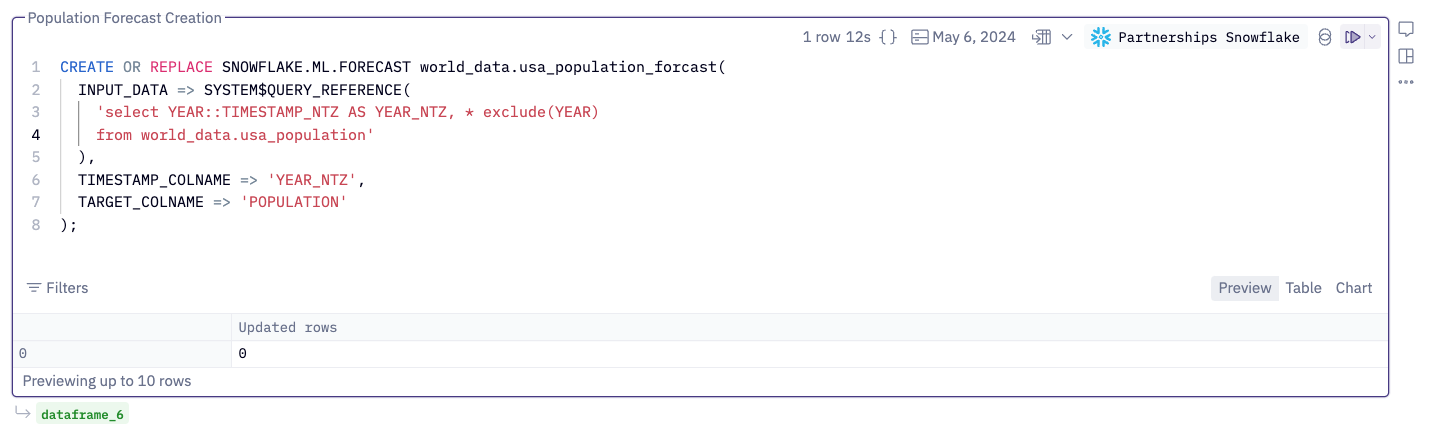
In the code I do not need to specify columns like birth rates and migration rates to the model. I only need to specify the TIMESTAMP_COLNAME and TARGET_COLNAME. The Forecast function automatically will use the columns for training The Forecast function will even exclude NULL values. You can learn more about the forecast function in Snowflake’s documentation.
For my INPUT_DATA I am using a system function called SYSTEM$QUERY_REFERENCE(). This is a simple trick that runs the query specified when I run the code above. This avoids me from having to create a separate table or view just to ensure that my timestamp column is of TIMESTAMP_NTZ.
Finally, I am ensuring that my timestamp column is of TIMESTAMP_NTZ (no time zone) as this is a requirement for the forecast model with the code YEAR::TIMESTAMP_NTZ AS YEAR_NTZ.
Model Inference With Snowflake ML Functions:
Now that our model is trained, let’s try it out! We can forecast population growth by simply calling the model we created.
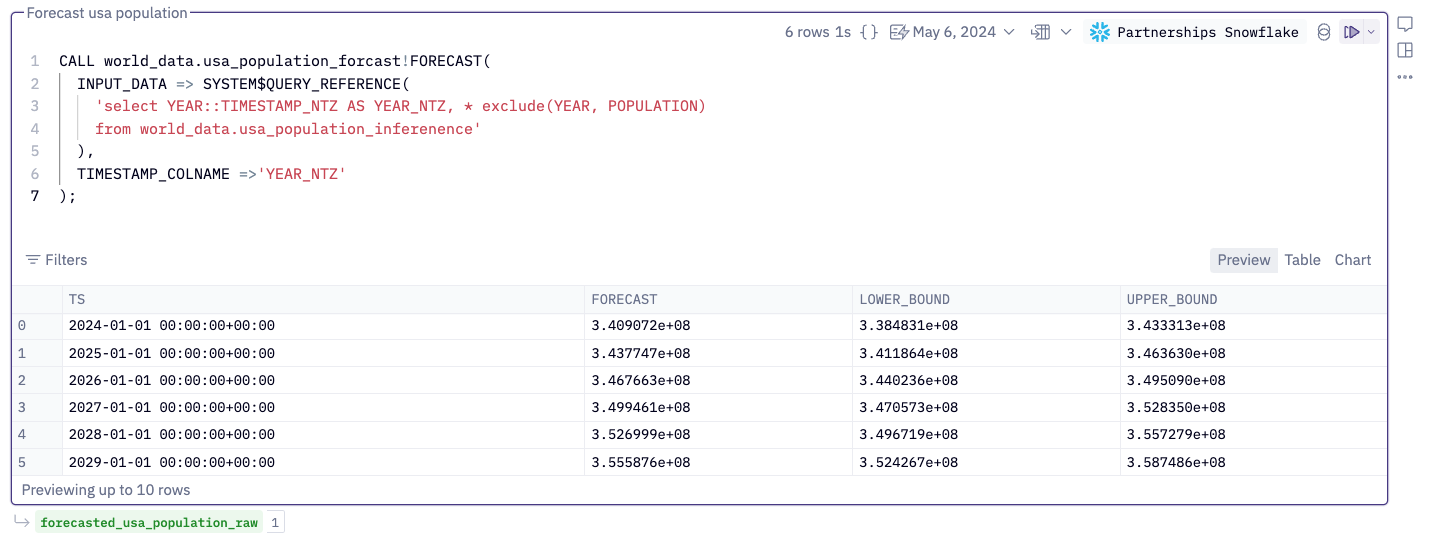
All I need to do is specify the timestamp column, TIMESTAMP_COLNAME = ‘YEAR_NTZ’ and the model will predict future values. Notice that I am using the SYSTEM$QUERY_REFERENCE() again to avoid having to create a view or table.
Partitioned Model Training
Only the forecasted data above is for the US. In real world applications, it is very likely that you have to perform partitioned model training. Meaning, you have data that can not be trained with one model. For example, imagine that our dataset had many different countries instead of just the US.
Traditionally, we would need to partition our data or rather create new datasets for each country and then train individual models. Each country has specific birth rates, immigration rates, etc. and that must be accounted for. The more performant way to handle this, is to partition the model training so that the models run in parallel. But, this is an advanced technique. With Snowflake ML functions partitioning is only one additional line of SQL code:

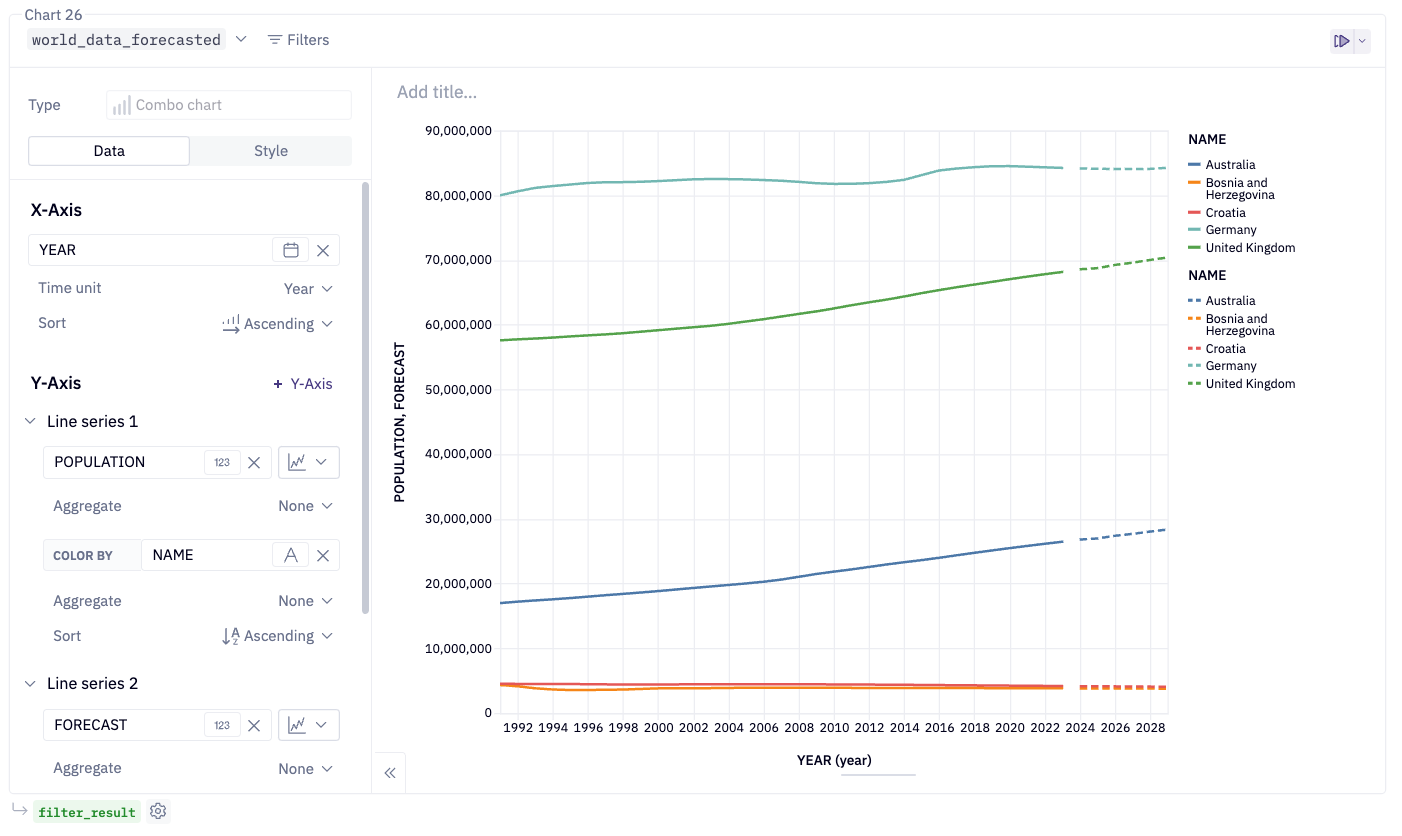
The SERIES_COLNAME is used to specify the column I want to partition on. In our dataset, the NAME column contains the names of the various countries; I can simply add SERIES_COLNAME => ‘NAME’ and the model will partition on each unique country in the dataset.
I am able to forecast on numerous country names with only one additional line of SQL. The final result is individually forecasted values for all the countries in my table:
Conclusion
To review all the code, how I got this dataset, prepared the data, and made the predictions check out Building ML Models In Minutes With Snowflake ML Functions and Hex and get a copy to run the code in your own Hex environment. These models have been trained using only SQL for quick and easy model development. Whether you are an ML engineer looking for quick base models that you optimize or a SQL analyst looking to upskill, you can leverage Snowflake ML models and the integration with Hex make it effortless.
If this is is interesting, click below to get started, or to check out opportunities to join our team.