Blog
Connecting to and querying MySQL from Python
Querying one of the most commonly used databases from Python
If you have spurned the latest NoSQL or serverless databases and continued to use the well-trod tables of MySQL for your production db, you’re in good company. It’s still the most popular database on the 2022 Stack Overflow Developer Survey and counts Facebook, Twitter, YouTube, and Netflix among its users.
There are two main ways you can connect to MySQL in Python. We’ll show you how to use both:
- Use
mysql-connector-pythonwhen you are just looking to run some quick queries - Use
sqlalchemywhen you want to run deeper analysis as it plays nicer with Pandas
Getting the credentials for your MySQL database
Firstly, to connect using either method you are going to need these credentials from your MySQL database:
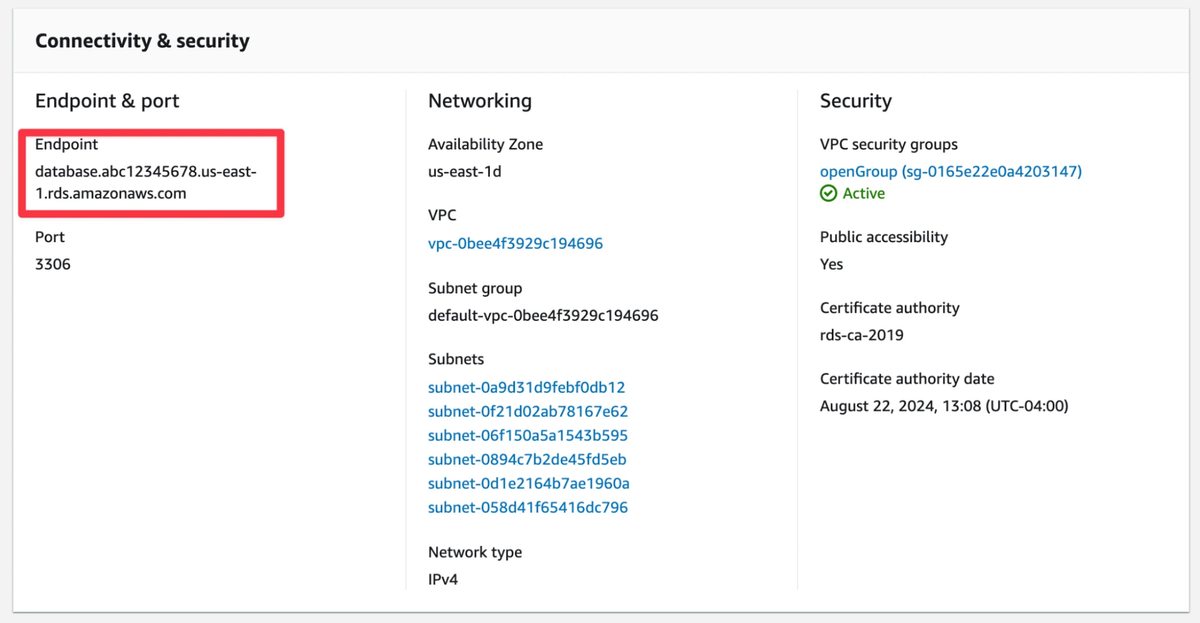
- Host address. If you were working on a local instance of MySQL, this would be ‘localhost.’ For production databases, this is more likely to be the endpoint URL of the instance in a data center, such as ‘database.abc12345678.us-east-1.rds.amazonaws.com’
- Username. The username of the account to connect with. Sometimes this will default to ‘user’ or ‘admin.’
- Password. The password for that user.
- Database. The database name.
Where to find this information will be different for different cloud providers. In this scenario, we are using a MySQL database on an AWS RDS instance (so YMMV). For the host address, it’s visible in the control panel for the database:
The username and password are configurable when you set up your instance. The username is available by going to Databases → Configuration under ‘Master username.’ You can’t see your password, but you can reset it by going to Databases → Modify and changing it there (make sure to ‘Apply Immediately’ otherwise you might be waiting days for the update to take effect).
Normally access to cloud databases is pretty locked down, so there’s a high likelihood you’ll also have to configure some security/accessibility settings to access your data. In AWS, this means setting your database to ‘publicly accessible’ and configuring a security group that allows incoming traffic from your IP address.
Now that we have each of these creds, we need to store them. If you like living dangerously, you can just store them as variables in the file. But if you build out the analysis into something useful, at some point you're probably going to commit it to version control. Then suddenly you have credentials in the wild, and you have to go through a whole rigamarole to fix it.
The better option at this stage is to save them as environment variables. You can do this via the terminal, like so:
export mysqlhost=<your_mysql_username>
export mysqluser=<your_mysql_username>
export mysqlpass=<your_mysql_password>
If you are using jupyter, you can use the %env 'magic' command, like so:
%env export mysqlhost=<your_mysql_username>
%env export mysqluser=<your_mysql_username>
%env export mysqlpass=<your_mysql_password>
You might already know your database name. If not, you can get that through the connectors. So let’s get to that.
Running MySQL queries with mysql-connector-python
mysql-connector-python is the official python connector developed by MySQL and uses Python database API v2.0 specification. It gives you access to the latest version of MySQL and its functions. If you are an SQL demon who wants low-level access to your MySQL database, then this connector is ideal (As we’ll see in a moment, if you are happier in the Python world, using Pandas, SQLAlchemy is a better option).
To install in the terminal, you can use:
pip install mysql-connector-pythonIf you are in a Jupyter notebook, you can use an exclamation mark to install via a system call:
!pip install mysql-connector-pythonLet’s connect initially without a specific database:
from mysql.connector import connect
import os
connection = connect(user=os.environ['mysqluser'], password=os.environ['mysqlpass'], host=os.environ['mysqlhost'])
This creates a connection object that will manage the connection to your MySQL instance. To list the databases available, you can use the SHOW_DATABASES SQL query:
cursor = connection.cursor()
query = ("SHOW DATABASES")
cursor.execute(query)
print(cursor.fetchall())
So what’s happening here?
- We create a cursor for our connection. A cursor allows you to execute SQL statements via the connection.
- We write the SQL we are going to use. SQL queries are just written as strings. This means for more advanced queries, you can use f-strings to build them. If you are writing multiline queries, triple quotes are suggested so you can use single or double quotes in the query.
- We execute that query with the cursor.
- Finally, we print out a list of all our databases.
In our example we get this output:
             Database
0           customers
1  information_schema
2  performance_schema
First on that list is the database we want: customers. But what are the others?
Information_schemais database metadata, such as the names of different databases or tables, the data types you have, and which users can access what.Performance_schemamonitors the performance of the databases and server events, such as function calls or the execution of your SQL statements.
Now we have our database name, we can query that specific database. Here we want to get all the names and urls of all entries that are current customers:
database_name = 'customers'
cursor.execute(f"USE {database_name}")
query = ("SELECT customer_name, customer_url FROM customers "
         "WHERE current = true")
cursor.execute(query)for (customer_name, customer_url) in cursor:
    print(customer_name, customer_url)
cursor.close()
In this case, this gives us the output:
customer_name      customer_url
Dynava             https://dynava.com
Cogidoo            https://cogidoo.com
Fatz               https://fatz.com
DabZ               https://dabz.com
Eabox              https://eabox.com
Bluezoom           https://bluezoom.com
Jabberstorm        https://jabberstorm.com
Jaxbean            https://jaxbean.com
Yodoo              https://yodoo.com
Eidel              https://eidel.com
Trunyx             https://trunyx.com
Quinu              https://quinu.com
Yodel              https://yodel.com
Trupe              https://trupe.com
Minyx              https://minyx.com
Blognation         https://blognation.com
The important concept here is that, as long as you have the connection and the cursor, you can write any SQL that would run on a database and it’ll work. But, the response that comes back will still have to be manipulated into a usable format for analysis.
That’s where Pandas comes in. Pandas has a read_sql that allows you to read data directly from a SQL connection:
df = pd.read_sql(query, connection)But when we try to use a mysql-connector-python connection with Pandas we get the Python equivalent of 😢.
UserWarning: pandas only supports SQLAlchemy connectable (engine/connection) or database string URI or sqlite3 DBAPI2 connection. Other DBAPI2 objects are not tested. Please consider using SQLAlchemy.mysql.connector uses a Python database API v2.0 connection so it isn’t ideal for using with Pandas for analysis. You will get an output, and you can continue to use it, but you will get some funky returns, such as datetime fields not formatted correctly, and you don’t know exactly when it’ll break.
So we’ll do what Pandas wants and consider using SQLAlchemy.
Running MySQL queries with sqlalchemy and Pandas
mysql-connector-python brings MySQL to Python but still expects you to use SQL. SQLAlchemy brings any relational database to Python and wraps it up in Pythonic language to keep you happy.
If you are working with SQL databases a lot in Python, SQLAlchemy is an invaluable tool. Its Object Relational Mapper (ORM) easily maps Python objects to a database model, so you don’t have to deal directly with SQL queries. We’re not going to use that functionality here, but if you build out more analysis and interaction with your SQL databases, it might be worth also using the ORM.
Installation is the same. In the terminal it is:
pip install sqlalchemyIn a notebook it will be:
!pip install sqlalchemySQLAlchemy is for any relational database, so you’ll also need a MySQL-specific driver. We’ll use pymysql:
pip install pymysqlFinally, we’ll also want to install Pandas to help with the analysis:
pip install pandasNow we’re ready to rock. You use the create_engine function to create your connection with an engine uri built with your credentials:
from sqlalchemy import create_engine

engine_uri = f"mysql+pymysql://{os.environ['mysqluser']}:{os.environ['mysqlpass']}@{os.environ['mysqlhost']}/{database_name}"
connection = create_engine(engine_uri)
Let’s call our read_sql again with the same query, but this time using the SQLAlchemy connection:
query = ("SELECT customer_name, customer_url FROM customers "
         "WHERE current = true")
df = pd.read_sql(query, connection)
print(df.head())
You should get the five first entries as in the output above:
customer_name      customer_url
Dynava             https://dynava.com
Cogidoo            https://cogidoo.com
Fatz               https://fatz.com
DabZ               https://dabz.com
Eabox              https://eabox.com
We have found when working with Snowflake connections that this method is less performant. But now it is nicely encapsulated in a Pandas dataframe so ripe for analysis. This makes it a ton easier to work with the data.
If you want to bypass a lot of these SQL -> Python hassles, you can use Hex to write SQL in a SQL cell and have the output directly in a dataframe.