Sentiment Analysis
Hex provides a flexible workspace to parse unstructured text data and perform sentiment analysis with SQL and Python. Hex's polyglot environment means you can use Python ...
How to build: Sentiment Analysis
Sentiment Analysis with Python and Hex
Sentiment analysis plays a crucial role in a ton of fields, offering insights into people's feelings and opinions. Its significance spans across industries, impacting decision-making and user experiences in the following ways:
- Market Research: It guides marketing strategies by understanding customer preferences, brand perception, and competitor analysis through social media listening and online reviews.
- Customer Service: Identify dissatisfied customers, understand their concerns, and proactively address issues, leading to improved satisfaction and loyalty.
- Finance: Track market sentiment towards specific stocks or industries, informing investment decisions and risk management.
- Politics: Analyze public opinion on political candidates, policies, and events, providing valuable insights for campaigns and governance.
- Healthcare: Understand patient sentiment towards treatments, doctors, and healthcare experiences, improving patient care and communication.
How do we unlock this power of sentiment analysis? Python is to go-to tool for building a own sentiment analysis engine. Its ecosystem of libraries and frameworks like NLTK, TextBlob, and spaCy make it ideal for natural language processing tasks.
Here, we want to show you how to use Python and Hex to perform sentiment analysis. We'll cover everything from the foundational concepts to the practical implementation, equipping you with the knowledge and tools to build your own sentiment analysis engines.
Sentiment Analysis with Python and Hex
For this article, we will be using Python 3.11 for writing code, and Hex as a development environment. Hex is a polyglot development environment that allows you to write code in different languages in the same environment. Hex's visualization feature makes it a unique tool that allows you to write code for visualization as well as provide the no-code functionality to create complex graphs. It is also an intelligent development environment as you can read data in one language and use that data in the rest of the notebook in another language. In Hex, you can use Python packages like NLTK, TF-IDF, SpaCy, or just some good old-fashioned regex and case statements in SQL directly against your data warehouse.
We will perform sentiment analysis for Yelp review data. The data is stored in the Snowflake warehouse that can be accessed within the Hex environment. We'll focus on two main aspects of the Yelp review data:
- Narrative Structure: Analyzing the narrative structure of a review, and its correlation with sentiment. We hypothesize that reviews often tell a story about the reviewer's experience and that this narrative structure might be associated with the sentiment of the review.
- Cultural Trends: Analyzing all reviews over time to uncover cultural trends. We hypothesize that certain types of food or dining experiences might be associated with more positive reviews during their peak in popularity (ex: avocado toast).
Let's start with downloading the necessary dependencies for sentiment analysis.
Install and Load Dependencies
Hex comes up with a lot of Python libraries preinstalled, but if you want to install any package you can install it using the Python Package Manager (pip). For example, packages for sentiment analysis can be downloaded as follows:
pip install nltk
pip install spacy
pip install scikit-learn
pip install textblob
pip install wordcloud
pip install pandas numpy matplotlib seabornOnce these libraries are installed, we need to install some additional data for the spacy library that can be downloaded with the help of the following command:#Install spacy extra data
!python -m spacy download en_core_web_smNext, we need to load all the dependencies that are going to be used in this article.
import pandas as pd
import numpy as np
import matplotlib.pyplot as plt
import seaborn as sns
from sklearn.feature_extraction.text import CountVectorizer
from sklearn.model_selection import train_test_split
from sklearn.linear_model import LogisticRegression
from sklearn.metrics import classification_report, confusion_matrix
from sklearn.feature_extraction.text import TfidfVectorizer
from nltk.corpus import stopwords
from nltk.stem import WordNetLemmatizer
from nltk.tokenize import word_tokenize
import nltk
import re
import string
import datetime
from wordcloud import WordCloud
from textblob import TextBlob
import spacy
from collections import Counter

# Download necessary NLTK data
nltk.download(['punkt', 'wordnet', 'averaged_perceptron_tagger', 'stopwords'])

# Load English tokenizer, tagger, parser, NER, and word vectors from spacy
nlp = spacy.load('en_core_web_sm')
As you can see in the above code, a lot of text preprocessing, modeling, and visualization libraries are imported. Then the additional data such as punkt, wordnet, averaged_perceptron_tagger, and stopwords is downloaded from the NLTK library. Finally, the tokenizer, tagger, parser, NER, and word vectors are loaded from the spacy library which will be used further for sentiment analysis.
Data Loading and Preprocessing
Now, we need to load the dataset from the warehouse and process it. We need to perform the text cleaning (removing punctuation, converting to lowercase, etc.) and calculate the sentiment scores for each review as part of the data preprocessing. We can load the dataset using the read_json() method from pandas as follows:
reviews = pd.read_json('yelp_academic_dataset_review.json', lines=True)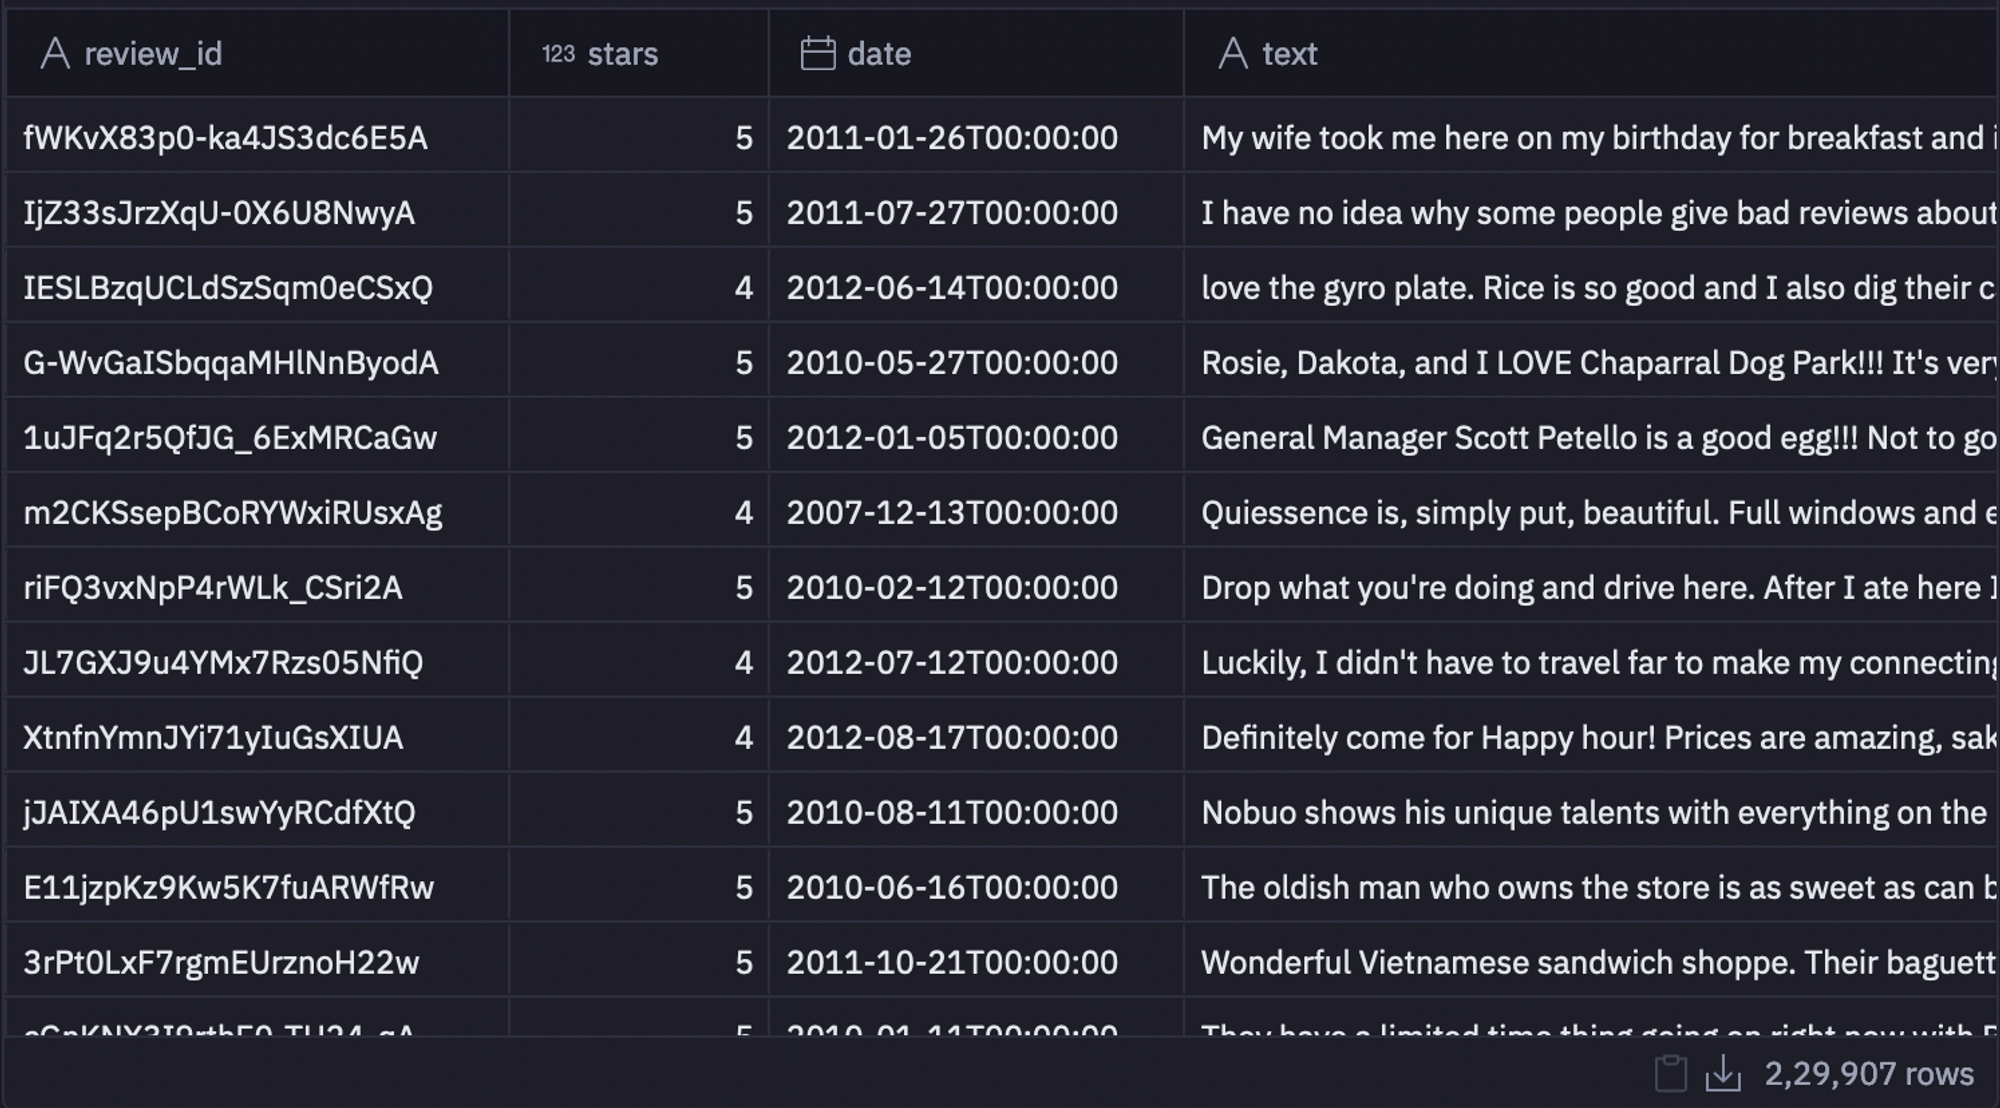
As you can see in the above image, the dataset consists of columns like review_id, stars, date, text, and so on.
Sentiment Analysis
Once the dataset is loaded, we need to start parsing and classifying the reviews in this dataset. For this, we need to use the TextBlob library of Python that returns two metrics for every text that is passed to it as input. The first one is Polarity, which indicates the positivity/negativity in the sentiment of the text. The second one is subjectivity which refers to objective info/facts versus personal opinions or emotions.
You simply need to load the textblob library and pass your text as input to get the polarity and subjectivity as follows:
# Import the TextBlob library
from textblob import TextBlob

# Define a function to calculate the polarity and subjectivity of a text
def get_sentiment(text):
	blob = TextBlob(text)
	return blob.sentiment.polarity, blob.sentiment.subjectivity

# Apply the function to the reviews
reviews['polarity'], reviews['subjectivity'] = zip(*reviews['text'].map(get_sentiment))

# Display the first few rows of the dataframe
reviews.head()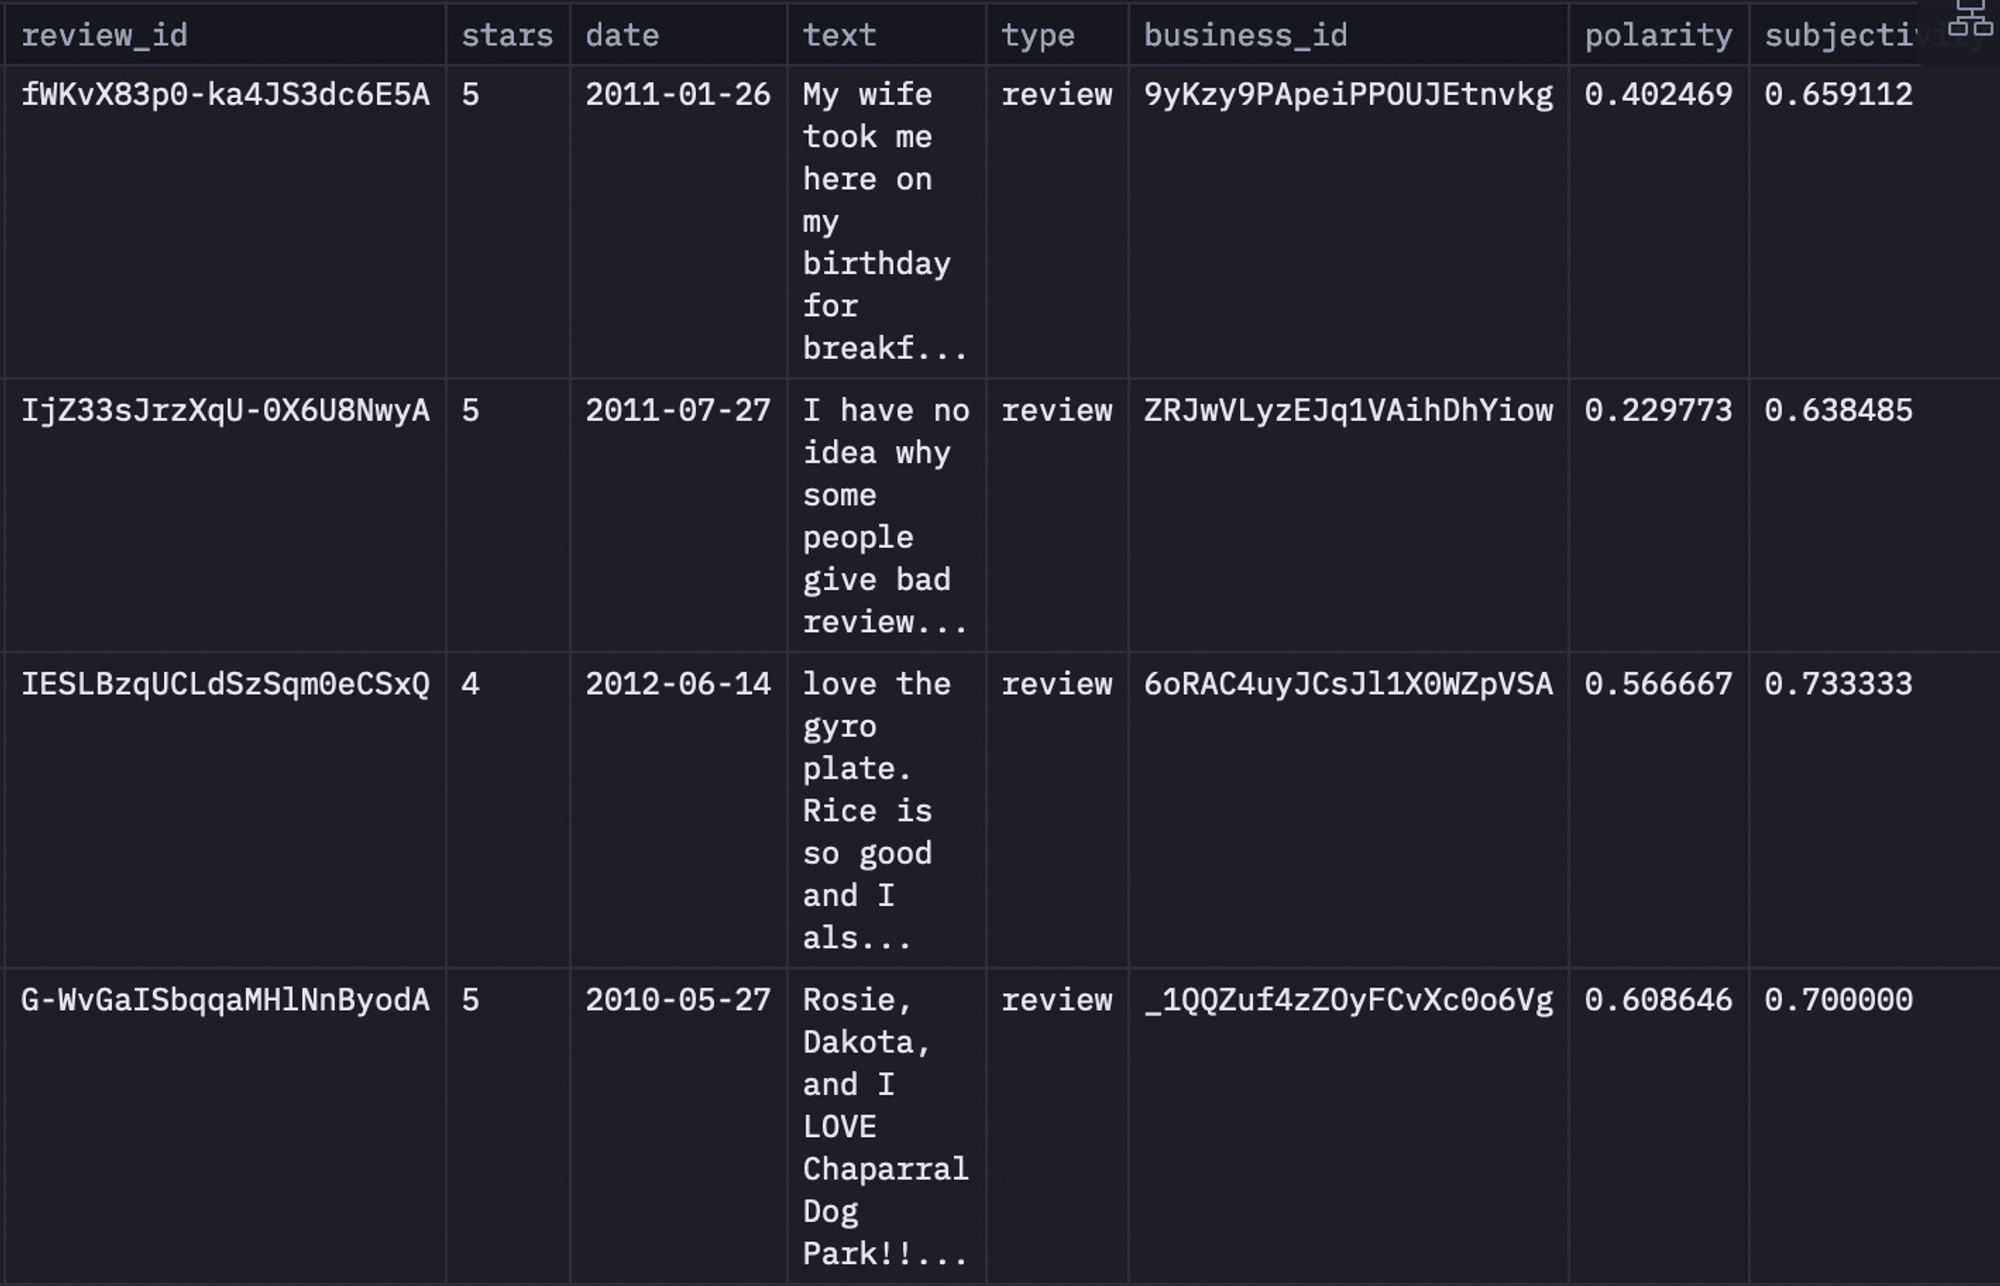
As you can see in the above code, the get_sentiment() method returns the polarity and subjectivity scores, Then we store these scores for all the reviews in the polarity and subjectivity columns of our original dataframe.
Narrative Structure
Now it's time that we look at the narrative structure of each review and its correlation to sentiment polarity. For this, we will use the concept of "sentiment arcs." Sentiment arcs identify the dynamic trajectory of sentiment throughout a text, offering insights into emotional shifts and nuances, and enhancing the precision of sentiment analysis by capturing the narrative's emotional flow.
We will create a plot of the polarity as a function of the position within the review that will tell us if reviews get more positive or more negative over time, or any combination of polarity changes. You can implement the concept of sentiment arcs with the help of the following code:
# Import the necessary libraries
import matplotlib.pyplot as plt
import numpy as np

# Define a function to calculate the sentiment arc of a review
def get_sentiment_arc(text):
	sentences = TextBlob(text).sentences
	polarities = [s.sentiment.polarity for s in sentences]
	return polarities

# Calculate the sentiment arcs for the first 100 reviews
arcs = reviews['text'].head(100).map(get_sentiment_arc)

# Plot the sentiment arcs
plt.figure(figsize=(10, 6))
for arc in arcs:
	plt.plot(np.linspace(0, 1, len(arc)), arc, alpha=0.1, color='blue')
plt.xlabel('Position in review')
plt.ylabel('Sentiment polarity')
plt.title('Sentiment Arcs of Yelp Reviews')
plt.show()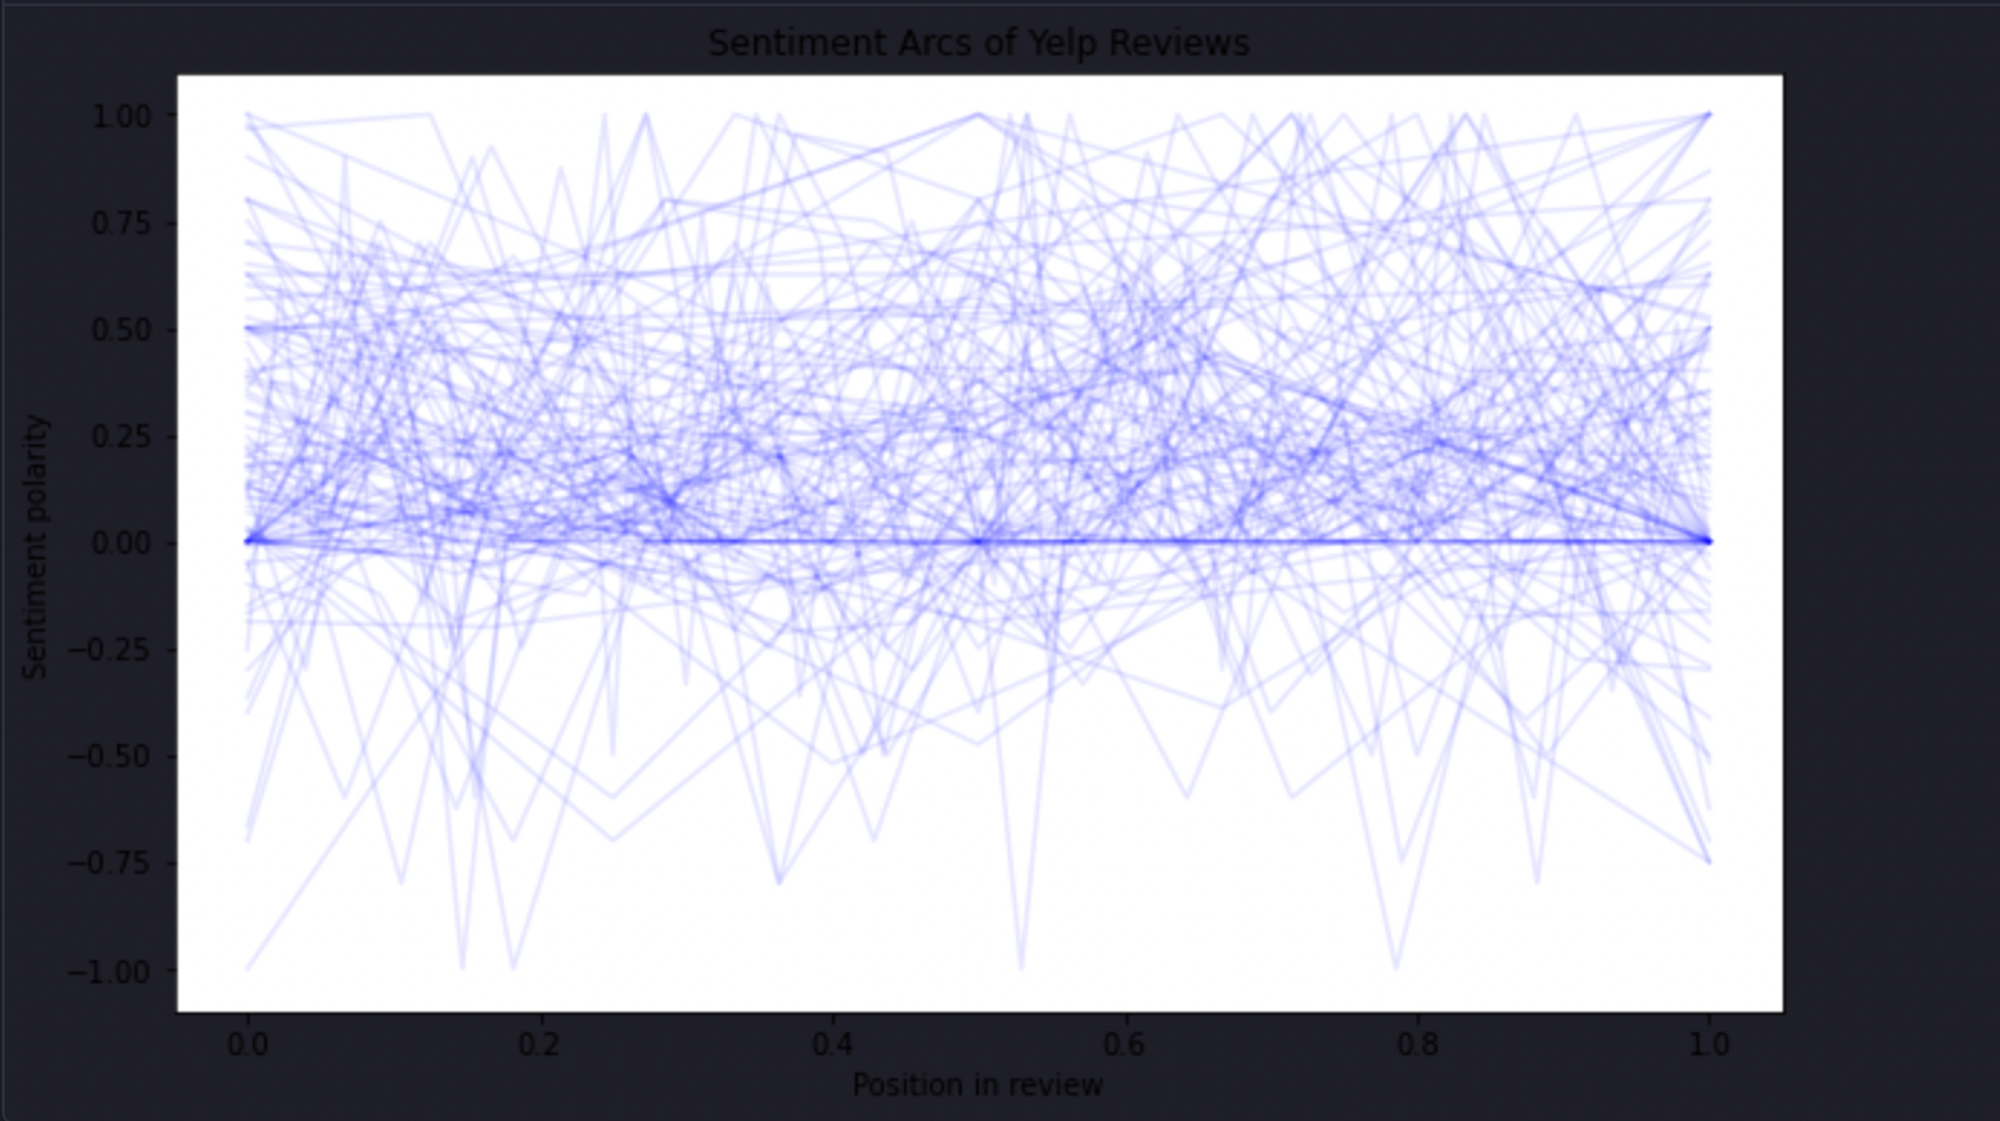
As you can see in the above code, we are using the get_sentiment_arc() method to get the polarity score of the first 100 reviews. Then we created a lineplot for the received polarity scores.
Next, we need to calculate the correlation between the sentiment arc and the overall sentiment, this can be done with the help of the following code:
# Define a function to calculate the correlation between the sentiment arc and the overall sentiment
def get_correlation(arc, overall_sentiment):
	return np.corrcoef(arc, np.linspace(0, 1, len(arc)) * overall_sentiment)[0, 1]

# Calculate the correlations for the first 100 reviews
correlations = [get_correlation(arc, sentiment) for arc, sentiment in zip(arcs, reviews['polarity'].head(100))]In the above code, we are simply iterating over the sentiment arc and polarity score (sentiment) of each review to calculate a correlation coefficient value. We are storing the correlation into a list named correlations. Next, you can plot a simple bar graph to visualize these correlations as follows:# Plot the correlations
plt.figure(figsize=(10, 6))
plt.hist(correlations, bins=20, edgecolor='black')
plt.xlabel('Correlation between sentiment arc and overall sentiment')
plt.ylabel('Number of reviews')
plt.title('Correlation between Sentiment Arc and Overall Sentiment of Yelp Reviews')
plt.show()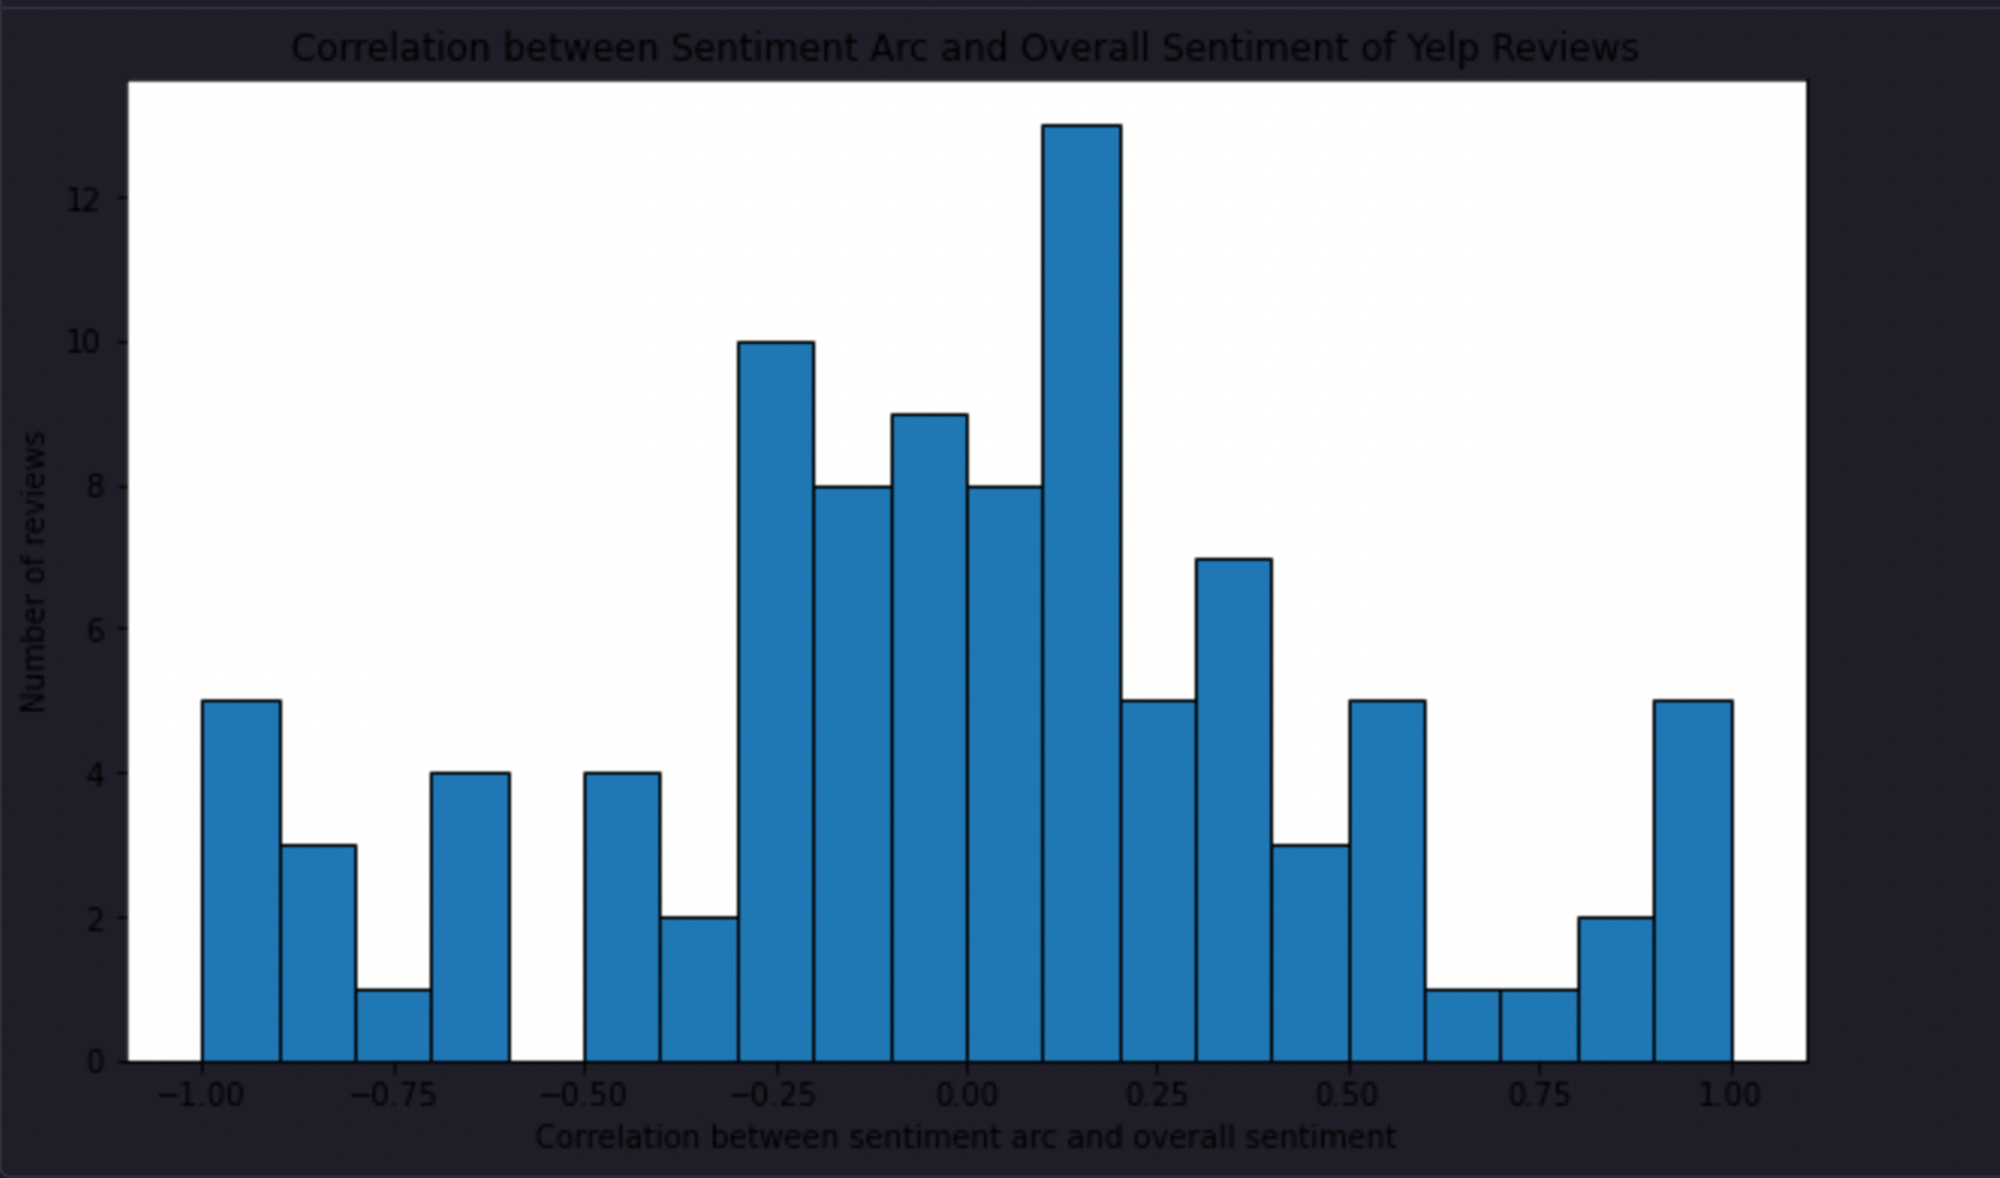
Upon inspection, the sentiment arcs of reviews are diverse and vary widely. There's a weak positive correlation between the sentiment arc and an overall positive sentiment— meaning that for overall positive reviews, the positivity of the review increases from the beginning to the end of the review and vice versa for negative ones.
However, it's a pretty weak effect, and the wide distribution means there are probably other factors at play in determining the overall sentiment of a review.
Cultural Trends
Now, let's look at the few cultural trends in the reviews. We'll identify key cultural terms in the reviews and analyze their sentiment over time. We will focus on two healthy cultural trends that have been popular in the years of the dataset (the early 2000s): avocados (usually on toast) and kale (in salads).
We'll identify reviews containing these phrases, calculate the average sentiment of these groupings, and draw comparisons.
To do so, you simply need to create a list containing the words and iterate over each review in the dataset to check if the reviews contain any of these two terms using the contains() method of string manipulation.
# Define the cultural terms
terms = ['avocado', 'kale']

# Identify the reviews that mention each term
for term in terms:
	reviews[term] = reviews['text'].str.contains(term, case=False)

# Display the first few rows of the dataframe
reviews.head()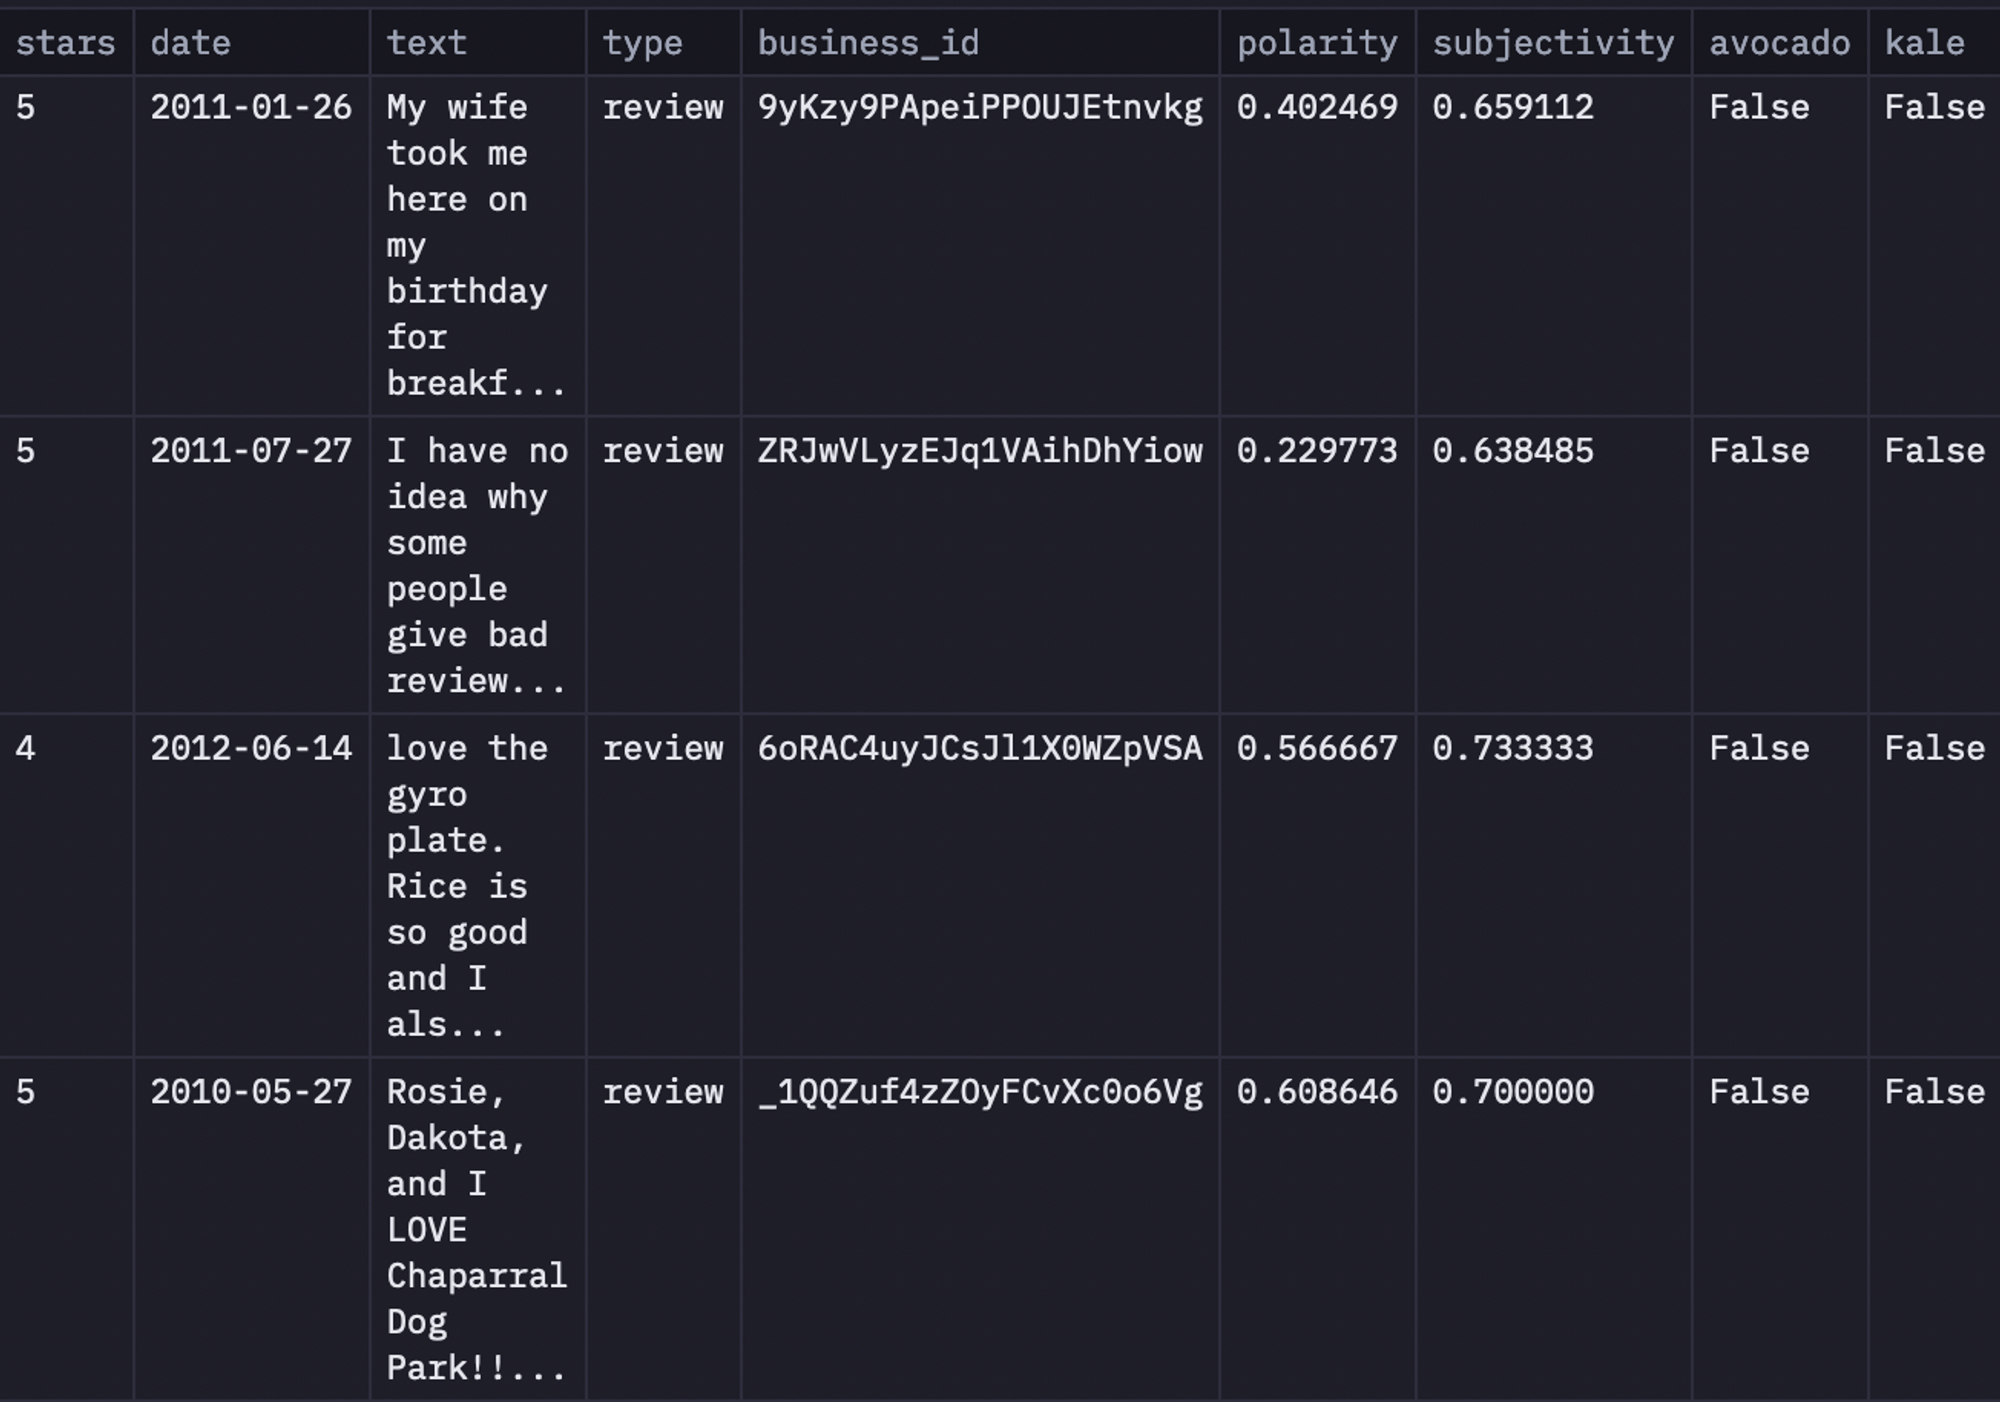
Once the reviews are filtered, we will create a new column in the dataset that will only contain dates for when these terms appeared. Then we will calculate an aggregated mean of the polarity score for the review containing these terms. Finally, we will create a line chart for visualizing the average sentiment of Yelp reviews mentioning cultural terms.
# Convert the date column to datetime
reviews['date'] = pd.to_datetime(reviews['date'])

# Extract the year from the date
reviews['year'] = reviews['date'].dt.year

# Calculate the average sentiment for each term for each year
average_sentiments = {}
for term in terms:
	average_sentiments[term] = reviews[reviews[term]].groupby('year')['polarity'].mean()

# Plot the average sentiment over time
plt.figure(figsize=(10, 6))
for term, sentiment in average_sentiments.items():
	plt.plot(sentiment.index, sentiment.values, label=term)
plt.xlabel('Year')
plt.ylabel('Average sentiment')
plt.title('Average Sentiment of Yelp Reviews Mentioning Cultural Terms Over Time')
plt.legend()
plt.show()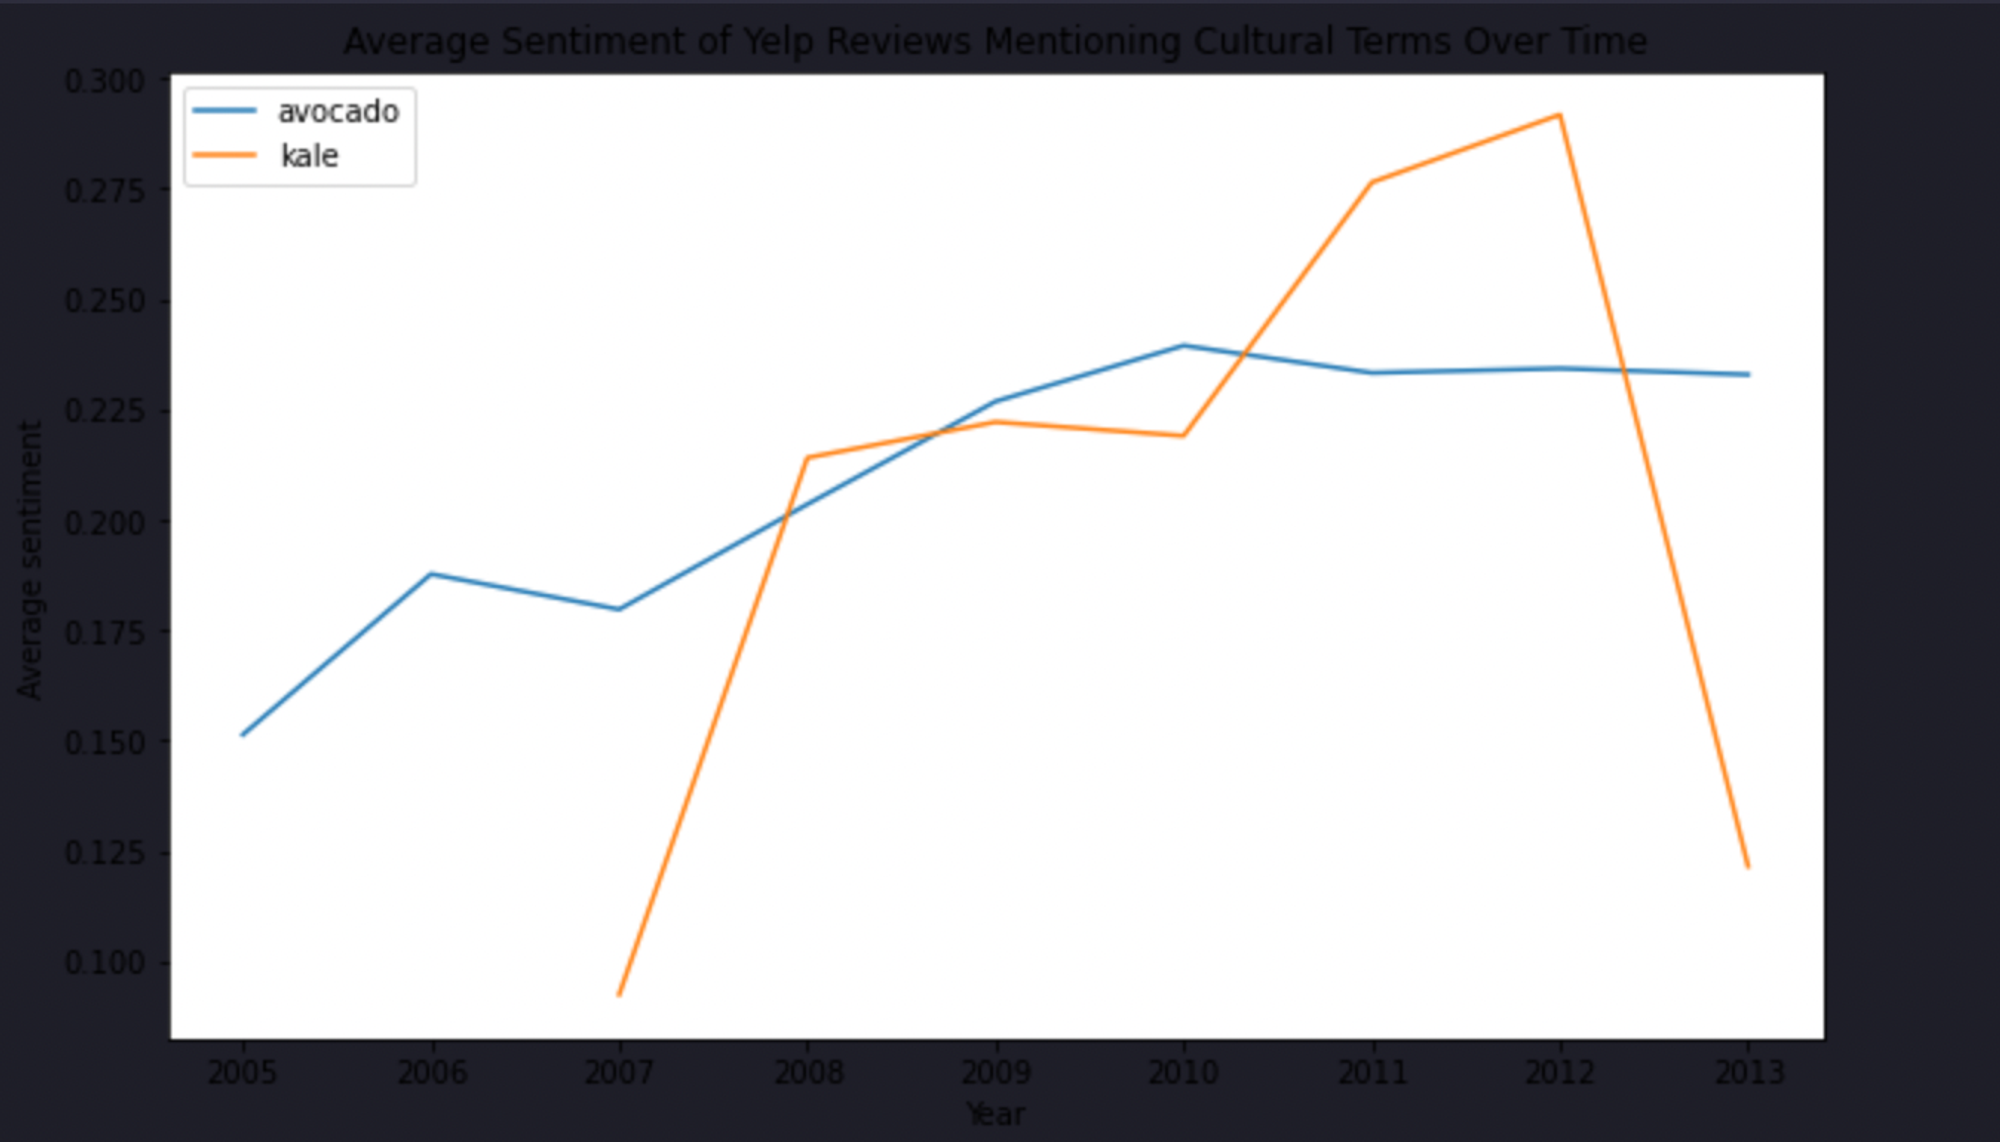
As you can see, the sentiment of the reviews containing the term avocado is increasing with time while with the kale term, it is decreasing.
you can also visualize the sentiment polarity for each term with the help of the following code:
# Calculate the sentiment polarity for each term
sentiment_polarities = {}
for term in terms:
	sentiment_polarities[term] = reviews[reviews[term]]['polarity']

plt.figure(figsize=(10, 6))
for term, polarity in sentiment_polarities.items():
	plt.hist(polarity, bins=20, alpha=0.5, label=term)
plt.xlabel('Sentiment polarity')
plt.ylabel('Number of reviews')
plt.title('Sentiment Polarity of Yelp Reviews Mentioning Cultural Terms')
plt.legend()
plt.show()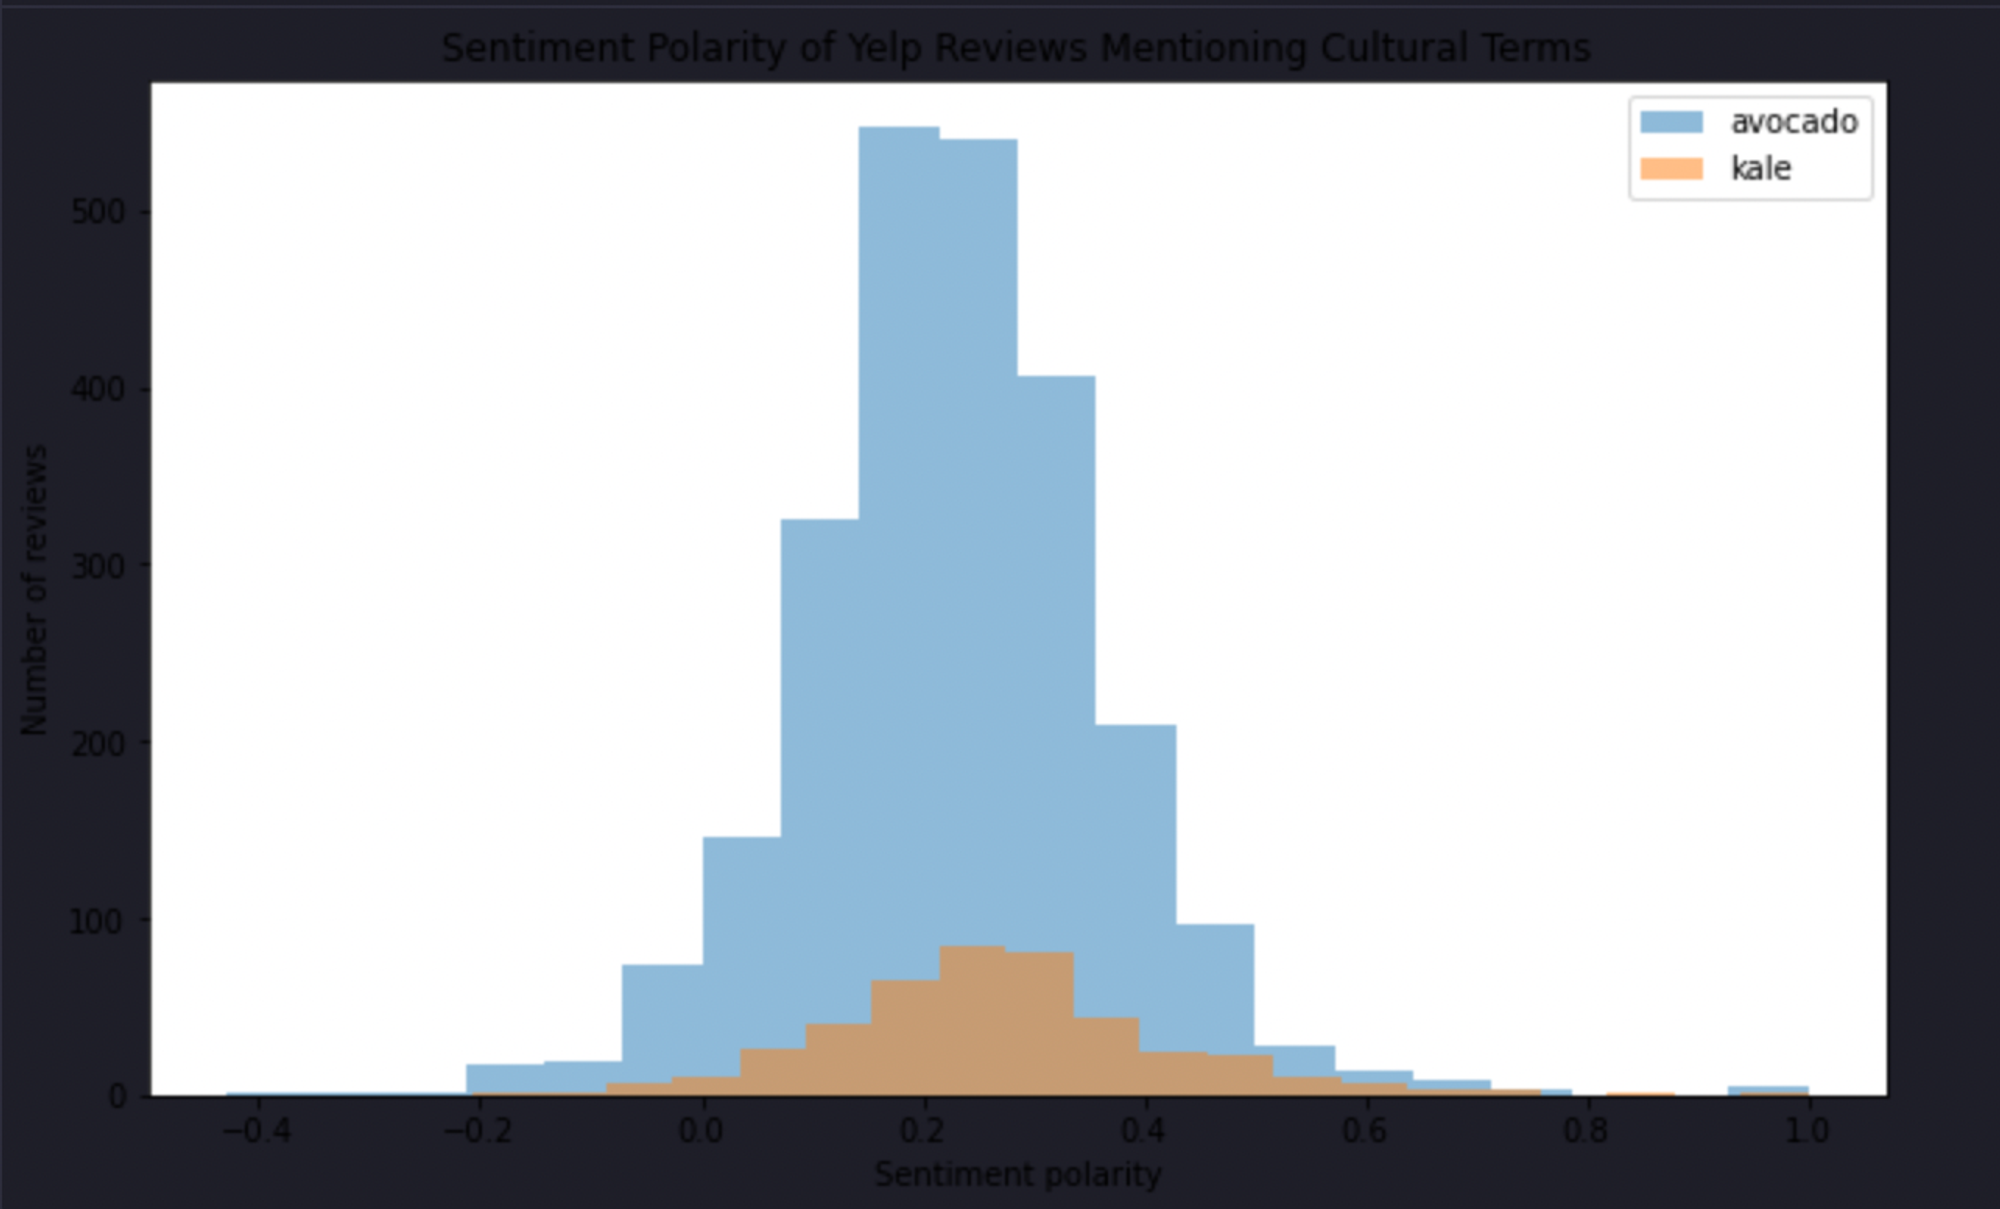
Review Ratings
Finally, we'll quickly look at the reviews-of-reviews given by other readers on whether a review was useful, funny, or cool. Do these correlate to sentiment— or to one another? To do so, you can simply use the corr() method to calculate the correlation among features like polarity, useful, funny, and cool.
reviews[['funny', 'useful', 'cool']] = pd.DataFrame(reviews['votes'].tolist())

# Calculate the correlation between the sentiment polarity and the number of votes
correlations = reviews[['polarity', 'useful', 'funny', 'cool']].corr()

# Display the correlations
correlations
The above image clearly states that the overall review sentiment (polarity) has a weak negative correlation with the number of useful and funny votes and a very weak negative correlation with the number of cool votes.
Similarly, You can also calculate the correlation between polarity and stars features as follows:
# Calculate the correlation between the sentiment polarity and the number of stars
correlation = reviews[['polarity', 'stars']].corr()

# Display the correlation
correlation
As you can observe, these two features are correlated which makes sense as sentiment reviews directly reflect the ratings that users provide.
This is it! now you have your own Yelp data sentiment analysis system.
Python Packages for Sentiment Analysis
We’ve used a number of Python packages above to perform our sentiment analysis. But there’s more! These packages serve as invaluable tools, offering a diverse set of functionalities to process and analyze textual data, making the sentiment analysis journey more accessible and efficient.
NLTK (Natural language toolkit)
NLTK, or the Natural Language Toolkit, is a powerful Python package designed to facilitate natural language processing tasks. NLTK is particularly valuable in sentiment analysis, where it simplifies complex tasks such as tokenization, stemming, and lemmatization. Below are the steps on how NLTK can perform sentiment analysis.
- NLTK is very useful for performing the basic preprocessing steps where it provides easy-to-use functions for text cleaning, tokenization, and lowercasing.
- It provides methods for extracting essential features from the text and converting it into a format suitable for analysis. Techniques like bag-of-words or TF-IDF (Term Frequency-Inverse Document Frequency) can be effortlessly implemented using NLTK's functionalities.
- Pre-trained models and classifiers in NLTK categorize text into positive, negative, or neutral sentiments. Custom classifiers can be trained as well.
- NLTK includes lexicons, such as the WordNet sentiment lexicon
- , which assigns sentiment scores to words. By utilizing these lexicons, NLTK enables a lexicon-based approach to sentiment analysis.
- It seamlessly integrates with machine learning models (e.g., Naive Bayes
- ), allowing users to train models on labeled datasets for improved sentiment predictions.
- NLTK provides tools to evaluate sentiment analysis models, assessing accuracy, precision, recall, and F1 score.
Spacy
Spacy specializes in providing advanced linguistic annotations and is widely recognized for its ease of use and integration capabilities. In the context of sentiment analysis, Spacy offers a powerful toolset to process and analyze textual data, contributing to a streamlined and effective sentiment analysis workflow. Below is the procedure for how Spacy can be leveraged to build a sentiment analyzer.
- Spacy excels in basic text processing, like breaking down sentences into words and identifying parts of speech.
- Its annotations help extract essential features from the text, providing valuable insights for sentiment analysis.
- Its parsing capability helps understand how words in a sentence relate.
- Spacy identifies and categorizes entities (like names or locations), enhancing analysis with specific elements.
TextBlob
TextBlob is a simplified and user-friendly natural language processing library in Python. It incorporates pre-trained models and lexicons, making sentiment analysis accessible without the need for extensive configuration. A standard approach to perform the sentiment analysis with TextBlob is as follows:
- Begin by creating a TextBlob object with the text data you want to analyze. TextBlob automatically processes the text and prepares it for sentiment analysis.
- Use sentiment. polarity to get a number (-1 to 1) indicating sentiment polarity (negative to positive).
- Utilize sentiment subjectivity to determine subjectivity (0 to 1, objective to subjective).
- Analyze polarity and subjectivity values. Positive polarity suggests positivity, negative implies negativity, and subjectivity measures how opinionated the text is.
Vader
The rule-based sentiment analysis tool VADER, which stands for Valence Aware Dictionary and Sentiment Reasoner, is intended for text found on social networking platforms. VADER is unique in that it is sensitive to the strength and polarity of textual expressions of sentiment. This tool is a useful resource for sentiment analysis jobs in social media platforms since it excels at handling brief and informal texts that are frequently encountered there. The steps of using Vader for sentiment analysis are listed below.
- Begin by installing the VADER sentiment analysis library in your Python environment. You can install it using a package manager like pip.
- Import the VADER module and initialize the sentiment analyzer.
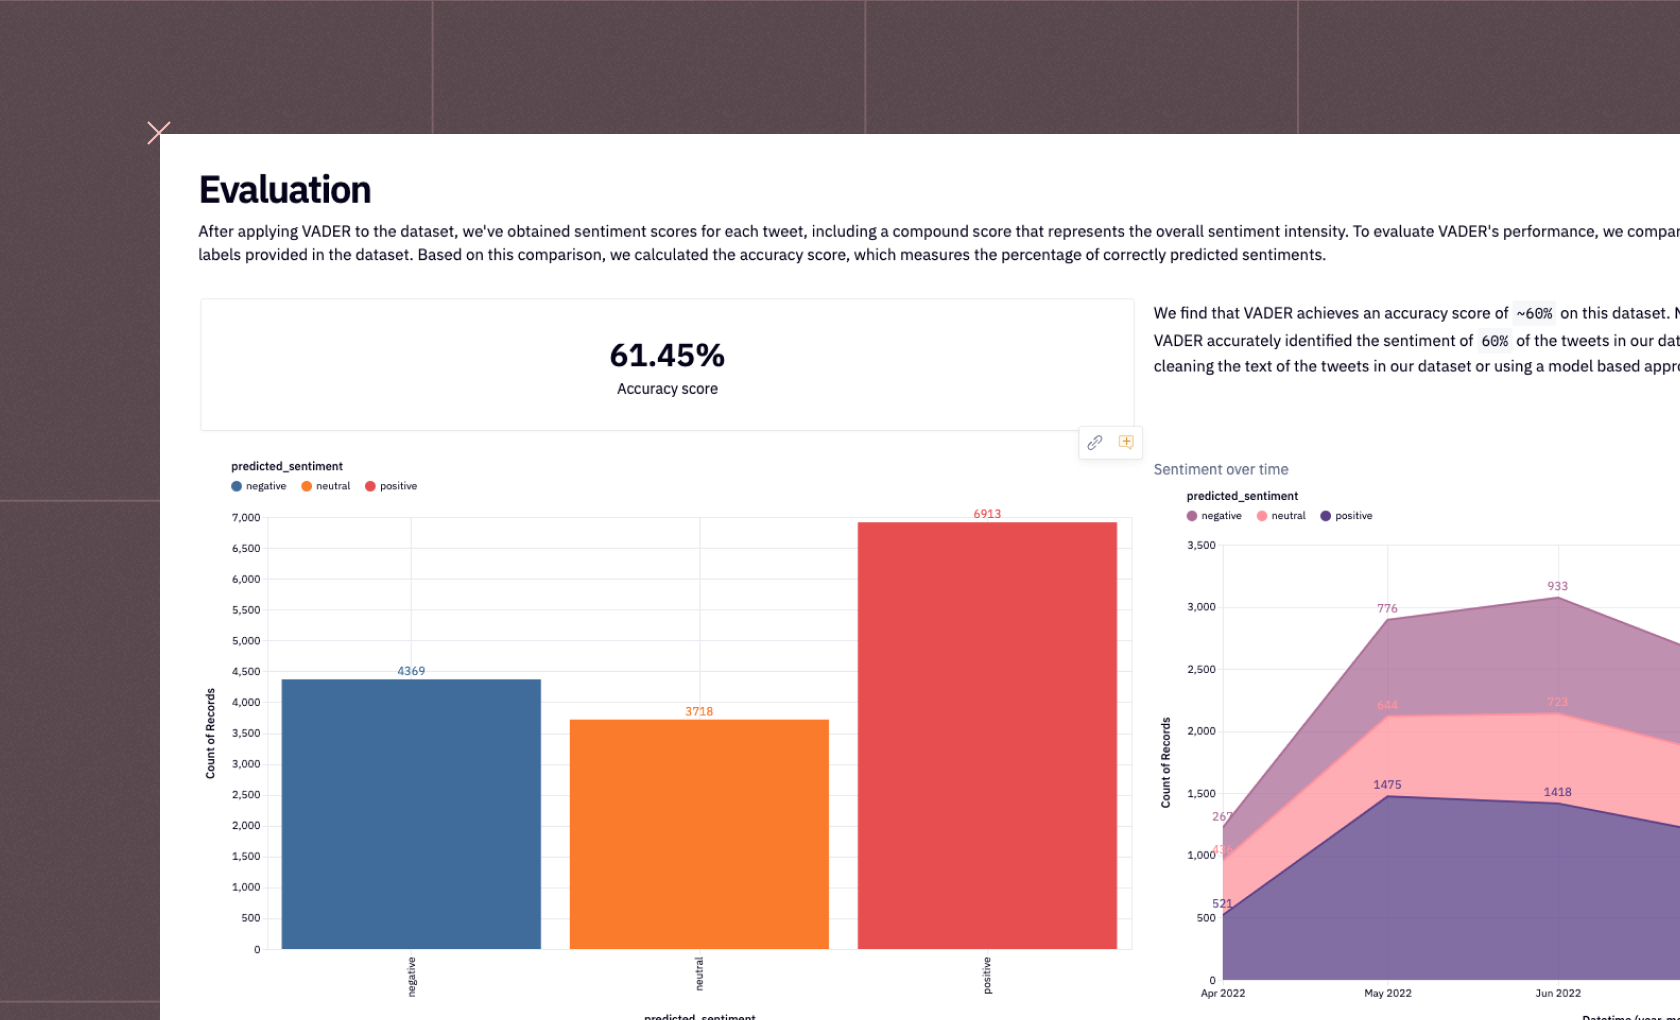
- Utilize the VADER sentiment analyzer to score the sentiment of the text. VADER provides a compound score that represents the overall sentiment intensity.
- Interpret the compound score to understand the sentiment. Positive scores indicate positive sentiment, negative scores denote negativity, and scores around zero suggest neutrality.
- Optionally, fine-tune the analysis by adjusting parameters or thresholds based on specific requirements or domain-specific characteristics.
Scikit-Learn
Scikit-Learn is a flexible machine-learning library for Python that is sometimes shortened to sklearn. Although Scikit-Learn is primarily concerned with machine learning, it offers functions and tools that are useful for sentiment analysis work. A general approach to building the sentiment classifier using machine learning algorithms would include the following steps:
- Prepare a labeled dataset with texts and corresponding sentiment labels (positive, negative, or neutral).
- Use Scikit-Learn's text feature extraction methods like TF-IDF or CountVectorizer
- to convert text data into numerical features suitable for machine learning.
- Choose a machine learning model from Scikit-Learn, such as Naive Bayes or Support Vector Machines, suitable for sentiment analysis.
- Train the selected model on your labeled dataset using Scikit-Learn's straightforward API, providing text features and sentiment labels.
- Assess the model's performance using Scikit-Learn's functions for metrics like accuracy, precision, recall, and F1 score.
- Once trained, use the model to predict sentiments for new text data, enabling efficient sentiment analysis.
Gensim
Gensim is used for document similarity analysis and topic modeling. Although Gensim's main focus is on unsupervised learning tasks such as topic modeling, it can also be used for sentiment analysis tasks because it has text processing and vector space modeling functionalities. Gensim is especially helpful in situations where sentiment analysis goals are aligned with a topic extraction focus. A simple sentiment classifier built using Gensim will have the following stages:
- Begin by cleaning and preprocessing the text data. Gensim supports techniques like tokenization, stop word removal, and stemming.
- Train a Gensim model, such as the Latent Semantic Analysis (LSA) or Latent Dirichlet Allocation (LDA), on the numerical representation of the text. Gensim's models are designed for unsupervised learning tasks.
- Extract topics from the trained model. In sentiment analysis, these topics can provide insights into the main themes expressed in the text.
- If sentiment analysis is a primary goal, consider evaluating and refining the results using additional sentiment-specific techniques or models.
Tensorflow
Google created the open-source machine learning library TensorFlow. Tasks involving sentiment analysis that require the capability of deep learning architectures are a good fit for TensorFlow. You can build a simple deep-learning neural network for sentiment analysis as follows:
- Prepare a labeled dataset with text samples and corresponding sentiment labels (positive, negative, or neutral).
- Use TensorFlow's text preprocessing tools to convert the text into numerical representations. Common techniques include tokenization and padding.
- Design a neural network architecture suitable for sentiment analysis. This typically involves embedding layers, recurrent or convolutional layers, and output layers.
- Compile the model by specifying the optimizer, loss function, and metrics. This step configures the training process.
- Train the sentiment analysis model using the labeled dataset. TensorFlow's flexibility allows the creation of various architectures, from simple to complex.
Pytorch
Facebook created the open-source machine learning library PyTorch. PyTorch is an effective tool for sentiment analysis since it works well for creating deep learning models, such as neural networks, and thrives at jobs involving dynamic processing graphs. You can build a simple deep-learning neural network for sentiment analysis using Pytorch as follows:
- Prepare a dataset with text samples and corresponding sentiment labels.
- Use PyTorch for text preprocessing to convert text into numerical representations, like tokenization.
- Design a neural network for sentiment analysis, tailoring it to project requirements.
- Set up the sentiment analysis model using PyTorch's neural network modules.
- Train the model on the dataset using PyTorch's automatic differentiation for efficient backpropagation.
- Evaluate model performance on a validation set using metrics like accuracy, precision, recall, and F1 score.
Sentiment analysis is one of those techniques it is great to have in your toolbox as a data analyst. It allows you to understand how your business, product, or team are perceived by users and public and then act on that information. Given the wealth of tools available to you to build not just basic good/bad sentiment analysis but sophisticated sentiment engines, there is no excuse not to have this technique running on your data all the time.
See what else Hex can do
Discover how other data scientists and analysts use Hex for everything from dashboards to deep dives.
Ready to get started?
You can use Hex in two ways: our centrally-hosted Hex Cloud stack, or a private single-tenant VPC.