Blog
What is the Jupyter kernel, and how does it work?
Learn how the computational engine for notebooks functions.

REPL. One of those acronyms developers love. Like CRUD, API, or “YOLO it straight to production on a Friday.”
It stands for Read-Evaluate-Print Loop and you’ll have come across how it works if you’ve ever typed “python” into your terminal and hit return:
you@your-computer ~ % python
Python 3.10.8 (main, Sep 14 2023, 22:22:30) [Clang 14.0.0 (clang-1400.0.29.202)] on darwin
Type "help", "copyright", "credits" or "license" for more information.
>>>
You get the >>> and you can type any python command there:
>>> print("hello world")
hello world
>>>
The python interpreter has read your input, evaluated it, and printed out the response. The loop is now ready to go again.
It does this serially. Read, then evaluate, then print. But it’s 2023. Can’t we do things in parallel now? Yes, we can.
This is what notebooks do. Notebooks decouple the evaluation from the read and print. This is why you can continue to use a Jupyter notebook while it’s still evaluating the cell you just ran.
The frontend handles the reading, printing, and anything the user sees or does. The evaluation is handled by the kernel. That’s what the kernel is—a computational engine for your Jupyter code.
Decoupling the IO from the computation has several benefits. Let’s go through them, and then we’ll see how the kernel actually works and have a go at building our own!
The benefits of kernels that you probably don’t use
The main benefit for most users of using the kernel is this workflow that comes from the decoupling model. You can continue to write and execute code while other code is executing.
This parallel execution with kernels allows you to run multiple code cells at the same time and speeds up the execution of your code. If cell 2 relies on cell 1, you still have to wait for the initial cell to complete evaluation before running cell 2, but this model increases interactivity overall. The kernel allows you to execute code in real time, which enables you to test and debug your code quickly.
But this better UX wasn’t the critical idea behind the kernel model. It’s a nice-to-have. There are two other core reasons why this decoupled approach is so valuable, which 99% of notebook users don’t notice or don’t use:
- More frontends. Decoupling the computational unit from the input and output means you can have more inputs and outputs. This is a benefit of notebooks used but seldom noticed. When you create a Jupyter notebook, you connect to a kernel. But if you’re like me, you’ll have a number of notebooks on the go at the same time. They are all connected to the same kernel. One computational unit is doing the work for all your notebooks. And the front end doesn’t have to be a notebook. You can use the kernel in the terminal IPython, or via a desktop GUI IPython QTconsole.
- More backends. When you start the default kernel in Jupyter, you are starting the IPython kernel. But Jupyter notebooks are language-agnostic. Though we colloquially think of them as “python notebooks,” they can be Julia notebooks, or R notebooks (The “Ju” and “r” of Jupyter, respectively. The “pyt” comes from Python. These were the first three kernels available for Jupyter), or SCALA notebooks, or TypeScript notebooks. You can install different kernels for different languages and types of computation. This is one of the reasons they are no longer called iPython notebooks—the python component is just one part.
Two other benefits of the kernel model are isolation, with each kernel running in its own separate process, which allows for better security and stability, and improved performance as the kernel can be optimized for performance to make the execution of your code faster and more efficient.
How the kernel communicates
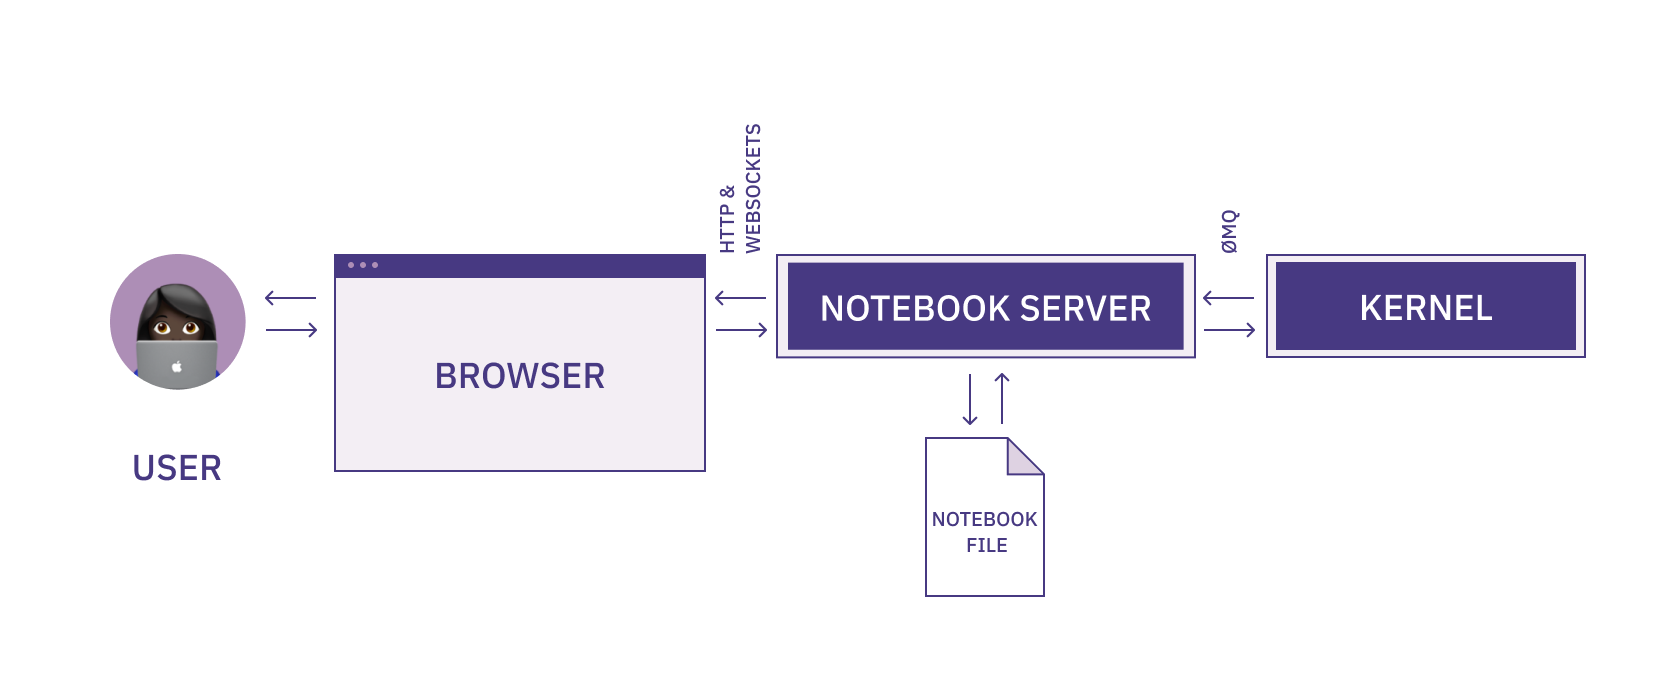
The Jupyter kernel architecture consists of several components that work together to execute code, manage the execution environment, and communicate with the frontend.
Here is a high-level overview of the Jupyter kernel architecture:
- The kernel process is a standalone process that runs in the background and executes the code that you write in your notebooks. The kernel process is responsible for running the code and returning the results to the frontend.
- The kernel manager is a component that manages the lifecycle of the kernel process. It is responsible for starting, stopping, and restarting the kernel process as needed.
- The kernel gateway is a web server that exposes the kernel's functionality over HTTP. The kernel gateway is used to connect the kernel to the frontend (i.e., the web-based interface that you use to interact with the notebook) over a network connection.
The communication between the frontend and the kernel is done using WebSockets and ZeroMQ
WebSockets is a protocol that enables bidirectional communication between a client (such as a web browser) and a server over a single, long-lived connection. It allows the client and server to send messages to each other at any time, rather than in response to a request as in traditional HTTP communication.
With Jupyter, the frontend acts as the client, and the kernel acts as the server. The frontend and kernel communicate over a WebSockets connection, which enables them to send messages back and forth in realtime as you work with your notebooks.
The WebSockets connection is established when you start a new kernel and open a new notebook. The frontend sends a request to the kernel to start a new kernel process, and the kernel responds by opening a WebSockets connection and sending a message back to the frontend to confirm that the connection has been established.
Here’s how that looks:
Within the computational heart of iPython, ZeroMQ is used. ZeroMQ (or 0MQ) is a high-performance, asynchronous messaging library that is used to facilitate communication between processes.
When you start a new kernel and open a new notebook, the kernel starts a ZeroMQ server that listens for incoming connections. The Jupyter server connects to ZeroMQ and establishes a communication channel.
The Jupyter kernel has five sockets implemented using ZeroMQ that are used to communicate with the frontend interface:
- Shell socket: This socket is used for executing code and introspection.
- IOPub socket: This socket is used for publishing the results of code execution, including the output of the code and any error messages.
- Stdin socket: This socket is used for receiving input from the user, such as when the user is prompted to enter input using the input() function in Python.
- Control socket: This socket is used for controlling the kernel, such as interrupting execution or restarting the kernel.
- HB (Heartbeat) socket: This socket is used for monitoring the health of the kernel. The frontend interface sends regular messages to the kernel over this socket to check that the kernel is still responsive, and the kernel responds to each message to confirm that it is still running.
How the kernel works
The best way to understand how the kernel works is to build one.
It’s easy. Well, kinda. Jupyter provides a Metakernel Python wrapper for generating kernels that reuse IPython functionality. If you want to write a bespoke Python kernel for some particular reason or write a kernel for a language that has kernel bindings, you can get your own kernel fairly easily.
Here’s an example from the Jupyter documentation. All it does is echo whatever you wrote in a cell, but it has all the functionality to do much more. Let’s go through it piece by piece to show what’s happening.
First, some setup. First, create a new virtual environment for tidiness:
python -m venv envThen activate the environment:
source env/bin/activateThen install jupyter:
pip install jupyterNow you can run jupyter and get a notebook up and running:
jupyter notebookWhen you try to create a new kernel, you’ll only have the default option of the ipykernel:
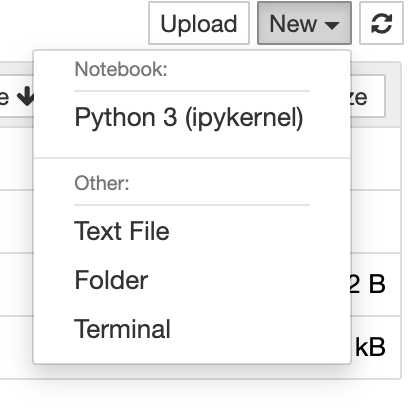
But we can add our own! Let’s use the basic Jupyter echo example to show how easy it is.
Create a file called echo_kernel.py. The first thing we need to do is import the Kernel class from ipykernel:
from ipykernel.kernelbase import KernelThen we can create our own extension of this class, Echokernel:
class EchoKernel(Kernel):After that, we need the implementation information. This is what would be returned if the client needs to know about the kernel:
implementation = 'Echo'
   implementation_version = '1.0'
   language = 'no-op'
   language_version = '0.1'
   language_info = {
       'name': 'Any text',
       'mimetype': 'text/plain',
       'file_extension': '.txt',
   }
   banner = "Echo kernel - as useful as a parrot"
Then we’re on to where the execution happens, the do_execute function:
def do_execute(self, code, silent, store_history=True, user_expressions=None, allow_stdin=False):
       if not silent:
           stream_content = {'name': 'stdout', 'text': code}
           self.send_response(self.iopub_socket, 'stream', stream_content)

       return {'status': 'ok',
               # The base class increments the execution count
               'execution_count': self.execution_count,
               'payload': [],
               'user_expressions': {},
               }
OK, let’s go through what’s happening here. We’re passing a number of parameters to do_execute, but the only important ones here are code which is our code to be executed, and silent because we’re using that within our catch statement to execute our statement.
If silent is true we move within our if statement. All we’re doing here is adding our code to the stream_content object and then sending that object back to the frontend using our IOPub socket. So this is just an echo–receive of some text (called code here because that is what a kernel is expecting) and then send it right back.
You can see if that the code the kernel received from the frontend was actually code, you could execute it here and then send the output back to the frontend. All the magic of a kernel is contained in the do_execute function.
We also return that object with status and execution_count. That execution_count is going to be used to increment the run count for your cells on the frontend.
That’s it. We’ll call it with if __name__ == '__main__':
if __name__ == '__main__':
   from ipykernel.kernelapp import IPKernelApp
   IPKernelApp.launch_instance(kernel_class=EchoKernel)
Here’s all that code together:
from ipykernel.kernelbase import Kernel
class EchoKernel(Kernel):
   implementation = 'Echo'
   implementation_version = '1.0'
   language = 'no-op'
   language_version = '0.1'
   language_info = {
       'name': 'Any text',
       'mimetype': 'text/plain',
       'file_extension': '.txt',
   }
banner = "Echo kernel - as useful as a parrot" def do_execute(self, code, silent, store_history=True, user_expressions=None,
allow_stdin=False):
if not silent:
stream_content = {'name': 'stdout', 'text': code}
self.send_response(self.iopub_socket, 'stream', stream_content)
return {'status': 'ok',
# The base class increments the execution count
'execution_count': self.execution_count,
'payload': [],
'user_expressions': {},
}
if __name__ == '__main__':
from ipykernel.kernelapp import IPKernelApp
IPKernelApp.launch_instance(kernel_class=EchoKernel)We need one more file, a JSON, kernel.json, that will be stored in a ‘echo_kernel’ directory:
//echo_kernel/kernel.json
{
"argv": ["python", "-m", "echo_kernel", "-f", "{connection_file}"],
       "display_name": "Echo"
}
This is how we’re going to install our kernel. Call:
jupyter kernelspec install --user echo_kernel And you’ll have your very own kernel ready to use. Refresh your jupyter notebook and you should see:
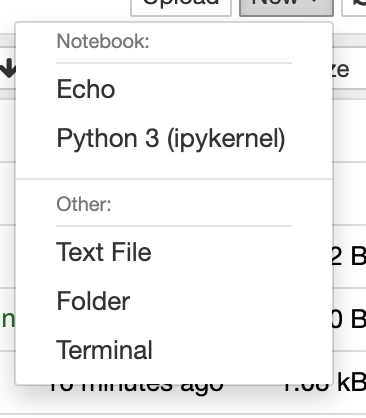
Excellent. Use it to create a new notebook and then type anything into the first cell and run. Whatever you typed will be echoed in the output:
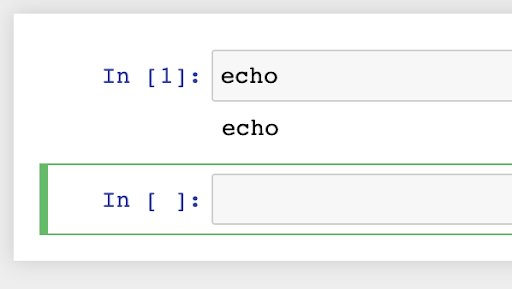
Echo, echo, echo, echo. OK, so this isn’t doing much, but you can see the potential. That do_execute loop can contain anything and will run any code you pass from your Jupyter frontend. That is how kernels work.
The Jupyter compute stack
When you press “Run” in Jupyter it is the Kernel that is running. It is abstracting away all of the above and making it as simple as possible for analysts to run code–whether that is straightforward number-crunching, sophisticated modeling, or beautiful visualizations. The IPython kernel with Jupyter can do it all.
Understanding how this system works should get you to appreciate the layers of complexity that make your data analysis possible. With this understanding, you can better anticipate potential issues and challenges that might occur, identify their sources more accurately, and find effective solutions.
Moreover, knowing the inner workings can also lead to optimization. Even though Jupyter abstracts away most of the complexity, your analysis can still benefit from mindful data handling, efficient coding practices, and wise utilization of computational resources. This can improve the speed and efficiency of your analyses, helping you get the most out of your notebook.
Finally, it deepens your knowledge and mastery of the tool. As you become more proficient in understanding the technology that powers your notebooks, you can leverage this understanding to extend the capabilities of your analyses, experiment with advanced functionalities, and ultimately, unlock the full potential of your data storytelling.
Want to learn more about Jupyter notebooks?
Here are some of our other articles:


