Named Entity Recognition
Unearth insights from your business text data using Named Entity Recognition (NER). Leverage Python libraries like SpaCy or NLTK, or employ SQL queries for precise entity...
How to build: Named Entity Recognition
Build Named Entity Recognition To Extract Your Most Important Data
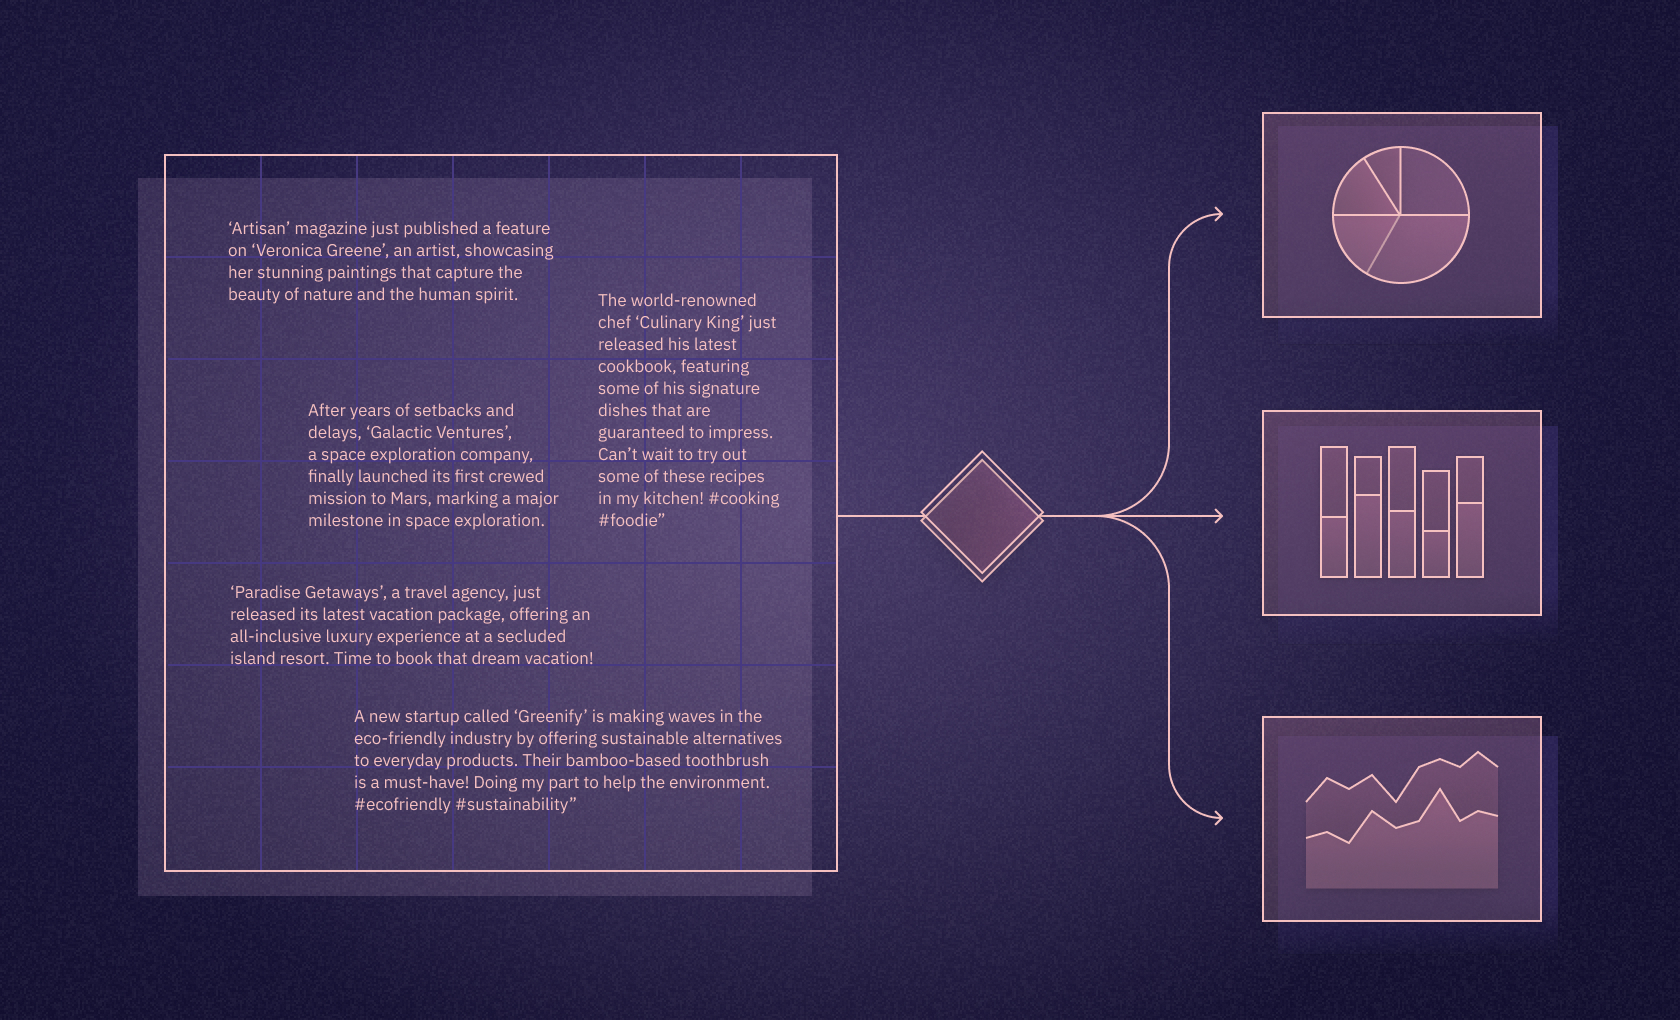
Imagine going through a ton of financial reports, news stories, or social media data and picking out the important players, places, and events in addition to the words. That's the power of Named Entity Recognition, orNER, a technology that makes it possible for computers to decipher the "who, what, when, and where" that are concealed in text. Imagine it as your assistant going through documents and emphasizing names, places, and organizations that are significant, saving you countless hours of manual effort.
But, why is NER so important? Businesses are drowning in text data in today's data-driven environment. It's critical to analyze this data to spot trends, track competitors, and understand customer sentiment. Nevertheless, it is almost impossible to manually identify significant things in large textual collections. By automating this process and collecting insightful data in a matter of seconds, NER helps businesses make faster and more informed decisions. With powerful Python libraries like spaCy and NLTK, anyone can leverage NER's power.
This article will be your guide to learn more about this fascinating technology. We'll delve into the basics of NER, understand its significance, and uncover practical ways to implement it using Python and Hex. We'll also discuss the best practices to ensure success. So be set to use Named Entity Recognition to uncover the mysteries hidden in your text data and go on an exciting adventure of exploration!
Understanding Named Entity Recognition
At its core, Named Entity Recognition is essentially a linguistic detective system whose job it is to locate and classify particular entities in a given text. NER might sound complex, but its core concept is quite intuitive. Imagine you're reading a news article about a recent movie release. With each sentence, your brain automatically identifies and categorizes key elements:
Who: The actors, director, and maybe even fictional characters are mentioned.What: The movie title, genre, and any awards it might have won.When: The release date or upcoming premiere.Where: The filming location or specific scenes mentioned.
Think of a phrase as a puzzle, with the entities being the unique pieces that are yet to be found. NER is quite good at identifying these puzzle parts, including names of individuals, locations, businesses, dates, and more.
How Does NER Identify and Classify Entities in Text Data?
Now that we understand the basic concept of NER, let's delve deeper and witness the magic behind the scenes. Imagine a sentence like "Barack Obama, the former president of the United States, visited his hometown of Honolulu, Hawaii." We'll follow how NER identifies and classifies the entities here:
Text Preparation: The journey begins with cleaning the text. Punctuation, extra spaces, and special characters are eliminated, making the text more structured for analysis. Think of it as tidying up your room before inviting guests. This step also includes the concept of tokenization which forms the groundwork, providing NER with the building blocks for analysis.
Feature Extraction: The NER system acts like a detective, extracting clues from the text. It examines individual words and their relationships, looking for patterns that might indicate an entity. NER proceeds to assign part-of-speech tags to each token, discerning their grammatical roles within the sentence. This step lays the foundation for understanding the contextual significance of each element. Here's what it finds:
Classification: The detective now uses its knowledge (machine learning models or pre-defined rules) to analyze the clues and make deductions. It recognizes "Barack Obama" as a person and "United States" as a location based on their features and patterns. NER utilizes linguistic patterns to identify sequences of tokens that exhibit characteristics of specific entities. These patterns act as clues, guiding NER to potential entities within the text.
Entity Labeling: Finally, the identified entities are tagged with their types. "Barack Obama" receives the "PER" (person) label, while "The United States" gets the "LOC" (location) label. This labeling allows the system to understand the roles these entities play within the sentence.
The Bigger Picture: The NER system doesn't work in isolation. It analyzes the entire sentence, considering the context and relationships between words. This helps it identify entities like "former president" (an organization role) and "hometown" (a location related to a person).
Python Libraries for NER
SpaCy and NLTK are prominent Python libraries for natural language processing (NLP), including named entity recognition (NER), each with unique strengths:
SpaCy
Purpose: Designed for production-level NLP tasks, emphasizing efficiency and accuracy.
Key Features: Offers pre-trained NER models, customizable for domain-specific accuracy, and advanced NLP capabilities such as part-of-speech tagging and dependency parsing. Optimized for fast processing of large text volumes.
Usage: Suitable for extracting a wide range of entity types accurately and integrating into comprehensive NLP workflows.
NLTK
Purpose: A broad toolkit for various NLP tasks, including NER, with a focus on flexibility and resource availability.
Key Features: Features a modular approach for task-specific module selection, extensive resources and community support, customizable models, and compatibility with other NLP libraries.
Usage: Identifies multiple entity types and supports multilingual processing, offering a more manual and flexible configuration compared to SpaCy's ready-to-use models.
Both libraries cater to different needs within the NLP and NER domains: SpaCy is tailored for streamlined, efficient processing with minimal setup, while NLTK provides comprehensive tools and resources for a more exploratory and customized approach to NER and other NLP tasks.
Named Entity Recognition with Python and Hex
Now that you have detailed knowledge about NER, it is time to see some practical implementation. In this section, you will perform a Comparative NER Analysis of Russian and American Literature using Python and Hex. Hex is a development environment that provides you with both code and no-code functionalities to create different apps and dashboards. It is a polyglot platform which means that you can use different programming languages in the same development environment. It also supports connection to different databases and data warehouses to easily read and write data. With Hex, it becomes easy to conduct deep-dive analyses like comparison of entity profiles across famous Russian and American authors (spoiler: Chekhov likes "EVENTS"). Hex makes your textual data exploration more efficient and intuitive and transforms the way you understand your data.
For this article, we will be using Python 3.11 for writing code, and Hex as a development environment. We will analyze each author's focus on characters, geography, time, organizations, and cultural artifacts. Our goal is to calculate some degree of association with each focus for each text/author, and then compare and contrast the findings across them. The authors and their works we will be analyzing are:Russian Literature:
Fyodor Dostoevsky - 'Crime and Punishment', 'The Brothers Karamazov'
Leo Tolstoy - 'War and Peace', 'Anna Karenina'
Anton Chekhov - 'The Cherry Orchard', 'Three Sisters'
American Literature:
Mark Twain - 'Adventures of Huckleberry Finn', 'The Adventures of Tom Sawyer'
Ernest Hemingway - 'The Old Man and the Sea', 'A Farewell to Arms'
F. Scott Fitzgerald - 'The Great Gatsby', 'Tender Is the Night'
Install and Load Dependencies
To begin with, we need to make sure that the dependencies that we are going to use are present in the Hex environment. Although Hex contains a lot of pre-trained ML and visualization libraries if the libraries are missing, you can install them using pip as follows:
pip install pandas matplotlib seaborn
pip install nltk
pip install spacy
You also need to install some additional requirements for the Spacy library with the help of the following command:
! python -m spacy download en_core_web_smOnce the dependencies and requirements are installed, you can load them in the Hex environment as follows:
import spacy
import nltk
from nltk.corpus import gutenberg
from nltk.tokenize import sent_tokenize, word_tokenize
from collections import Counter
import pandas as pd
from spacy import displacy
from collections import Counter
import en_core_web_sm
import matplotlib.pyplot as plt
import seaborn as sns

# Set the style of the visualization
sns.set(style='darkgrid')

# Set the size of the figure
plt.figure(figsize=(10, 5))

nlp = spacy.load('en_core_web_sm')
The pandas library will help us read and manipulate the data, matplotlib and seaborn will help us visualize the data while nltk and spacy will actually be used for NER.
Load and Preprocess Data
For this project, we will be using Project Gutenberg's collection of public domain books. We will load the texts, preprocess them, and then apply our get_entities() function to extract the entities.
For reading the data, we will be using the most popular requests package of Python. Once the data is retrieved, as part of data preprocessing, we will remove unwanted new line and tab characters from the text and will filter the text using the *** START OF and *** END OF strings.
import requests
import pandas as pd

# Define the URLs of the texts to be analyzed
urls = {
	'Moby Dick': '<https://www.gutenberg.org/files/2701/2701-0.txt>',
	'Little Women': '<https://www.gutenberg.org/files/37106/37106-0.txt>',
	'The Scarlet Letter': '<https://www.gutenberg.org/files/25344/25344-0.txt>',
	'The Great Gatsby': '<https://www.gutenberg.org/files/64317/64317-0.txt>',
	'Huckleberry Finn': '<https://www.gutenberg.org/files/76/76-0.txt>',
	'Adventures of Tom Sawyer': '<https://www.gutenberg.org/files/74/74-0.txt>',
	'Crime and Punishment': '<https://www.gutenberg.org/files/2554/2554-0.txt>',
	'Brothers Karamazov': '<https://www.gutenberg.org/files/28054/28054-0.txt>',
	'War and Peace': '<https://www.gutenberg.org/files/2600/2600-0.txt>',
	'Anna Karenina': '<https://www.gutenberg.org/files/1399/1399-0.txt>',
	'Chekhov': '<https://www.gutenberg.org/files/13415/13415.txt>'
}

# Define a function to download and preprocess the text
def download_and_preprocess_text(url):
	try:
    	r = requests.get(url)
    	text = r.text
    	# Remove unwanted new line and tab characters from the text
    	for char in ["\\\\n", "\\\\r", "\\\\d", "\\\\t"]:
        	text = text.replace(char, " ")
    	# Subset for the book text (removing the Project Gutenberg introduction/footnotes)

    	start = text.find('*** START OF')
    	print(start)
    	end = text.find('*** END OF')
    	print(end)
    	text = text[start:end]
    	return text
	except Exception as e:
    	print(f'Error occurred: {e}')
    	return None

# Download and preprocess the texts
texts = {title: download_and_preprocess_text(url) for title, url in urls.items()}

# Convert the dictionary to a DataFrame
df_texts = pd.DataFrame.from_dict(texts, orient='index', columns=['text'])
df_texts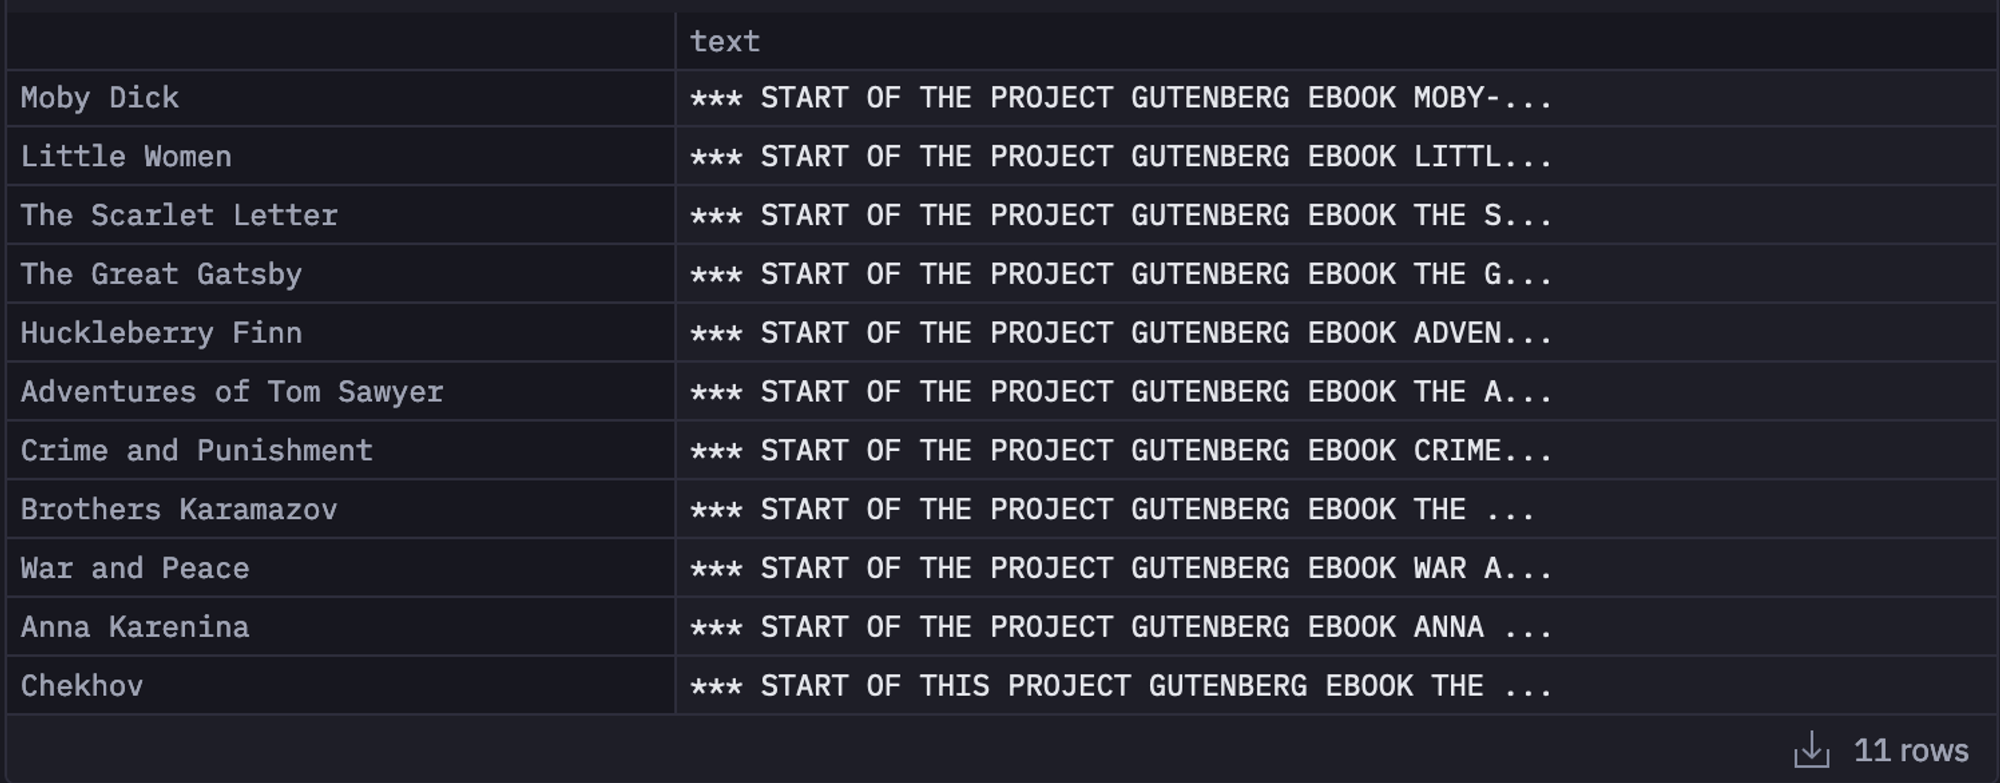
In the above code, we have first defined a set of URLs to extract data from, and then we have created a dictionary of text extracted from different websites using the download_and_preprocess_text() method.
Next, we are going to extract the entities from the text data. To do so, we will iterate over the text and use the nlp object from spacy to identify different entities in the text (NER processing). Then store the results such as text, start_char, end_char, and label_ to a list. Finally, we need to store the entire list inside a pickle file (texts_entities.pkl) for further use.
import os
import pickle

# Check if the file "texts_entities.pkl" exists
if os.path.exists("texts_entities.pkl"):
	# If it exists, load the file into a pandas DataFrame
	with open("texts_entities.pkl", "rb") as f:
    	df_texts = pickle.load(f)
else:
	# If it doesn't exist, define a function to extract entities from a given text
	def extract_entities(text):
    	# Split the text into chunks of 100,000 characters
    	chunks = [text[i : i + 100000] for i in range(0, len(text), 100000)]
    	entities = []
    	# Process each chunk with the NLP model
    	for chunk in chunks:
        	doc = nlp(chunk)
        	# Extract entities from the processed chunk and add them to the entities list
        	entities.extend(
            	[
                	(ent.text, ent.start_char, ent.end_char, ent.label_)
                	for ent in doc.ents
            	]
        	)
    	return entities

	# Apply the extract_entities function to each text in the DataFrame
	df_texts["entities"] = df_texts["text"].apply(extract_entities)
	# Save the DataFrame with extracted entities to a pickle file
	with open("texts_entities.pkl", "wb") as f:
pickle.dump(df_texts, f)Then you can use the collection module of Python and count the number of entities detected by spacy. We will also be storing it in the entity_type_counts column in our dataframe.from collections import Counter
def count_entity_types(entities):
# Extract the entity types from the entities
entity_types = [entity[3] for entity in entities]
# Count the occurrences of each entity type
entity_type_counts = Counter(entity_types)
return dict(entity_type_counts)
# Count the occurrences of each entity type in each text
df_texts['entity_type_counts'] = df_texts['entities'].apply(count_entity_types)
df_texts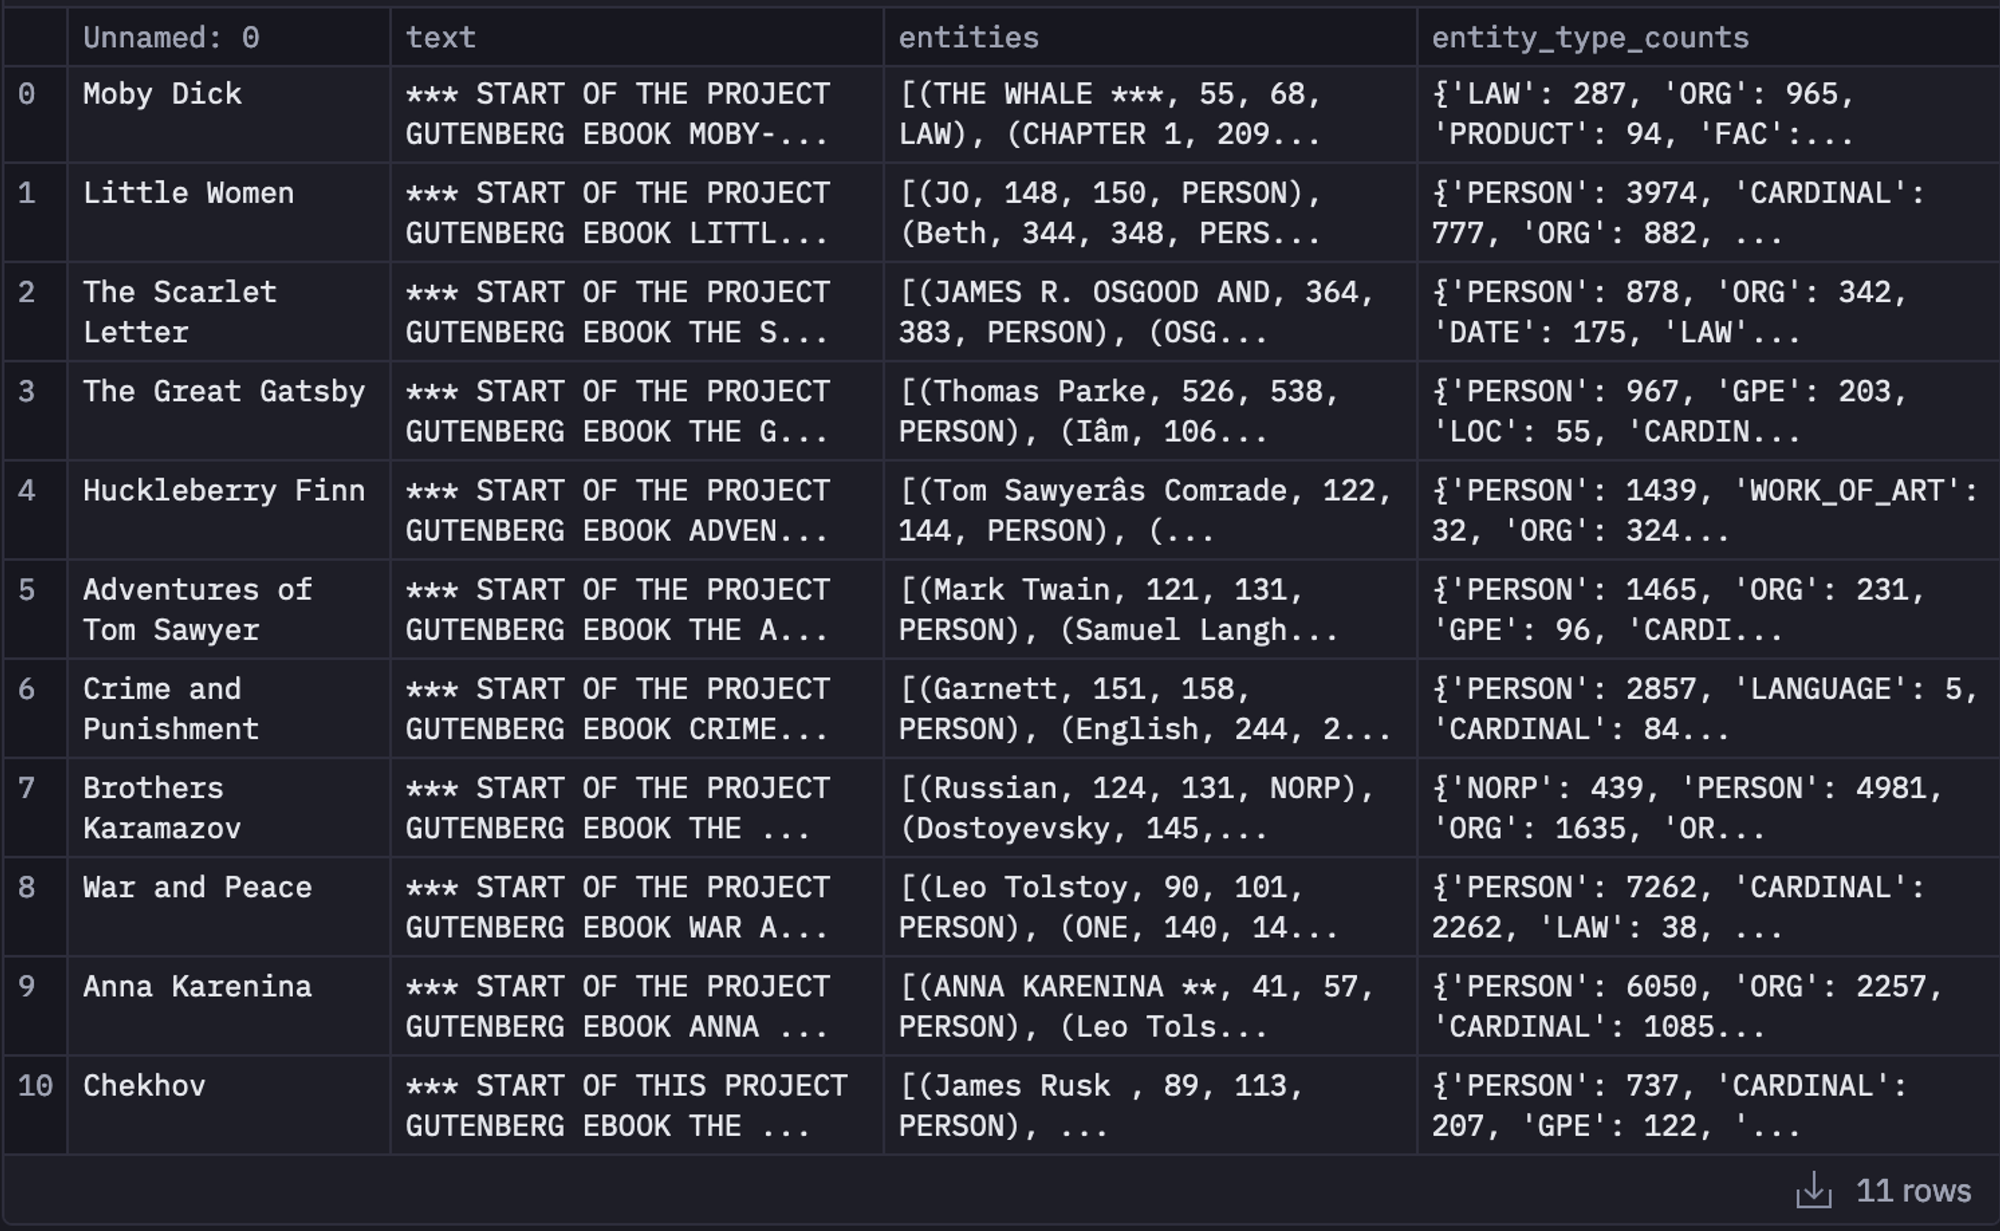
To make the data more appealing, we will rename the column Unnamed: 0 to book_title.
df_texts.rename(columns={"Unnamed: 0": "book_title"}, inplace=True)Finally, to create a simple dataframe for different entity counts for different book titles, you can use the following lines of code:df_entity_type_counts = pd.DataFrame(
list(df_texts["entity_type_counts"]), index=df_texts["book_title"]
)
df_entity_type_counts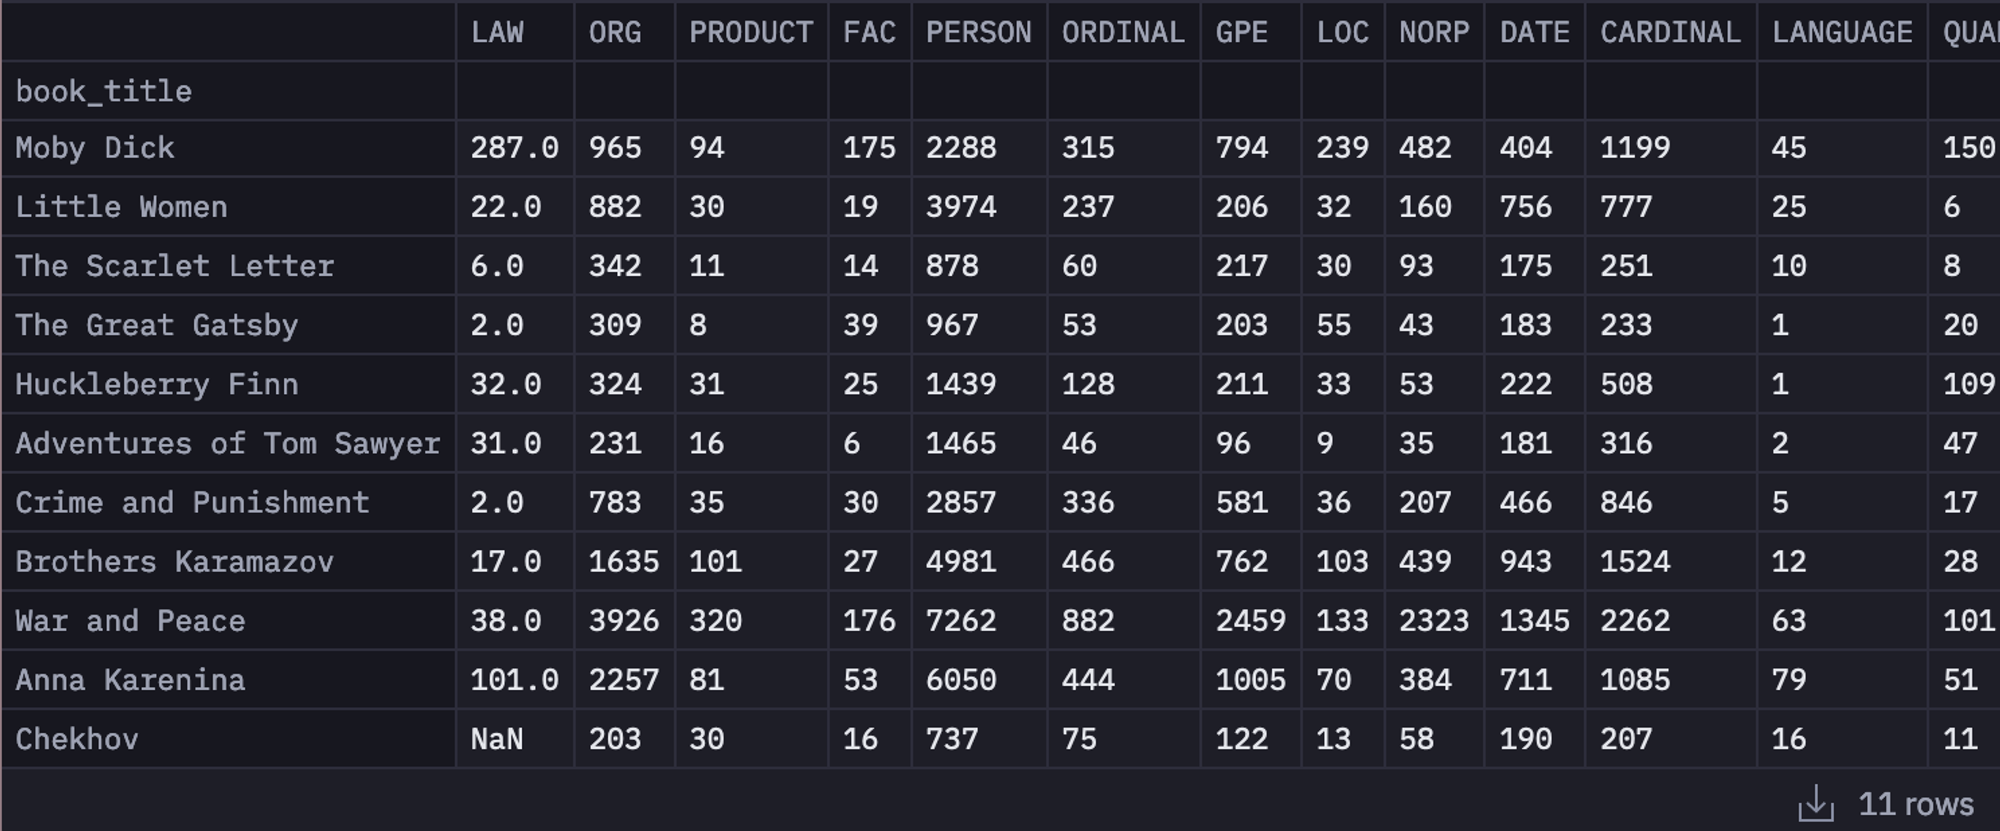
You can also check the entity type counts by the total number of entities as follows:
# Calculate the total number of entities in each text
total_entities = df_entity_type_counts.sum(axis=1)

# Normalize the entity type counts by the total number of entities
df_entity_type_counts_normalized = df_entity_type_counts.divide(total_entities, axis=0)
df_entity_type_counts_normalized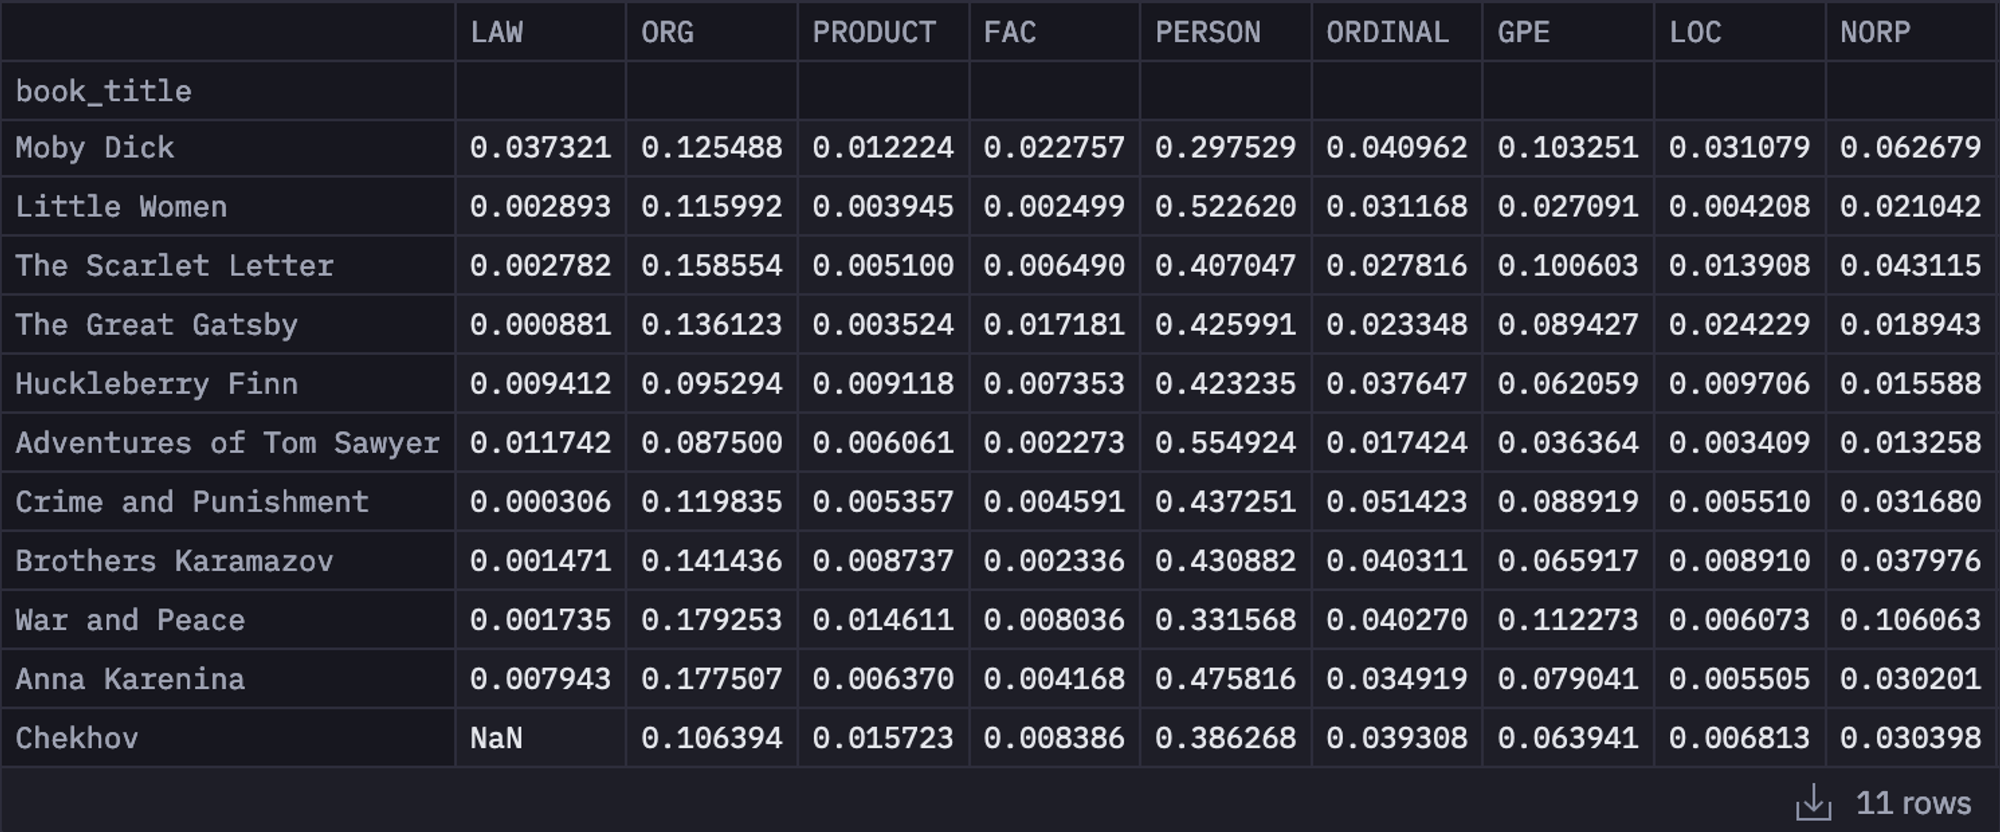
Visualize the Data
To make things more interesting and more visually appealing, we will create some plots for these entities. We will first create different subplots for different entities belonging to each book in our dataset. To do so, we will create a list of entities, then we will iterate over this list and will filter out the data from the dataframe. Then we will create different subplots using matplotlib where each subplot will be a bar plot explaining the count of different entities.
import matplotlib.pyplot as plt
import seaborn as sns

sns.set_style("whitegrid")

fig, axs = plt.subplots(2, 4, figsize=(20, 10))

entity_types_of_interest = [
	"PERSON",
	"GPE",
	"LOC",
	"DATE",
	"TIME",
	"ORG",
	"WORK_OF_ART",
	"EVENT",
]
for i, entity_type in enumerate(entity_types_of_interest):
	row = i // 4
	col = i % 4
	ax = axs[row, col]
	sns.barplot(
    	x=df_entity_type_counts_normalized.index,
    	y=df_entity_type_counts_normalized[entity_type],
    	ax=ax,
	)
	ax.set_ylabel(f"{entity_type} proportion")
	ax.set_xticklabels(ax.get_xticklabels(), rotation=45, horizontalalignment="right")
	ax.set_title(entity_type)

fig.tight_layout()

plt.show()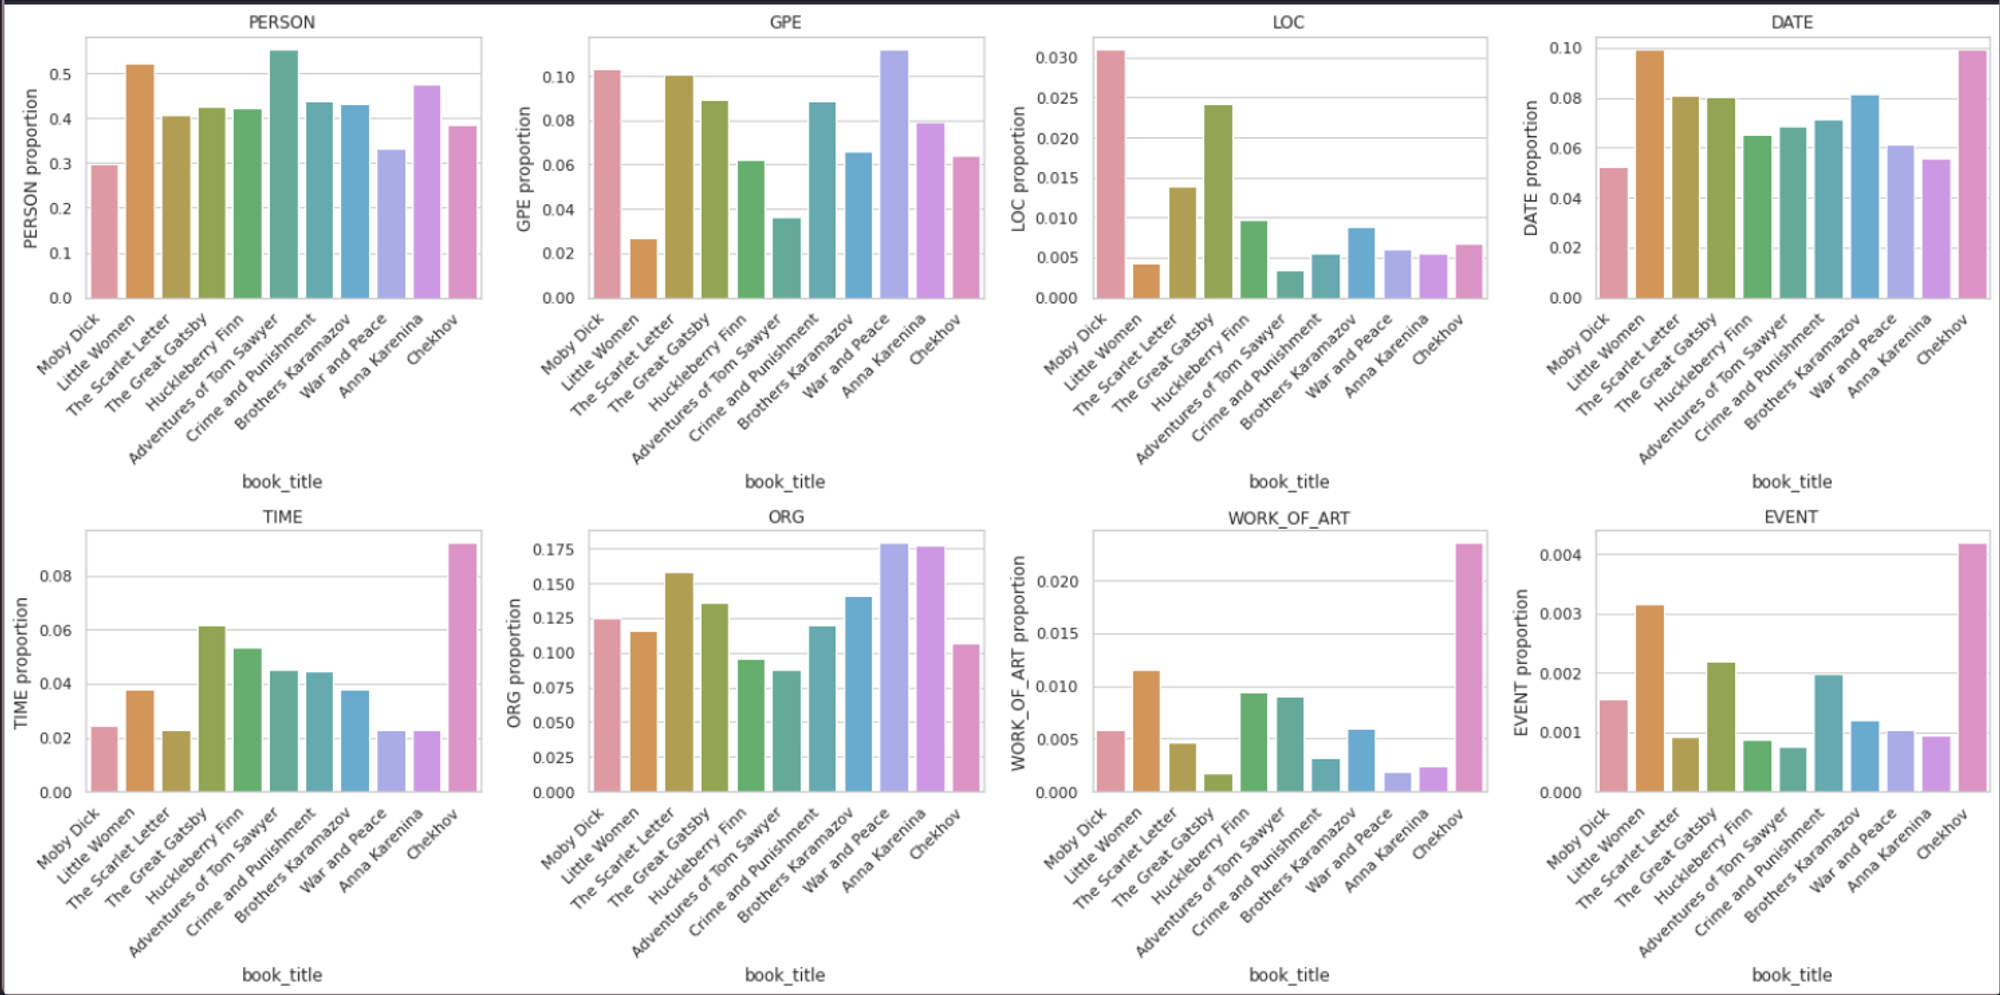
You can also create a graph for visualizing different entities in the text with respect to the language ("American", "Russian") with the help of the following lines of code:
book_to_author = {
	'Crime and Punishment': 'Fyodor Dostoevsky',
	'The Brothers Karamazov': 'Fyodor Dostoevsky',
	'War and Peace': 'Leo Tolstoy',
	'Anna Karenina': 'Leo Tolstoy',
	'The Cherry Orchard': 'Anton Chekhov',
	'Three Sisters': 'Anton Chekhov',
	'Huckleberry Finn': 'Mark Twain',
	'Tom Sawyer': 'Mark Twain',
	'The Old Man and the Sea': 'Ernest Hemingway',
	'A Farewell to Arms': 'Ernest Hemingway',
	'The Great Gatsby': 'F. Scott Fitzgerald',
	'Tender Is the Night': 'F. Scott Fitzgerald'
}

# Create a new column for the author
df_texts['author'] = df_texts['book_title'].map(book_to_author)

# Define the nationality of the authors
author_to_nationality = {
	'Fyodor Dostoevsky': 'Russian',
	'Leo Tolstoy': 'Russian',
	'Anton Chekhov': 'Russian',
	'Mark Twain': 'American',
	'Ernest Hemingway': 'American',
	'F. Scott Fitzgerald': 'American'
}

def total_entity_count(entity_counts):
	return sum(entity_counts.values())

def relative_frequency(entity_counts, total):
	return {entity: count / total for entity, count in entity_counts.items()}

# Create a new column for nationality
df_texts['nationality'] = df_texts['author'].map(author_to_nationality)

# Calculate total entity count for each book
df_texts['total_entities'] = df_texts['entity_type_counts'].apply(total_entity_count)

# Calculate relative frequency for each entity type
df_texts['entity_type_freq'] = df_texts.apply(lambda row: relative_frequency(row['entity_type_counts'], row['total_entities']), axis=1)

# Group the data by nationality and calculate the mean relative frequency for each entity type
grouped = df_texts.groupby('nationality')['entity_type_freq'].apply(lambda x: pd.DataFrame(x.tolist()).mean()).reset_index()

# Visualizations
plt.figure(figsize=(15, 7))
sns.barplot(x='level_1', y='entity_type_freq', hue='nationality', data=grouped)
plt.xticks(rotation=90)
plt.title('Mean Relative Frequency of Entity Types by Nationality')
plt.show()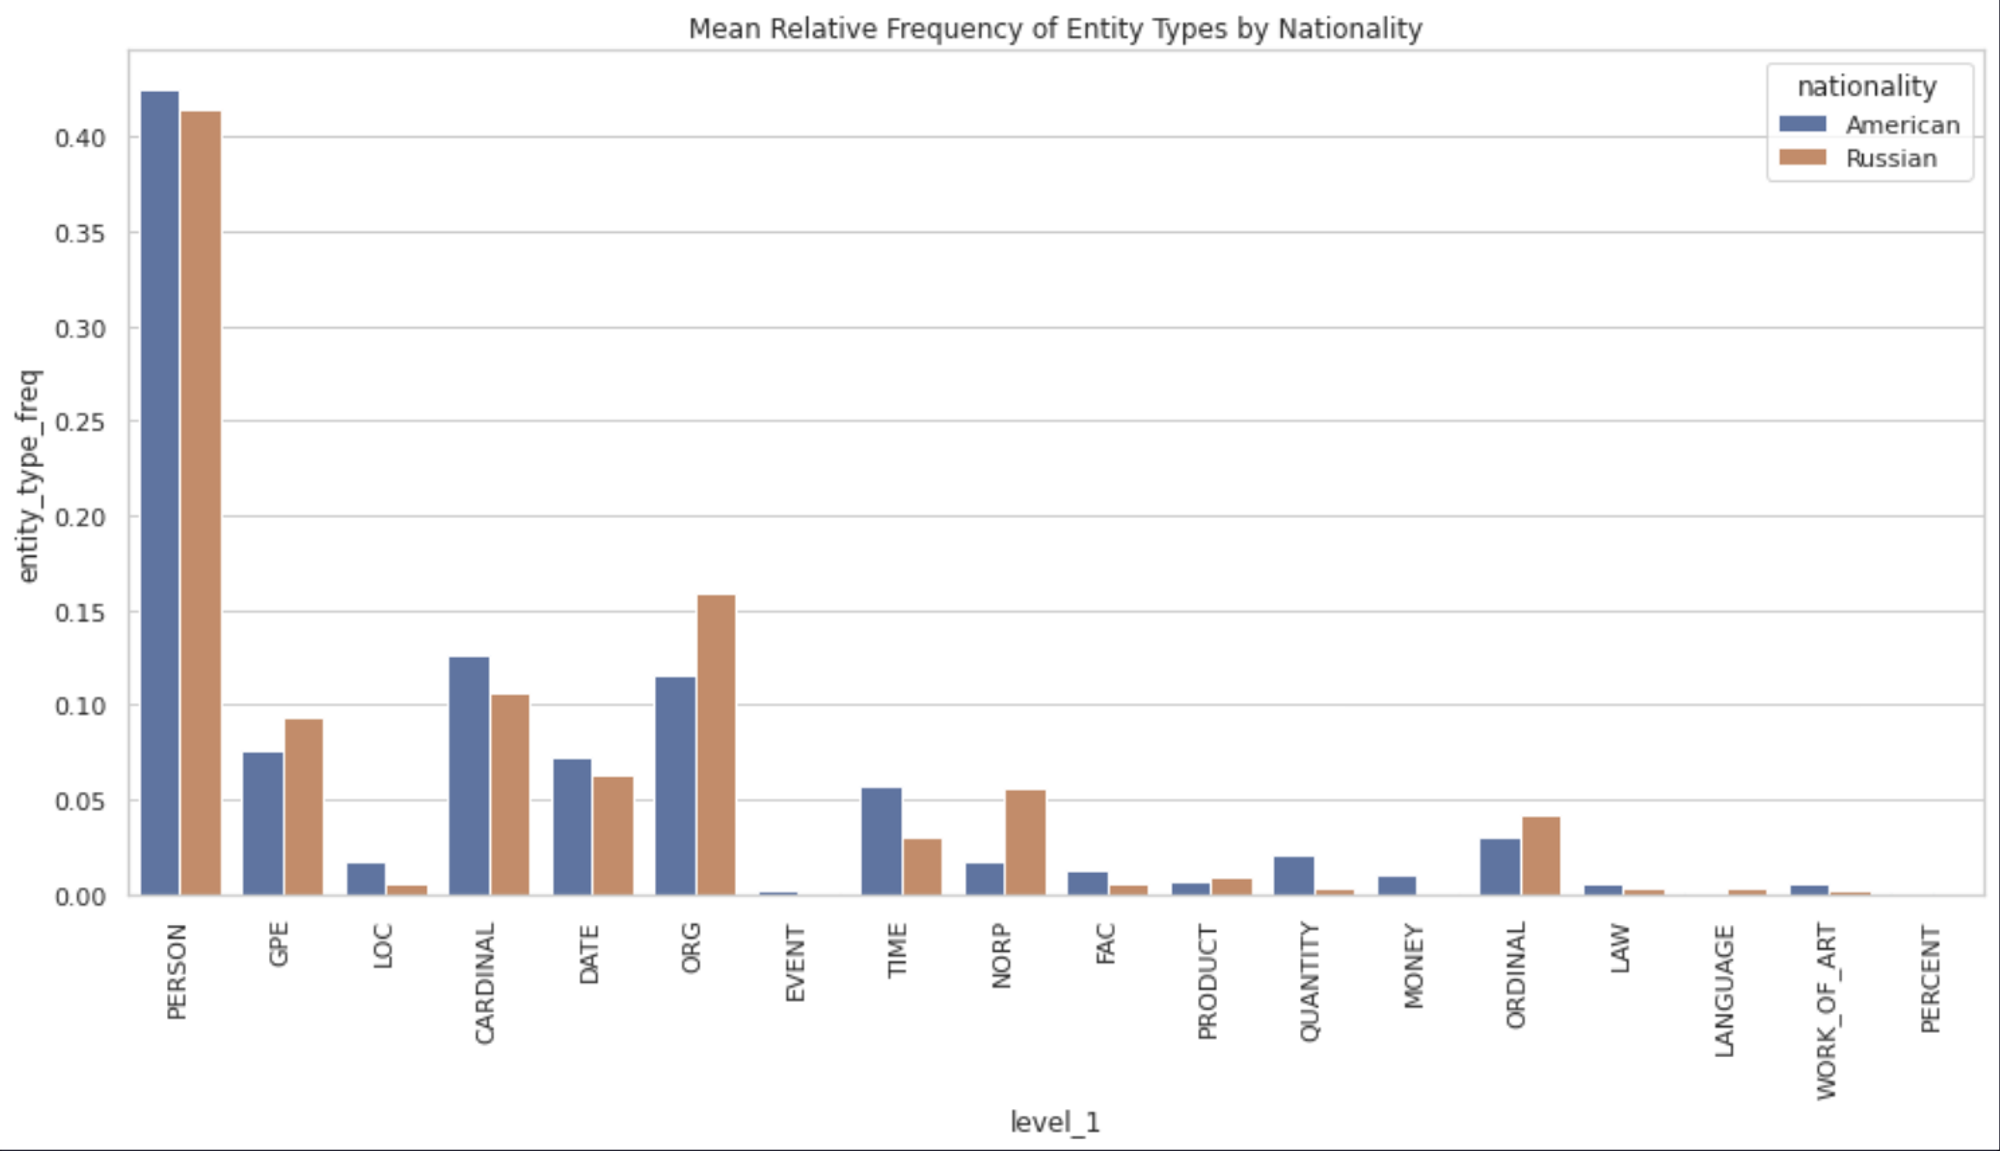
We can also check the entities that appear maximum and minimum in our dataframe using the idxmax() and idxmin() methods respectively.
# Specific comparisons
most_common_us = grouped[grouped['nationality'] == 'American']['entity_type_freq'].idxmax()
least_common_us = grouped[grouped['nationality'] == 'American']['entity_type_freq'].idxmin()
most_common_ru = grouped[grouped['nationality'] == 'Russian']['entity_type_freq'].idxmax()
least_common_ru = grouped[grouped['nationality'] == 'Russian']['entity_type_freq'].idxmin()

print(f"Most common entity type in American literature: {grouped.loc[most_common_us, 'level_1']}")
print(f"Least common entity type in American literature: {grouped.loc[least_common_us, 'level_1']}")
print(f"Most common entity type in Russian literature: {grouped.loc[most_common_ru, 'level_1']}")
print(f"Least common entity type in Russian literature: {grouped.loc[least_common_ru, 'level_1']}")

# Biggest drastic differences
grouped['difference'] = grouped.groupby('level_1')['entity_type_freq'].diff().abs()
max_difference = grouped['difference'].idxmax()
print(f"Biggest drastic difference is for entity type: {grouped.loc[max_difference, 'level_1']}")
Explore examples of the extracted entities
Finally, let's create different methods for getting the example text, sentences from the example text, and storing the examples. Then we will iterate over each entity type and will store the examples of different entities based on languages. The code for the same can be written as follows:
import random

# List of entity types
entity_types = grouped['level_1'].unique()

def get_sentence(text, start, end):
	sentence = text[max(0, start - 10):min(end + 10, len(text))].replace('\\\\n', ' ')
	return sentence

# Function to get example entities
def get_examples(entities, entity_type, num_examples=5):
	examples = [entity for entity in entities if entity[3] == entity_type][:num_examples]
	return examples

# Function to get example entities
def get_random_examples(entities, entity_type, num_examples=5):
	examples = [entity for entity in entities if entity[3] == entity_type]
	if len(examples) > num_examples:
    	examples = random.sample(examples, num_examples)
	return examples

# Get examples for each entity type for each nationality
random_examples = []
for entity_type in entity_types:
	for nationality in ['American', 'Russian']:
    	# Get examples
    	example_entities = df_texts[df_texts['nationality'] == nationality].apply(lambda row: get_random_examples(row['entities'], entity_type), axis=1).values[0]
    	# Get sentences for the examples
    	example_sentences = [get_sentence(df_texts[df_texts['nationality'] == nationality]['text'].values[0], start, end) for _, start, end, _ in example_entities]
    	# Store examples
    	random_examples.append((nationality, entity_type, example_sentences))

random_examples_df = pd.DataFrame(random_examples, columns=['nationality', 'entity_type', 'examples'])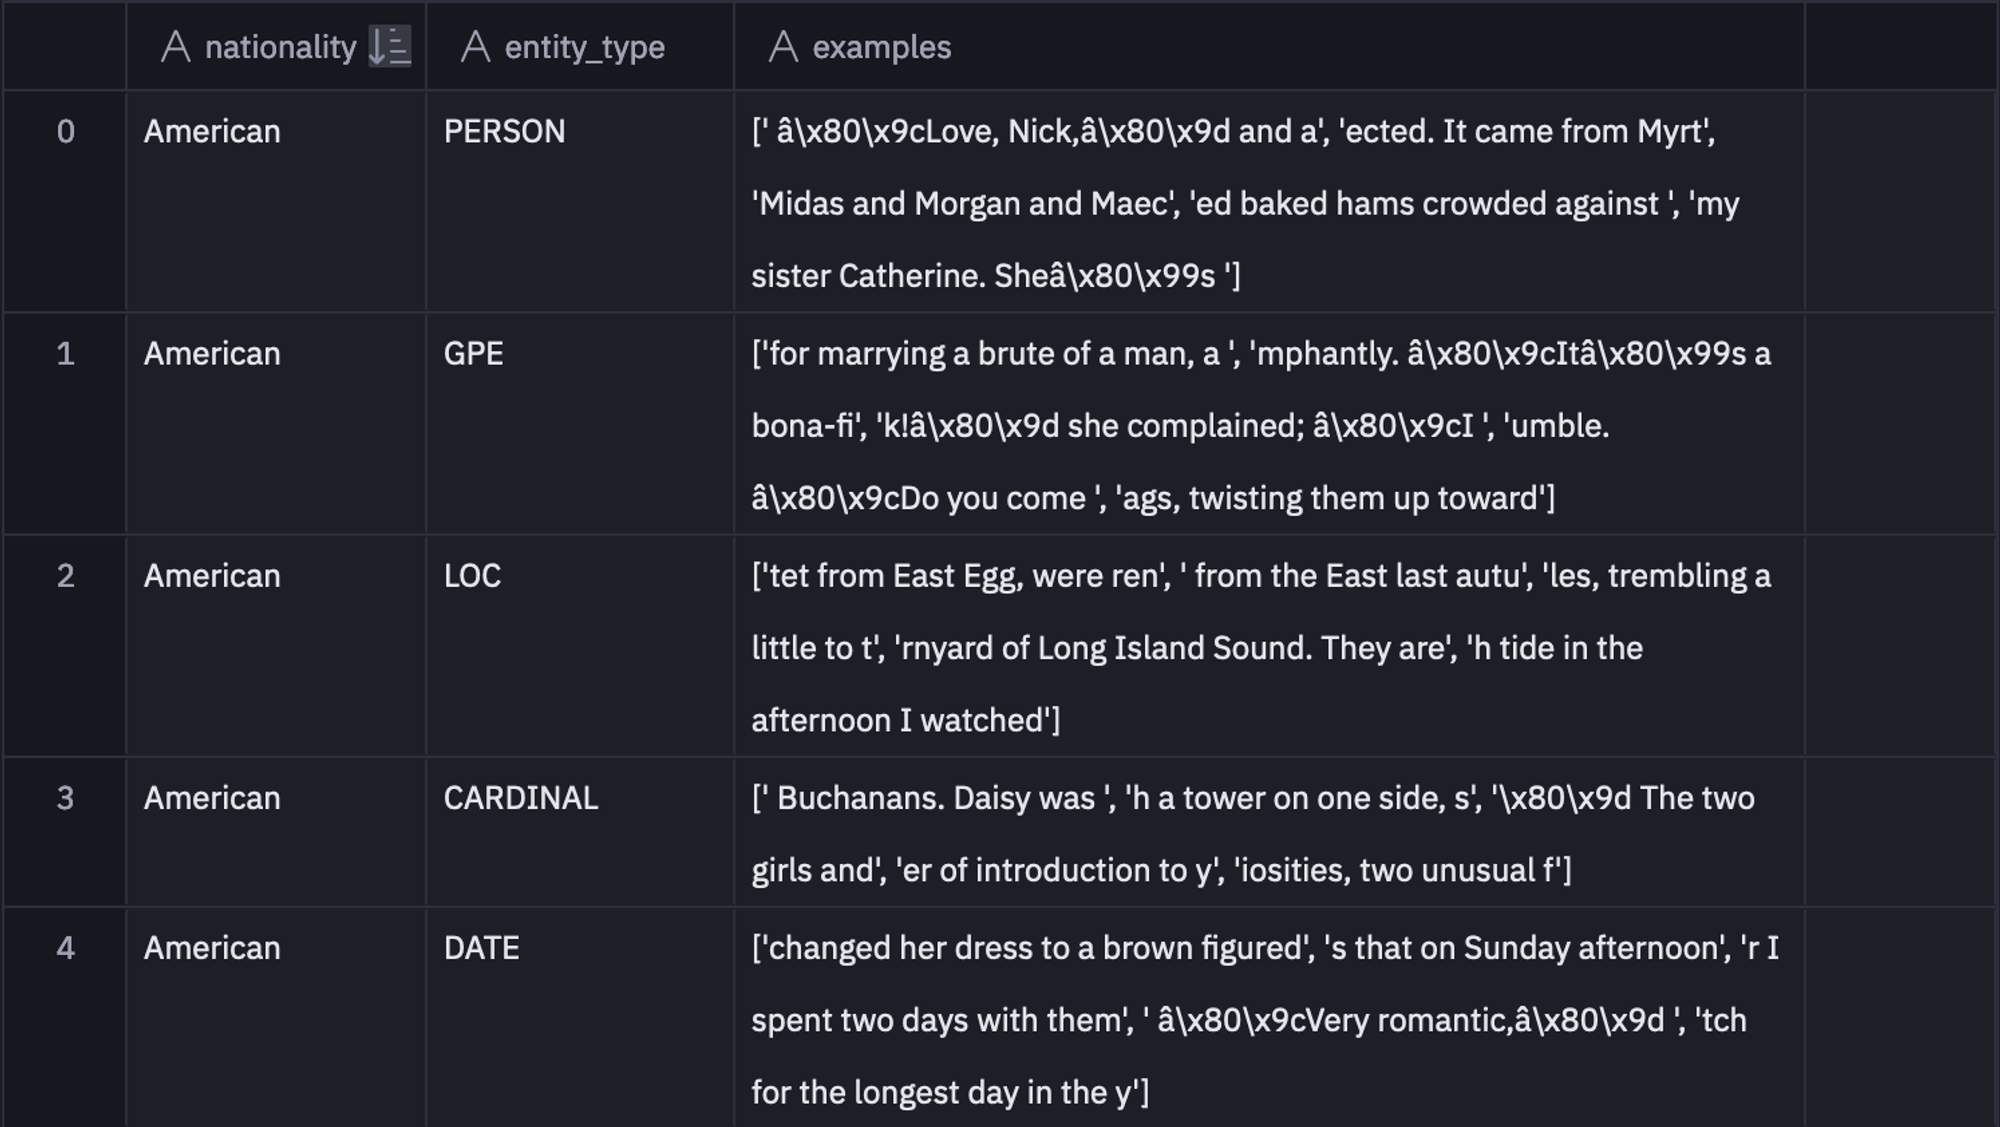
This is it, you have ow mastered the NER with NLTK and Spacy using Python and Hex development environment. You are also given the flexibility to convert your code into a dashboard and then easily deploy it using a few clicks in the Hex environment.
NER works across various industries:
Finance
Healthcare
Media & Marketing
E-commerce
NER's ability to efficiently parse vast amounts of text for specific entities enhances decision-making, customer service, and operational efficiency in these sectors. If you have any dataset where you have to extract specific named entities, this technique will save you a huge amount of tome and money.
See what else Hex can do
Discover how other data scientists and analysts use Hex for everything from dashboards to deep dives.
Ready to get started?
You can use Hex in two ways: our centrally-hosted Hex Cloud stack, or a private single-tenant VPC.
