Social Media Sentiment Analysis

Izzy Miller
Hex provides a flexible workspace to parse text data like social media posts and perform sentiment analysis with SQL and Python. Hex's polyglot environment means you can ...
How to build: Social Media Sentiment Analysis
Social media has been on the rise with a global penetration rate of 62.3%. Social media has changed the way people communicate, discuss various agendas, as well as provide feedback for different products and services. So, you can consider social media as a bank of opinions, ideas, and discussions shared daily.
As a data analyst for a company, your job would be to dig into social media data to gather insights about the products and services that the company provides. The only issue for you is the amount of data that these social media platforms hold, it is nearly impossible to analyze this huge amount of data manually. This is where the concept of sentiment analysis come into play.
Sentiment analysis, a powerful Natural Language Processing (NLP) process, can analyze text and determine its polarity, whether it's positive, negative, or neutral. The basic type of sentiment analysis is a binary class classification, but it’s not limited to that. You have the power to customize these categories further, including other classes like neutral, negative, or positive, giving you more control over your analysis.
In this article, you will learn about social media sentiment analysis, various Python libraries for sentiment analysis, and NLP stages to carry out sentiment analysis. Finally, you will see a practical guide for implementing social media sentiment analysis with Python and Hex.
Approaches of Social Media Sentiment Analysis
Initially, a rule-based approach was ruling the sentiment analysis space. This rule-based approach follows a simple procedure of creating a bucket of words for both positive and negative categories, and based on the occurrence of these words in a sentence, the text is classified as negative and positive. This approach fails for some of the scenarios. For example, if someone tweets for an airline company "Great! You lost my baggage again", the original polarity of the sentence is negative but given the choice of words, it will be classified as positive.
As an improvement, analysts started to explore machine learning-based approaches to classify the text into a set of categories (sentiments). All they had to do was collect the data, generate the embedding vectors for the data, and finally train the ML model to use it for prediction. While traditional ML models like Naive Bayes or SVM work quite well for sentiment analysis, they can not maintain the context of words as they do not have any memory component. This is where deep learning models like RNN, LSTM, and GRU come to aid as they can handle very large amounts of data while memorizing some parts of input.
Finally, the world is moving towards a new AI revolution with the help of transformer-based models often referred to as Large Language Models (LLMs). These transformer-based models use a concept called attention mechanism and have two advantages over the deep learning models. The first is that they can manage long-term dependencies, for example you have a word mentioned in one paragraph, transformers will still remember it if it comes after a few more sentences. Second, they have a larger context window which allows them to capture the complex contextual dependencies among words easily. As the technology grows, we might notice more development in this space.
Python Libraries for Social Media Sentiment Analysis
NLP is often performed using Python. It provides a set of libraries that have the implementation of several sentiment analysis approaches. While libraries like Textblob and VADER provide the implementation of rule-based approaches, libraries like SKlearn and Tensorflow provide implementation for different machine learning (ML) models to build the sentiment classification systems.
NLTK (Natural Language Toolkit)
Natural Language Toolkit (NLTK) is a leading Python library in the space of NLP. It provides tools and services for performing various language processing tasks including sentiment analysis, text classification, tokenization, stemming, tagging, parsing, and semantic reasoning. Although there is no built-in function specifically for sentiment analysis in NLTK, but you can surely build a system with the help of its text processing capabilities along with other libraries and techniques like scikit learn and tensorflow.
It also provides the implementation of different performance metrics like accuracy, precision, or recall to test the performance of your social media sentiment analysis system. You can know more about NLTK here.
TextBlob
Textblob is a very powerful Python library for natural language processing that offers a straightforward approach to sentiment analysis. It is a lexicon-based sentiment classifier that uses a predefined dictionary (lexicon) of words and their respective weights. It matches words in the input text against entries in the lexicon and aggregates their sentiment scores to compute an overall sentiment polarity for the text. For each piece of text, it returns two scores: polarity and subjectivity.
The polarity score indicates the sentiment of the text and its value ranges from -1 to 1. A positive value indicates the positive sentiment, 1 being the most positive sentiment. On the other hand, a negative value indicates a negative sentiment, with -1 being the most negative. When the polarity is 0, the text is considered neutral. Subjectivity, on the other hand, explains if the text has opinions or facts. Its value ranges from 0 to 1 where the value close to 1 indicates that the sentence has a lot of personal opinion instead of just facts. One important thing to note about Textblob is that the accuracy of sentiment analysis using lexicons heavily relies on the quality and coverage of the lexicon itself, as well as the context in which the words or phrases are used in the text. You can know more about textblob here.
VADER (Valence Aware Dictionary and sEntiment Reasoner)
VADER (Valence Aware Dictionary and sEnsentimentasoner) is a rule-based sentiment analysis tool in Python that is specifically designed for analyzing sentiment in text data, especially social media texts. VADER uses a predefined lexicon that contains words and phrases annotated with sentiment scores, capturing nuances such as intensity and polarity. Due to its ability to handle context-dependent sentiment expressions, including emoticons, slang, and idiomatic expressions commonly found in social media texts, it is highly used for social media sentiment analysis.
Apart from using Lexicon, it also employs linguistic rules and heuristics to enhance its accuracy in sentiment analysis. For any sentence, VADER generates a polarity score that ranges from -1 (extremely negative) to 1 (extremely positive), and 0 indicates the neutral polarity. Although VADER uses a predefined set of words and sentiment scores, you can customize it based on your needs. You can learn more about VADER here.
spaCy
SpaCy is a popular Python library that is widely used for NLP tasks and is widely known for its efficiency, accuracy, and ease of use. SpaCy does not include any dedicated function for dealing with sentiment analysis directly but provides a powerful framework and a rich set of features that can be leveraged for sentiment analysis tasks. Similar to NLTK, spaCy also provides an implementation of various NLP tasks like tokenization, part-of-speech tagging, named entity recognition, dependency parsing, and more. These capabilities form the foundation for building sophisticated sentiment analysis systems.
One of its major advantages is its integration capability with machine learning and deep learning frameworks. You can use spaCy to preprocess text data, extract linguistic features relevant to sentiment, and integrate with machine learning models or external lexicons for sentiment classification. Furthermore, spaCy offers flexibility in identifying sentiment-related entities or patterns within text data thanks to its support for customized entity recognition and rule-based matching. You can learn more about spaCy in its official documentation.
Scikit-learn
Scikit-learn also known as sklearn is one of the most prominent libraries for implementing various machine-learning models in Python. It is widely known for its simplicity, versatility, ease of use, and efficiency. While there is no dedicated module for sentiment classification in sklearn, it provides a comprehensive suite of tools and algorithms that can be leveraged for sentiment analysis/classification tasks.
To use sklearn for sentiment analysis, you need to start with the collection of labeled data where the labels represent sentiment categories such as positive, negative, neutral, or other custom categories. Once the data is collected, you can use one of the classification models that sklearn provides such as Support Vector Machines (SVM), Naive Bayes, Decision Trees, and Random Forests, among others to build a sentiment classification system. Additionally, you can leverage the functionalities that sklearn provides such as feature extraction, dimensionality reduction, and model evaluation, enabling users to preprocess text data, extract relevant features, and assess the performance of sentiment analysis models. You can learn more about sklearn in the official documentation.
TensorFlow
While sklearn provides an implementation of a lot of machine learning models including regression, classification, and clustering, it does not provide an implementation for deep learning models. Here, an open-source Python framework, Tensorflow comes to aid. Developed by Google, TensorFlow offers a range of deep learning architectures for sentiment analysis that can effectively learn complex patterns and relationships within textual data. These architectures include Recurrent Neural Networks (RNNs), Long Short Term Memory (LSTM) models, and some most recent transformer-based models like BERT and GPT.
All these deep learning-based models require the labeled data to classify sentiment categories such as positive, negative, or neutral. Tensorflow provides a high-level API called TensorFlow keras, which simplifies the process of building and training neural network models. Apart from this, TensorFlow also supports natural language processing tasks through its TensorFlow Text library, which includes pre-trained word embeddings, tokenization utilities, and other text processing tools. To learn more about TensorFlow, you can refer to this official documentation.
Note: PyTorch is another library that provides an implementation of various deep learning-based models for sentiment analysis.
Preprocessing Data for Sentiment Analysis
While there are several libraries of text preprocessing and model training, you will have to perform these stages all by yourself. Now, let's have a look at the various text processing techniques that you need to apply to your data before performing the model-based or lexicon-based social media sentiment analysis.
1. Removing noise (HTML tags, special characters, URLs)
The text from social media is never ideal for directly passing it to the sentiment classification modules. This data contains a lot of irrelevant information such as special characters, HTML tags, email IDs, URLS, and emojis that do not make any contribution to the sentiment classification model. Removing these noisy components is very crucial in NLP tasks as it helps to improve the efficiency of downstream processing tasks such as tokenization, part-of-speech tagging, and sentiment analysis.
Ultimately, it allows our sentiment analysis algorithm to focus more on underlying semantic meaning and patterns rather than the distorted features.
2. Stopword removal
In the context of social media, the text normally contains a lot of common words that typically do not carry any significant semantic meaning. These words include articles, prepositions, conjunctions, and other functional words that serve grammatical purposes and are commonly known as stop words. Examples of common stopwords in English include "the," "and," "is," "of," "in," "to," "a," "an," "on," "at," "for," "with," "by," etc. These words do not contribute to the overall understanding or interpretation of the text.
You need to remove these stop words so that the downstream processing tasks can be efficient and your sentiment classification model can focus only on the relevant words. Removing the stop words also helps in the reduction of dimensionality of the data and improves the computational efficiency.
3. Stemming or lemmatization
For humans, understanding the different forms of a word is easy, but for a machine, it is quite difficult. For example, run, running, and ran are all different forms of the word run, for a machine, all these words are treated differently. Stemming and Lemmatization are the types of text normalization techniques that aim to reduce the words to their base or root form to improve text analysis and understanding. While these two techniques serve the same purpose, they operate differently and have different characteristics.
Stemming is the process of removing the suffix and prefix of a given word to bring it to its root level. The resulting word may not necessarily be valid but is a linguistic root representing the word's core meaning. Stemming is a computationally efficient task as it uses the heuristic rules to truncate words. Lemmatization on the other hand is the process of mapping the words to their canonical or dictionary form, known as a lemma. Lemmatization uses lexicon resources such as dictionaries or word corpora to determine the lemma. But, unlike stemming, lemmatization ensures that the resulting word is found in the dictionary.
4. Tokenization and Encoding
These are two of the most prominent stages of text processing if you are using ML or DL models for sentiment classification which are not able to process the text directly. Tokenization is the process of breaking down a long text, document, or corpus into small units called tokens. These tokens can be words, characters, phrases, or other meaningful entities that work as a building block for the subsequent analysis. The entire goal of tokenization is to separate the text into meaningful units that can be processed and analyzed independently.
Once you get the tokens, you need to encode them into numerical values that can be understood and processed by machine learning algorithms or statistical models. There are various techniques for encoding some of the popular ones are one-hot encoding, TF-IDF, Word2Vec, GloVe, FastText, and finally transformer-based encoding. Encoding the text ensures that ML models can identify patterns in your data and can predict the sentiment of the text easily.
By following these steps in order, you make sure that your data is ready for sentiment analysis.
Social Media Sentiment Analysis with Python and Hex
Hex provides a flexible workspace to parse text data like social media posts and perform sentiment analysis with SQL and Python. Hex's polyglot environment means you can use Python packages like NLTK and SpaCy directly on data from your warehouse— or in this case, just a good old-fashioned logistic regression against a simple CSV file. From simple 5-minute projects to production-deployed data applications, Hex makes it easy to perform any kind of sentiment analysis on social media (or any) data.
The data that we are going to use for this use case is a dataset of Tweets (from kaggle) about airline companies. We will perform the sentiment analysis on this data to get a sense of how people feel about the airlines.
Ready to begin? Let's start.
Install and Load Dependencies
For this article, we will be using the NLTK library for the text processing part while the sklearn library for building an ML model for building a sentiment classification system. Although Hex provides a lot of preinstalled libraries, you can install the required one with the help of PIP as follows:
$ pip install nltk
$ pip install scikit-learn
Once the libraries are installed, you can load them in the Hex environment as follows:
import nltk
from nltk.corpus import stopwords
from nltk.stem import WordNetLemmatizer
import re
nltk.download('stopwords')
nltk.download('wordnet')
nltk.download('omw-1.4')


As NLTK does not come with different text preprocessing datasets and requirements preinstalled, you need to download them explicitly with the download() method. In the above code, you might notice that the download() method is used to download the stopwords, wordnet, and omw-1.4 requirements.
Load and Explore Dataset
Now it is time to load the dataset. Our data is stored in the Snowflake data warehouse, so we will be using the SQL cell to read this dataset.
select * from 'Tweets.csv'


As you can see in the above image, the dataset that we are using already has a sentiment included in it. So, in addition to exploring the data as it is, we'll spend most of the project constructing our own very simple sentiment analysis model as an experiment.
Also, it's no surprise that most of the chatter on social media about airlines is negative. After all, you don't usually go on Twitter to praise United for your flight being on time... usually, the opposite is what'd drive you to tweet. Although looking at the data, it's much more common for a "Customer service issue" to be the problem rather than a late or canceled flight!
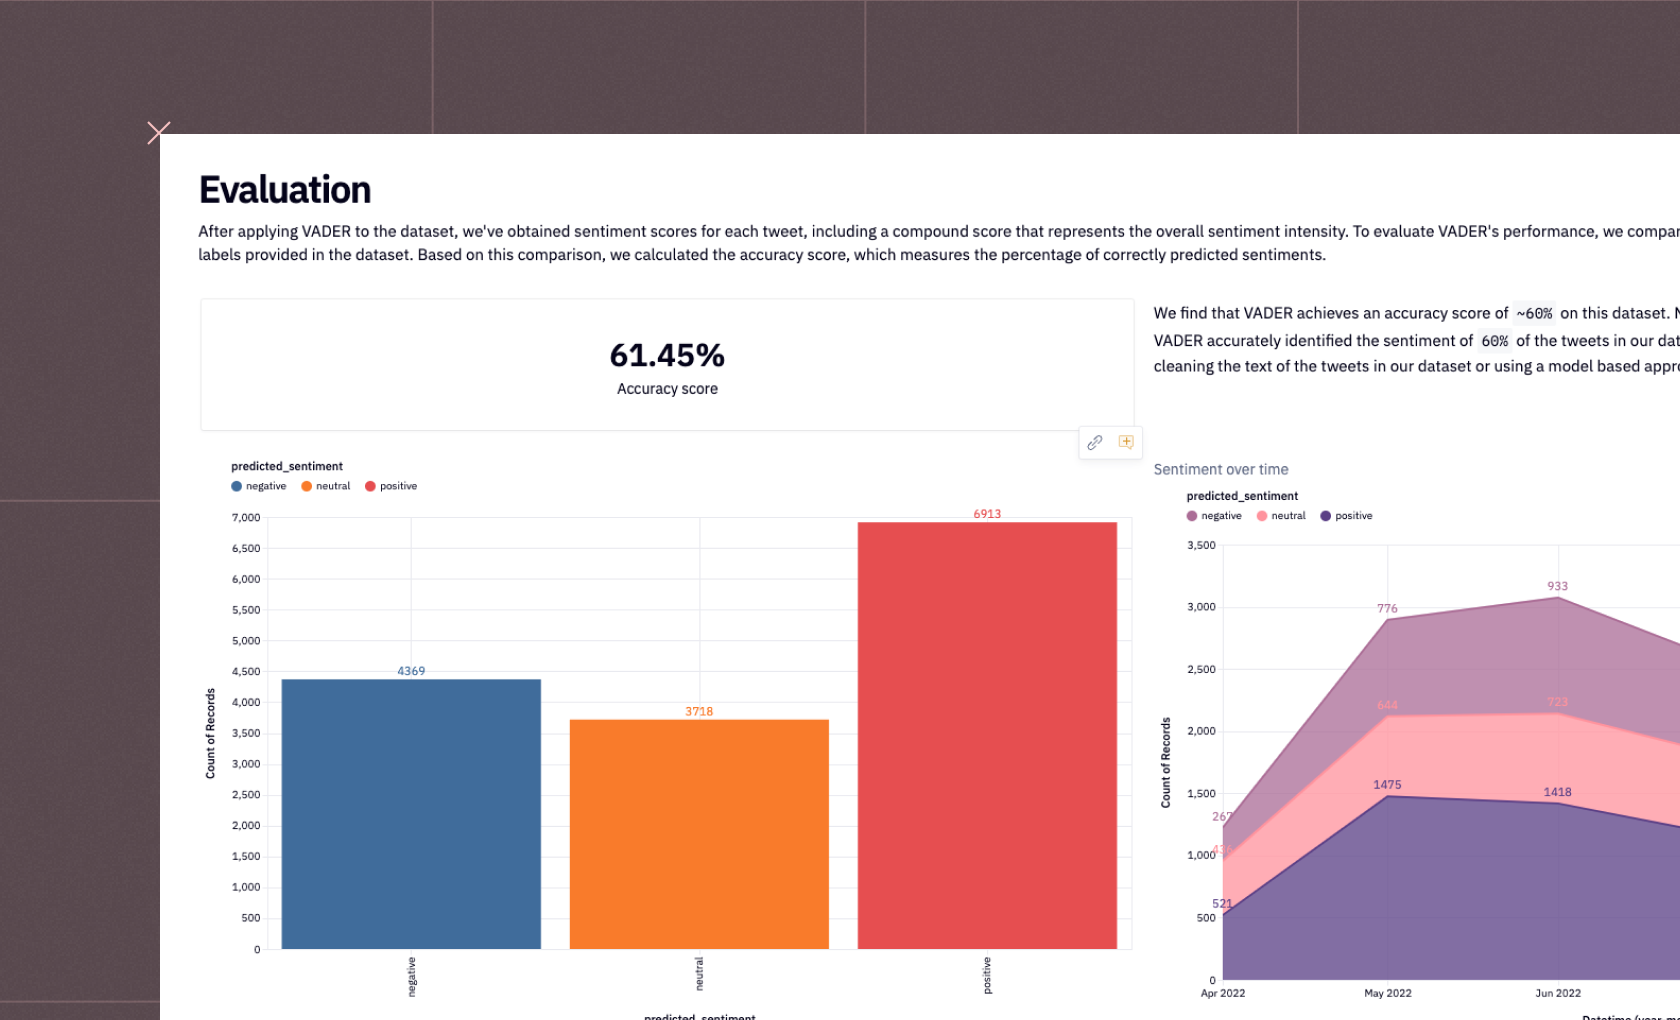
As a next step, let's create a bar plot for checking the distribution of the sentiment classes. For this, we will use the chart cell from Hex that does not require any coding, you just need to select the features and types of plot you want to create, that is it. The created bar chart will look like this:


As you can see in the above image, the negative class dominates the positive and neutral class. This makes us curious about all the different areas that customers are complaining about for the airlines. To answer this question, we will again use the bar plot to check the distribution of the reasons for negativity.


As you can see in the above image, most of the customers are complaining about the customer service.
We will also create a bar plot for checking the distribution of all kinds of sentiments across various airlines as follows:


As you might notice, United Airlines has the most number of negative tweets from customers.
Sentiment Model Development
In this section, we will work on the model-building part where we will build a very simple model that can classify the text into one of the three sentiment categories. Let's start with the basic preprocessing stages that have been mentioned earlier in this article. You need to use the following lines of code for the same:
stop_words = set(stopwords.words('english'))
lemmatizer = WordNetLemmatizer()
def preprocess_text(text):
	text = re.sub(r'[^a-zA-Z]', ' ', text)
	text = text.lower()
	text = [lemmatizer.lemmatize(word) for word in text.split() if word not in stop_words]
	text = ' '.join(text)
	return text
tweets['text'] = tweets['text'].apply(preprocess_text)
tweets['text'].head()


In the above code, we have first created a list of stopwords named stop_words that contains the most common English language words. Then we created an object lemmatizer for the WordNetLemmatizer class. Then, we created a Python method preprocess_text that takes a text as input, removes all the special characters, punctuations, numbers, etc., and only keeps the English characters. Then the text is converted to lower using the lower() method for standardizing the text. Finally, the lemmatizer is used to bring the words to their root form. This preprocess_text() method is then applied to the text feature of our dataset to get the preprocessed text.
Now, we will use the TfidfVectorizer form sklearn that converts a series of text into a vector of numerical values that is ideal for ML modeling. You can use the same as follows:
from sklearn.feature_extraction.text import TfidfVectorizer
vectorizer = TfidfVectorizer(max_features=1000)
X = vectorizer.fit_transform(tweets['text'])
X.shape


In the above code, we have created an object of the TfidfVectorizer() class and defined the max_features as 1000 which means that the text is allowed to have a maximum 1000 number of tokens. Then we used the fit_transform() method that converts the text into vectors of numerical values.
Since we are working on the machine learning models, we can not pass any type of text data into the model, not even the target classes (negative, neutral, and positive). To convert these classes into numerical values, you can use the following lines of code:
y = tweets['airline_sentiment'].map({'positive': 2, 'neutral': 1, 'negative': 0})
y.value_counts()


Now that our target classes are converted into numerical values, it is time to split the data into training and testing sets for model training and model evaluation purposes. We will use the train_test_split method from the sklearn.model_selection module and will split the data into 80% training set and 20% testing set.
from sklearn.model_selection import train_test_split
X_train, X_test, y_train, y_test = train_test_split(X, y, test_size=0.2, random_state=42)
X_train.shape, X_test.shape


Now, we'll implement a basic logistic regression model with the help of the sklearn library as follows:
from sklearn.linear_model import LogisticRegression
model = LogisticRegression(solver='liblinear', multi_class='auto')
model.fit(X_train, y_train)


In the above code, we first created an object of the LogisticRegression and then trained the model on the training dataset using the fit() method.
Once the model is trained, we need to evaluate its performance on the testing data. Since this is a classification use case, we can use performance measures such as accuracy, precision, recall, F1-Score, and AUC-ROC. The sklearn module provides the implementation of all these metrics. To make predictions on the testing data and evaluate the model performance, you can use the following lines of code:
import seaborn as sns
import matplotlib.pyplot as plt
from sklearn.metrics import accuracy_score, confusion_matrix
y_pred = model.predict(X_test)
accuracy = accuracy_score(y_test, y_pred)
confusion_mat = confusion_matrix(y_test, y_pred)print('Accuracy: ',accuracy)
plt.figure(figsize=(10, 7))
sns.heatmap(confusion_mat, annot=True, fmt='d', cmap='Blues')
plt.xlabel('Predicted')
plt.ylabel('Actual')
plt.show()


In the above code, we first generated the predictions for the test data using the predict() method. Then we calculated the accuracy and other metrics like precision, and recall F1-score using the accuracy_score() and confusion_matrix() methods respectively. Finally, we have created a heatmap to visualize the confusion matrix using the heatmap() method from Seaborn.
Our simple logistic regression model has an accuracy of 79.3% when predicting the sentiment of a tweet— not bad, considering how quick and easy it was to make! Breaking down that confusion matrix, it looks like our model is most accurate when it's predicting a negative result and least accurate for neutral.
This makes sense since the data is heavily imbalanced towards negative results due to the number of each class present in our data.
Note: Ideally it is not good to use the accuracy as a performance measure if there is an imbalance in the dataset. You should prefer precision, recall, F1-Score instead.
Next Steps
Further modeling here could address that imbalance using oversampling/resampling techniques or using a different type of model that's better suited for imbalanced data like a random forest classifier. For now, we'll leave our model at ~80% accuracy and pat ourselves on the back for creating an incredibly simple and surprisingly effective estimator of social media sentiment— a notoriously hard and context-dependent domain.
Now, that the implementation part is done for the social media sentiment analysis, you can head over to the App Builder section. Here you will see that a dashboard is already created for you which includes the charts and other necessary components that you have implemented in the Notebook section. You can adjust the components of this dashboard by dragging and dropping them to different locations. Once the dashboard looks good enough, you can click on the Publish button to deploy this dashboard.


This is it, you now created a social media sentiment analysis system and deployed a dashboard for the same.
See what else Hex can do
Discover how other data scientists and analysts use Hex for everything from dashboards to deep dives.
Ready to get started?
You can use Hex in two ways: our centrally-hosted Hex Cloud stack, or a private single-tenant VPC.